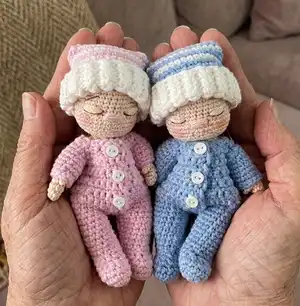
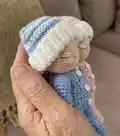
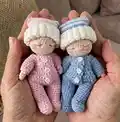
Make a cozy Goodnight Set including tiny sleepers, night caps, a basket bed, a little pillow and a bedtime bunny toy. This pattern walks you through each small piece with clear step-by-step rounds and photos so you can create a sweet miniature sleep set for gifting or play. Suitable for those comfortable with small hook work and basic amigurumi shaping, the set produces charming, pocket-sized dolls with delightful details.
Progress Tracker
0% Complete
— Sleeper :
Using :
Using Yarn Over (v-stitch). Using 2.0mm hook. Light Blue yarn (or desired color).
Rnd 1 :
Starting in 2nd ch from hook, 3 sc, 3 sc across end in next ch, (now working opposite side) 2 sc, INC (10)
Rnd 2 :
INC, 2 sc, INC, 3 sc in next sc, INC, 2 sc, INC, 3 sc in next sc (Fig. 1) (18)
Rnd 3-4 :
18 sc (2 rounds) (18)
Rnd 5 :
6 sc, (inv DEC) x3, 6 sc (Fig. 2) (15)
Rnd 6-10 :
15 sc (5 rounds) (15)
Rnd 11 :
INC, 7 sc, INC, 6 sc (17)
Rnd 12-14 :
17 sc (3 rounds) (Fig. 3) (17)
Leg 1 :
Finish off with invisible join. Sew in ends.
Leg 2 :
Continue to Rnd 15
Body of sleeper :
Rnd 15: ch1, (join to Leg 1 with a sc, just slightly back from center so that legs are slightly turned out) (Fig. 4) - 17 sc (around Leg 1), 1sc in back bump of ch, 17 sc (around Leg 2), place marker (36)
Rnd 16-18 :
36 sc (3 rounds) (Fig. 5) (36)
Note :
turning ch (ch 1) not included in the stitch count
Rnd 19 (shortened) :
BLO 3 sc, (skipping all other sc in this round, and changing to Rows) (Fig. 6), ch 1, turn (remove marker) (3)
Row 19 :
36 sc, 3 sc in front loops (exposed from previous Rnd) (Fig. 7 and 8), ch 1, turn (39)
Row 20 :
39 sc, ch1, turn (39)
Row 21 :
37 sc, ch 1, sk next sc, 1 sc, ch 1, turn (39)
Row 22 :
sk next sc, 2 sc in ch1 space (creating button hole) (Fig. 9), 7 sc, DEC, 16 sc, DEC, 10 sc, ch 1, turn (37)
Row 23 :
37 sc, ch1, turn (37)
Row 24 :
6 sc, (DEC, 8 sc) x2, DEC, 9 sc, ch 1, turn (34)
Row 25 :
14 sc, DEC, 5 sc, DEC, 9 sc, ch1, sk next sc, 1 sc, ch 1, turn (32)
Row 26 :
sk next sc, 2 sc in ch 1 space (creating button hole) (Fig. 10), 30 sc, ch 1, turn (32)
Row 27 :
32 sc, ch 1, turn (32)
Row 28 :
4 sc, DEC, 1 sc, ch 6, sk next 4 sc, 4 sc, DEC, 4 sc, ch 6, sk next 4 sc, 1 sc, DEC, 4 sc, ch1, turn (33)
Row 29 :
2 sc, DEC, 2 sc, (1 sc in front loop of next ch) x2, DEC across front loops of next 2 ch, (1 sc in front loop of next ch) x2, DEC (Fig. 11), 5 sc, DEC, (1 sc in front loop of next ch) x2, DEC across front loops of next 2 ch, (1 sc in front loop of next ch) x2, 2 sc, DEC, ch 1, sk next sc, 1 sc, ch 1, turn (27)
Row 30 :
sk next sc, 2 sc in ch 1 space (creating button hole) (Fig. 12), 2 sc, DEC, 3 sc, DEC, 5 sc, DEC, 3 sc, DEC, 4 sc (23)
Finish :
Finish off. Sew in ends.
— Sleeves :
(make 2) Join yarn to inside arm opening on the right (Fig. 13), crocheting across top of arm opening.
Row 1 :
1 sc in corner, (1 sc in next ch) x6, 1 sc in corner (Fig. 14), ch 1, turn (8)
Now :
Now working on outside arm opening, begin a continuous round by starting across the top, and then continuing around the bottom of arm opening.
Rnd 1 :
8 sc (across the 8 sc from Row 1) (Fig. 15), 5 sc across the bottom of arm opening, place marker (Fig. 16) (13)
Rnd 2-4 :
13 sc (3 rounds) (13)
Rnd 5 :
11 sc, inv DEC (12)
Rnd 6 :
12 sc (Fig. 17) (12)
Finish sleeves :
Finish off with invisible join. Sew in ends. Sew on 3 (6mm) buttons to match up with button holes. (Fig. 18)
— Night Cap :
Using :
Using Yarn Over (v-stitch). Starting with 1.5mm hook. Starting with White or Natural White yarn.
Cap band (fits around head) :
Ch 9
Row 1 :
Starting in 2nd ch from hook, 8 sc, ch 1, turn (8)
Row 2-36 :
BLO 8 sc, ch 1, turn (35 rows) (Fig. 19 and 20) (8)
Fold :
Fold piece over, and slst through beginning chain and both loops of Row 36. (Fig. 21 and 22) (8 slst) (Do NOT turn cap band inside out.)
Body of Cap :
Change to 2.0mm hook. Change to Light Blue yarn (or desired color).
Rnd 1 :
(2 sc in next ridge) x18 (see below), place marker (36)
Note :
Hole right before each ridge. Slip stitches face out (Because later you will fold the cap brim up).
Every 3rd round :
Every 3rd round will be done in White (if desired). You do not need to cut the yarn. Color changes will be hidden inside the cap. (Fig. 23) (Rounds in White: 3, 6, 9, 12, 15, 18, 21, 24) The last 3 rounds are in Light Blue.
Rnd 2-4 :
36 sc (3 rounds) (36)
Rnd 5 :
(7 sc, inv DEC) x4 (32)
Rnd 6-8 :
32 sc (3 rounds) (32)
Rnd 9 :
(6 sc, inv DEC) x4 (28)
Rnd 10-11 :
28 sc (2 rounds) (Fig. 24) (28)
Rnd 12 :
(5 sc, inv DEC) x4 (24)
Rnd 13-14 :
24 sc (2 rounds) (24)
Rnd 15 :
(4 sc, inv DEC) x4 (20)
Rnd 16-17 :
20 sc (2 rounds) (20)
Rnd 18 :
(3 sc, inv DEC) x4 (16)
Rnd 19-20 :
16 sc (2 rounds) (16)
Rnd 21 :
(2 sc, inv DEC) x4 (12)
Rnd 22-23 :
12 sc (2 rounds) (12)
Rnd 24 :
(1 sc, inv DEC) x4 (8)
Rnd 25-27 :
8 sc (3 rounds) (8)
Close hole :
Close hole, pull tail through the hole with tapestry needle, and sew in ends. Fold up cap brim. Measure to doll's head and tack down the long tail end of the night cap to the back of cap (with a little piece of yarn) to keep it down (if desired.)
— Basket Bed :
Base :
Starting Yarn Over (v-stitch) (or preferred). Using Size 2 yarn (super fine), double stranded OR Size 4 (medium) yarn. Using 3.25mm - 3.75mm hook. Brown/light brown yarn.
Note :
turning ch (ch1) not included in the stitch count
Row 1 :
Starting in 2nd ch from hook, 8 sc, ch 1, turn (8)
Row 2 :
INC, 6 sc, INC, ch 1, turn (10)
Row 3 :
INC, 8 sc, INC, ch 1, turn (12)
Row 4 :
INC, 10 sc, INC, ch 1, turn (14)
Row 5-25 :
14 sc, ch 1, turn (21 rows) (14)
Row 26 :
DEC, 10 sc, DEC, ch 1, turn (12)
Row 27 :
DEC, 8 sc, DEC, ch 1, turn (10)
Row 28 :
DEC, 6 sc, DEC, ch 1 (place marker) (Fig. 25) (8)
Border :
27 sc across ends of rows, 2 sc in corner (starting ch), 6 sc across starting chains, 2 sc in corner (last starting ch), 27 sc across ends of rows, 2 sc in corner (next sc), 6 sc (across Row 28), 2 sc in corner (last sc), skip ch 1 and slst into the first sc of the border (Fig. 26) (74)
Side Wall (starting continuous rounds) :
Changing to Yarn Under (x-stitch). Rnd 1: BLO 74 sc (Fig. 27) (74)
Rnd 2-8 :
74 sc (7 rounds) (74)
Note :
If you are using the larger hook size, you may want to reduce the height by 2 rounds, in other words “Rnd 2-6: 74 sc (5 rounds)” for previous step.
Rnd 9 :
(starting this round from center of the bottom side of the basket bed) 16 sc, ch 8, sk 5 sc, (Fig. 29) 32 sc, ch 8, sk 5 sc, 16 sc (80)
Rnd 10 :
16 sc, 10 sc in ch 8 space, 32 sc, 10 sc in ch 8 space, 16 sc (84)
Note :
Handles should be centered on basket, across from each other. Adjust if necessary.
Finish :
Finish with invisible join. Sew in ends.
— Pillow :
Using :
Using Yarn Over (v-stitch). Using 2.0mm hook. Starting with Light Blue yarn (or desired color).
Circle (make 2) :
Rnd 1: 7 sc in mr (7)
Rnd 3 :
(1 sc, INC) x7 (21)
Rnd 4 :
(2 sc, INC) x7 (28)
Rnd 5 :
(3 sc, INC) x7 (35)
Rnd 6 :
(4 sc, INC) x7 (42)
Rnd 7 :
(5 sc, INC) x7 (49)
Rnd 8 :
(6 sc, INC) x7 (56)
Finish :
Finish with invisible join. Sew in ends. Take both circles, and match up corners with back side facing back side. Continue to Rnd 9.
Rnd 9 :
Change to Navy Blue yarn (or desired color) on first circle. (Fig. 30 and 31) 56 sc around through both layers, stopping around 48 sc to lightly stuff pillow with fiber fill. Slst into first sc. (56)
Ruffle :
Rnd 10: (ch 2, 2 dc) in first sc (ch 2 counts as first dc), ((3 dc) in next sc) x55 (168). Finish with invisible join. Sew in ends.
— Granny Square Blanket :
Using :
Using Yarn Over (v-stitch). Using 2.0mm hook. Make a total of 9 squares – 3 of each color arrangement. Starting with Yarn 1 color choice.
Rnd 1 :
8 sc in mr, join with slst, cut yarn (Fig. 32)
Join Yarn 2 :
Join with slst to one sc of Rnd 1. Make first petal, followed by 7 more petals.
First petal :
Ch 2, yarn over (as if making a dc), insert into same sc, yarn over and pull up a loop. Yarn over and pull through first 2 loops on hook. Repeat yarn over (as if making a dc), insert into same sc, yarn over and pull up a loop, yarn over and pull through first 2 loops on hook. Repeat to have 4 loops then yarn over and pull through all 4 loops on hook. Ch 2.
Petals 2-8 :
*(Yarn over (as if making a dc), insert into next sc, yarn over and pull up a loop. Yarn over and pull through first 2 loops on hook.) Repeat from * 2 more times. Yarn over and pull through all 4 loops on hook. Ch 2. Join with slst, cut yarn.
Join Yarn 3 :
Rnd 3: Join with slst to one ch 2 space of Rnd 2. (Ch3 (counts as first dc), 1 dc, ch 3, 2 dc) in first ch 2 space, (3 dc) in next ch 2 space, *[(2 dc, ch 3, 2 dc) in next ch2 space, (3 dc) in next ch 2 space], repeat from * 2 more times, join with slst, cut yarn. Sew in all ends.
Sewing :
Sew squares together in horizontal and vertical rows with a whip stitch. The needle should pass through one loop of each chain, and through both loops of double crochets (matching up stitches carefully.) Sew in ends, (or crochet them in with the border.) Create a border with the lightest color, 11 sc across each square, but with 3sc in each of the 4 corners of the blanket. Join with slst.
— Bedtime Bunny Toy :
Using :
Starting with Yarn Under (x-stitch). Starting with 1.5mm hook. White or Natural White yarn.
Head :
Rnd 1: 6 sc in mr (6)
Rnd 3 :
(1 sc, INC) x6 (18)
Rnd 4 :
(2 sc, INC) x6 (24)
Rnd 5-9 :
24 sc (5 rounds) (24)
Rnd 10 :
(2 sc, inv DEC) x6 (18)
Rnd 11 :
(1 sc, inv DEC) x6 (12)
Rnd 12 :
BLO 12 sc (Fig. 34) (12)
Stuffing :
Stuff head lightly with fiber fill. Create indents for eyes 6 sts apart, between Rows 7 and 8. (Fig. 35 and 36). Add more fiber fill to fill out the head completely. Glue eyes in place (where you placed the indents.) (Fig. 37). Cut yarn and close hole. (Fig. 38)
Ears (make 2) :
Ch 5. Rnd 1: Starting in 2nd ch from hook, 3 sc, 3 sc across end in next ch, (now working opposite side) 2 sc, (2 sc, 2 dc) in next ch (12). Rnd 2: INC, 3 sc (sk rest of round) (5). Finish off. Fold bottom end of ear together and sew with yarn tail. Sew ear to head at Rnd 2-3.
Body :
Change to Yarn Over (v-stitch). Change to 2.0mm hook. Blue yarn. With head upside down and facing away from you, join desired color yarn to exposed front loops from Rnd 11. (Fig. 39) Try to join at the center of the back of the head. Rnd 1: 12 sc, place marker (Fig. 40) (12). Rnd 2: (2 sc, INC) x4 (16). Rnd 3: (3 sc, INC) x4 (20). Rnd 4: (4 sc, INC) x4 (24). Rnd 5-10: 24 sc (6 rounds) (24)
Left Leg :
Rnd 11: 2 sc, sk 12 sc, 10 sc (Note: adjust sc placement if needed for legs to be correctly positioned) (Fig. 41 and 42) (12). Rnd 12: 12 sc (12). Rnd 13: (2 sc, inv DEC) x3 (9). Rnd 14: 9 sc (9). Change to Yarn Under (x-stitch). Change to 1.5mm hook. Change to white yarn. Rnd 15: BLO 9 sc (Fig. 43) (9). Rnd 16: 9 sc (9). Rnd 17: (1 sc, inv DEC) x3 (Fig. 44) (6). Close hole, pull tail through the hole with tapestry needle, and sew in ends.
Right Leg :
Change to Yarn Over (v-stitch). Change to 2.0mm hook. Rnd 11: Join yarn (color from body) on back of body where you skipped 12 sc on Rnd 11 of the Left Leg. (Fig. 45) 12 sc, place marker. (12). Rnd 12: 12 sc (12). Rnd 13: (2 sc, inv DEC) x3 (9). Rnd 14: 9 sc (9). Change to Yarn Under (x-stitch). Change to 1.5mm hook.
Change to white yarn :
Rnd 15: BLO 9 sc (9). Rnd 16: 9 sc (9). Rnd 17: (1 sc, inv DEC) x3 (6). Close hole, pull tail through the hole with tapestry needle, and sew in ends.
Arms (make 2) :
Using Yarn Under (x-stitch). Using 1.5mm hook. Using White yarn. Rnd 1: 8 sc in mr (8). Rnd 2: 8 sc (8). Rnd 3: (2 sc, inv DEC) x2 (6). Rnd 4-7: 6 sc (4 rounds) (6). Finish off, leaving a tail for sewing. Sew opening on end of arm together flat. Sew arms to body about 2 rows down from where head and body join.
Tail :
Using Yarn Under (x-stitch). Using 2.0mm hook. Using White yarn. Rnd 1: 8 sc in mr (8). Join with slst (close the mr), pull tight (forming a little half-ball shape). (Fig. 47) Knot ends together and cut tails short. Attach tail to back of body with craft glue.
Finishing :
Knot ends together and cut tails short. Attach tail to back of body with craft glue. Attach buttons to sleeper coat. Add blanket and pillow to basket bed. Sew in all ends and adjust features.
This little Goodnight Set brings tiny bedtime magic to life with a sleepy doll, bunny toy, night cap, pillow and cozy basket bed. The pattern blends small-scale amigurumi techniques with clever texture work for charming results. Make a sweet set to gift or keep — each piece is a pocket-sized treasure to enjoy. 🧶🌙✨