🧢 Beautiful ✨ Detailed πŸ’ Adorable

Giada Crochet Bag Pattern

Giada Crochet Bag Pattern
4.8β˜… Rating
5-7 Hours Time Needed
3.5K Made This
βœ‚οΈ

Intermediate Level

Ideal for those with basic crochet experience, featuring slightly more advanced stitches and techniques to expand your skills.

⏱️

Weekend Treat

Takes 5-7 hours, making it an enjoyable project to finish over a couple of days.

✨

Stylish Touch

An elegant detail to elevate any look, combining traditional techniques with contemporary design sensibilities.

About This Giada Crochet Bag Pattern

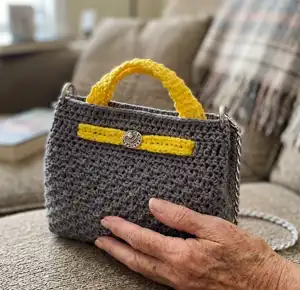
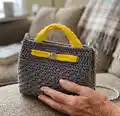
This pattern creates the Giada Crochet Bag β€” a compact, structured handbag crocheted in macrame cord for a durable finish. It uses a repeating v-stitch body with optional plastic canvas inserts for shape and stability. The bag includes a woven belt strap, bright handles, and optional lining for a professional look.

Giada Crochet Bag Pattern crochet pattern - detailed view of completed project

Designed for intermediate crocheters, the pattern provides full row- and round-by-round instructions and material lists. Make it with the recommended macrame cord or similar #4 weight yarns for best results.

Why You'll Love This Giada Crochet Bag Pattern

I absolutely love this pattern because it combines sturdy construction with a delicate-looking stitch texture that feels both modern and timeless. I enjoy how the optional plastic canvas lets you customize the bag's structure depending on how rigid you want it to be. The contrasting belt and handles give a playful pop of color that makes each finished bag unique. I also love that the pattern is approachable for those expanding beyond simple projects while still finishing in a weekend.

Giada Crochet Bag Pattern step 1 - construction progress Giada Crochet Bag Pattern step 2 - assembly progress Giada Crochet Bag Pattern step 3 - details and accessories Giada Crochet Bag Pattern step 4 - final assembly and finishing

Switch Things Up

I love changing the color palette to make each bag feel unique; try muted neutrals for a classic look or bright contrasting colors for a statement piece.

You can switch yarn types: using cotton cord will yield a firmer, more structured bag while a softer macrame or bulky yarn will make it cushier and more casual.

If you want a slouchier bag, omit the plastic canvas inserts entirely and allow the bag to drape naturally for a more relaxed style.

For an upscale finish, sew in a full fabric lining and add an internal pocket; choose a coordinating lining fabric for a polished interior.

Change the hardware: swap the included chain for leather straps, or replace the round keyrings with decorative rings to alter the bag's aesthetic.

I sometimes add an inner zipped pocket for security; you can sew it into the lining before inserting the fabric into the bag.

To make a crossbody version, lengthen the chain or attach longer straps and reinforce attachment points with extra stitching to handle the weight.

Experiment with embellishments like embroidered initials, crocheted flowers, or buttons along the belt strap for personalized details.

Make the bag larger or smaller by adjusting hook size and yarn weight; a larger hook with bulky yarn creates a roomy tote while smaller yarn yields a compact clutch.

I also enjoy making matching accessories like a small coin pouch or key fob using the same stitch pattern to create a coordinated set.

Don't be afraid to combine techniques: try using a narrow leather strip woven through Round 17 instead of the crocheted belt strap for a different texture and finish.

Common Mistakes & How to Fix Them

βœ— Skipping the gauge check with #4 weight macrame cord can lead to a bag that is too large or too small; always make a swatch and adjust hook size to match the gauge. βœ— Not cutting plastic canvas to the exact base and side dimensions will make sewing pieces together difficult; measure and trim the plastic canvas carefully before inserting and sewing. βœ— Forgetting that beginning ch-1 does NOT count as a stitch can throw off your stitch counts and cause misalignment; count stitches exactly as instructed and use a marker at the start of rounds. βœ— Turning when the pattern instructs DO NOT turn will change the orientation of your stitches and distort the pattern; follow the turn/DO NOT turn instructions precisely and refer back to rounds when unsure.

Giada Crochet Bag Pattern

Make a stylish, structured handbag using macrame cord and a simple stitch pattern. This intermediate crochet bag features a woven-looking body, optional plastic canvas for stability, and a bright contrasting strap and handles. Follow the clear step-by-step instructions to create a polished, gift-ready bag you'll be proud to carry.

Intermediate 5-7 Hours

Materials Needed for Giada Crochet Bag Pattern

β€” Main Fabric

  • 01
    Ice Yarns Macrame Cord, worsted weight #4 yarn (100% polyester; 175 yds/160 m per 3.5 oz/100 g skein)
  • 02
    Color A: Grey - 2 skeins
  • 03
    Color B: Yellow - 1 skein

β€” Tools Required

  • 01
    US Size E (3.5mm) crochet hook
  • 02
    Plastic canvas (optional)
  • 03
    43" chain
  • 04
    2 - round keyrings
  • 05
    Fabric for lining (optional)
  • 06
    Sewing thread & needle
  • 07
    Button (optional)
  • 08
    Magnetic button (optional)
  • 09
    Yarn needle

Progress Tracker

0% Complete

β€” Notes :

Info :

1. Similar #4 weight yarns may be substituted; please check gauge. Yarn substitutes include Red Heart Yarns Nylon Crochet Thread and Lion Brand 24/7 Cotton. 2. Beginning ch-1 does NOT count as stitch. 3. Sl st to 1st stitch of each round to join.

Info :

SPECIAL STITCHES v-st (v-stitch) = (dc, ch 1, dc) in same

β€” Base :

Row 1 (RS) :

With A, ch 17, sc in 2nd ch from hook and in each across, turnβ€”16 sc.

Row 2 :

Ch 1, sc in each across, turn.

Rows 3-38 :

Repeat Row 2, after Row 38, do NOT turn, do NOT fasten off.

Info :

Cut plastic canvases to fit Base dimensions.

Round 1 :

Place plastic canvas on WS, working through both Base and plastic canvas, ch 1, *sc in each across to corner, ch 1; repeat from * around, join, do NOT turnβ€”108 sc, 4 ch-1 sps.

Round 2 :

Working in BLO, sl st in next, ch 1, *sc in each across to next ch-1 sp, (sc, ch 1, sc) in next ch-1 sp, skip 1; repeat from * around, joinβ€”112 sc, 4 ch-1 sps.

β€” Body :

Round 1 :

Skipping all corner ch-1 sps, ch 4 (counts as (dc, ch 1)), dc in same (v-st made), skip 1, sc in next, skip 1, *v-st in next, skip 1, sc in next, skip 1; repeat from * around, join, turnβ€”28 v-sts, 28 sc.

Round 2 :

Sl st in next ch-1 sp, (ch 1, sc) in same ch-1 sp, skip 1, v-st in next sc, *sc in next ch-1 sp, skip 1, v-st in next sc; repeat from * around, join, turn.

Round 3 :

Ch 4 (counts as (dc, ch 1)), dc in same (v-st made), skip 1, sc in next, skip 1, *v-st in next, skip 1, sc in next, skip 1; repeat from * around, join, turn.

Rounds 4-15 :

Repeat Rounds 2-3, do NOT turn after Round 15.

Round 16 :

Ch 1, hdc in each around, skipping all ch-1 sps, joinβ€”84 hdc.

Round 17 :

Ch 1, hdc in each around.

Round 18 :

Ch 4 (counts as tr), tr in each around, joinβ€”84 tr.

Info :

Cut plastic canvas to fit side dimensions. With A, sew pieces together. Insert plastic canvas in bag.

Round 19 :

Ch 1, working through both bag and plastic canvas, hdc in each around, joinβ€”84 hdc.

Round 20 :

Ch 1, hdc in each around, join.

Round 21 :

Ch 1, sc in each around, join with invisible join.

Info :

Fasten off, weave in ends.

β€” Belt Strap :

Belt Strap (P1) :

With B, ch 68, sc in 2nd ch from hook and in each across to last, 3 sc in last, rotate to work other side of starting ch, sc in each across to last, 2 sc in last, joinβ€”138 sc. Fasten off.

Info :

Working from WS of back, starting in back center, weave Belt Strap through Round 17 around as desired, sew ends together. Sew button to center of Belt.

β€” Handle (make 2) :

Row 1 :

With B, ch 4, sc in 2nd ch from hook and in each across, turnβ€”3 sc.

Row 2 :

Ch 1, sc in each across, turn.

Rows 3-30 :

Repeat Row 2.

Info :

Fasten off, weave in ends. Sew Handles to bag as desired.

β€” Lining (optional) :

Info :

With fabric of choice, cut 2 pieces following outline of Panels, hand sew together, insert in bag, secure Lining to bag. Sew magnetic button at center top edge of Lining if desired.

Info :

Attach 1 keyring to each side of bag, attach chain as desired.

Assembly Instructions

  • Cut plastic canvas to fit the base and side panels precisely, insert the base piece on the WS of the Base and work Round 1 through both the crocheted Base and plastic canvas to secure it.
  • Sew the side plastic canvas pieces and crocheted panels together with Color A, then insert the side plastic canvas pieces into the bag before continuing Rounds 19-21.
  • Weave the Belt Strap (made with Color B) through Round 17 around the back of the bag starting from the WS, sew the strap ends together and secure a button to the center of the belt.
  • Sew the two handles (made with Color B) to the top of the bag at desired placement, securing them firmly with passes of yarn and weaving in ends.
  • If adding lining, cut two fabric pieces to the panel outline, hand sew them together, insert the lining in the bag and secure it to the bag edge; add magnetic button to the lining top edge if desired.

Important Notes

  • πŸ’‘Similar #4 weight yarns may be substituted but always check gauge with a swatch before starting to ensure correct finished size.
  • πŸ’‘Beginning ch-1 does NOT count as a stitch and Sl st to 1st stitch of each round is used to join; follow these conventions to keep counts accurate.
  • πŸ’‘Plastic canvas is optional but recommended for a more structured bag; cut canvas to precise dimensions before sewing into place.
  • πŸ’‘Fasten off and weave in ends as you finish each piece to keep the assembly tidy and make sewing parts together easier.

This Giada Crochet Bag pattern brings a modern, structured handbag into your craft rotation with simple stitches and thoughtful construction. The macrame cord gives durability while still feeling chic and lightweight. Make it as a gift or a special treat for yourself β€” finished pieces add instant style to any outfit. πŸ‘œβœ¨

You ask,

we answer.

FAQs

What size will the finished piece be?

The finished bag measures approximately Height: 8" Depth: 4" Length: 9 1/2" using the recommended macrame cord and hook size.

Can I skip the plastic canvas and still make the bag?

Yes, you can skip the plastic canvas for a softer bag, but the pattern uses optional plastic canvas to provide structure and shape; without it the bag will be more slouchy.

Do I need previous experience with special stitches?

Basic knowledge of ch, sc, dc, hdc, tr and working in rounds is recommended as this pattern is rated intermediate and uses v-stitches and working in BLO.

How long does this project typically take to complete?

Most crocheters complete this project in 5-7 hours, depending on experience and whether you add lining or plastic canvas.