About This Ghost in Pumpkin Amigurumi Pattern
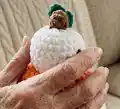
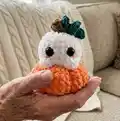
This pattern creates a tiny amigurumi ghost sitting inside a textured pumpkin using bobble stitches and simple shaping. The design uses chunky yarn for a plush look and finishes with sewn-in ribs to give the pumpkin character. Youll learn a neat color-change trick and how to sculpt ribs using a long tail for charming detail.

Perfect for seasonal gifts, keychains, or a cute shelf accent, the project is quick and satisfying. Includes step-by-step rounds, assembly tips, and optional tendril instructions for finishing touches.
Why You'll Love This Ghost in Pumpkin Amigurumi Pattern
I absolutely love this pattern because it turns simple stitches into a character full of charm and personality. I adore how the bobble stitch gives the ghost a cuddly, bumpy texture that contrasts so well with the plush pumpkin. Sewing the ribs is such a satisfying step — it really brings the pumpkin to life and feels like sculpting with yarn. I also love how quick this project is; you can make a delightful handmade gift in just a few hours and customize it with colors and embroidery.
Switch Things Up
I love customizing this little ghost by changing yarn colors — try pastel orange and pale gray for a soft, muted version.
You can make the project larger or smaller by swapping yarn weight and hook size; bulky yarn will give you a plush chunky pumpkin while DK weight makes a dainty mini.
I often swap the bobble stitch for single crochet clusters if I want a subtler texture on the ghost head.
For a keychain, add a small loop to the top of the stem before finishing and attach a split ring.
Try embroidering a tiny face instead of safety eyes for a softer, toy-safe option for babies.
Use variegated or speckled yarn for the pumpkin to create natural color variation without extra sewing or color changes.
If you want more ribs, sew them closer together or repeat the ribbing process 6-8 times for extra definition.
Make a family of ghosts by varying eye sizes and blush placement to give each one a unique expression.
Add tiny crocheted accessories like a scarf, hat, or mini broom to create seasonal character variations.
I sometimes stuff the stem with scrap yarn to make it sturdier and then wrap it with contrasting yarn to make a decorative band that hides the join.
Common Mistakes & How to Fix Them
✗ Skipping the color-change technique can leave messy color joins; leave two loops on the hook, cut the first color, pull through the new color and tie the small tails to secure.
✗ Forgetting to stuff evenly causes lumpy shapes and misshapen pumpkins; stuff gradually and adjust stuffing as you work, especially before closing rounds.
✗ Not tightening the rib sewing tautly will result in shallow ridges; pull firmly on the long tail after each rib to create visible indentations and repeat if needed.
✗ Placing eyes without counting stitches causes asymmetry; place 12mm eyes between rounds 8-9 with 2-3 visible stitches between for even positioning.
✗ Using the wrong hook with chunky yarn can make stitches too loose or too tight; use the recommended 4.5mm hook (or adjust if your tension differs) to match gauge and texture.