🧢 Beautiful ✨ Detailed πŸ’ Adorable

Loafie the Bread Loaf Amigurumi Pattern

Loafie the Bread Loaf Amigurumi Pattern
4.0β˜… Rating
2-4 Hours Time Needed
1.3K Made This
βœ‚οΈ

Intermediate Level

Ideal for those with basic crochet experience, featuring slightly more advanced stitches and techniques to expand your skills.

⏱️

Bite-Sized Project

Finishes in 2-4 hoursβ€”perfect for an afternoon of creative relaxation.

🧸

Cute Companion

An adorable friend to cherish, handcrafted with love to bring comfort and joy for years to come.

About This Loafie the Bread Loaf Amigurumi Pattern

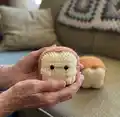
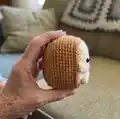
This pattern creates a small, stuffed bread loaf character named Loafie with a cream interior and tan crust. It combines flat pieces crocheted in rows with single crochet rounds to form a 3D loaf shape. Youll use bobble stitches for tiny feet and simple embroidery for the mouth.

Loafie the Bread Loaf Amigurumi Pattern crochet pattern - detailed view of completed project

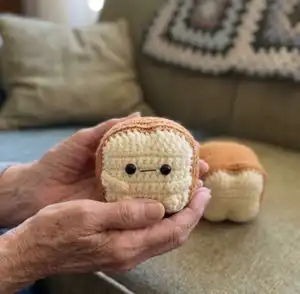
Clear step-by-step instructions and photos guide assembly and finishing. Perfect for making as gifts, desk buddies, or collection pieces.

Why You'll Love This Loafie the Bread Loaf Amigurumi Pattern

I absolutely love this pattern because it turns simple stitches into a delightful little character with tons of charm. I enjoy how quickly it comes together β€” you can make a pair in an afternoon and customize faces or colors. The combination of flat pieces and rounds keeps the work interesting without being overwhelming. I especially love the tiny bobble feet; they add personality and are fun to crochet.

Loafie the Bread Loaf Amigurumi Pattern step 1 - construction progress Loafie the Bread Loaf Amigurumi Pattern step 2 - assembly progress Loafie the Bread Loaf Amigurumi Pattern step 3 - details and accessories Loafie the Bread Loaf Amigurumi Pattern step 4 - final assembly and finishing

Switch Things Up

I love customizing this pattern to make a family of loaves in different crust and crumb colors β€” try cinnamon browns, pale golden yellows, or even pastel 'sweet bread' tones.

To make a smaller version I use DK or sport weight yarn with a 2.75mm hook and adjust stuffing for a mini keychain-sized loaf.

For a chunkier, cuddlier loaf, switch to bulky yarn and a larger hook to create a plush desk pal that feels squishy and satisfying to squeeze.

I often change eye sizes to shift the personality β€” tiny 6mm safety eyes look shy while larger eyes make the loaf look extra cute and expressive.

You can embroider different mouths or add tiny felt cheeks for extra expression β€” a stitched smile, surprised O, or tiny blush circles all change the look.

Try adding tiny crocheted accessories like a scarf, hat, or an embroidered patch to make themed loaves for holidays or gifts.

If you want posable arms, insert thin wire inside the arm before stuffing so you can pose Loafie holding a tiny prop.

Use variegated or speckled yarn for the crust to give your loaf a rustic artisan appearance without extra sewing work.

Make a matching set by varying the bobble foot sizes or placement β€” you could make one loaf with two buns, another with three, and display them together.

I also enjoy turning the pattern into a magnet or ornament by reducing stuffing and attaching a small magnet or ribbon loop at the top for hanging.

Common Mistakes & How to Fix Them

βœ— Skipping stitch markers when joining and turning can cause your rounds to shift and misalign; place a marker at the start of each round to maintain consistent stitch counts. βœ— Forgetting to change colors properly before finishing the last loop will leave an ugly join line; always pull your new color through to complete the final stitch of the previous color. βœ— Not stuffing as you go may lead to lumps or an overstuffed final piece; stuff gradually and evenly while you close seams to keep a smooth shape. βœ— Ignoring the back loop only (BLO) instructions will change the border look and fit; work in BLO exactly where specified to create the neat crust edge and correct assembly surfaces.

Loafie the Bread Loaf Amigurumi Pattern

Make a tiny, squishy Loafie the Bread Loaf with this friendly crochet pattern. Youll work a simple cream center and a tan crust to create a charming little bread plush that is perfect for gifting or decorating. The pattern uses basic stitches plus a bobble stitch for cute feet and includes full assembly and finishing instructions. Ideal for crafters who enjoy small, quick amigurumi projects.

Intermediate 2-4 Hours

Materials Needed for Loafie the Bread Loaf Amigurumi Pattern

β€” Main Fabric

  • 01
    Worsted weight yarn (#4) in cream (main inner color), small amount (approx 25-50g)
  • 02
    Worsted weight yarn (#4) in tan (crust color), small amount (approx 50-75g)

β€” Tools Required

  • 01
    Crochet hook size 3.5 mm
  • 02
    8 mm safety eyes (2 pieces)
  • 03
    Stitch marker
  • 04
    Scissors
  • 05
    Sewing needle
  • 06
    Fiber fill stuffing
  • 07
    Black thread for mouth embroidery
  • 08
    Yarn needle for sewing pieces together

Progress Tracker

0% Complete

β€” Arms :

Arms (make 2) :

Starting with a long tail ch 6, slst in the 2nd ch from hook and in remaining ch spaces (5) f/o and leave a long tail for attaching

β€” Front of Loaf :

R1 :

ch 13, sc across starting in the 2nd ch from the hook (12) ch 1 and turn

R2 :

sc 2, BO, sc 6, BO, sc 2. ch 1 and turn

R3-10 :

sc across. (12) ch 1 and turn

R11 :

(top of the loaf) 2 HDC in one st, dc, dc, tr, tr, dc & HDC in one st, HDC and dc in one st, tr, tr, dc, dc, 2 HDC in last st (16)

Info :

Now you will crochet around the piece.

Instruction :

ch 1 and put a st marker in the ch 1 (it counts as a st) then sc 9 down the side

Instruction :

inc in corner

Instruction :

sc 10 across bottom

Instruction :

inc in corner

Instruction :

sc 10 up the other side

Info :

Change to tan.

Instruction :

inc in the first st along the top, sc in the next 14 sts, inc in the last st

Info :

You are now back at the st marker... you are going to finish sc around the bread with tan.

Instruction :

sc 10 down the side

Instruction :

inc in corner

Instruction :

sc 12 across the bottom

Instruction :

inc in corner

Instruction :

sc 10 up the other side (you will reach the tan yarn across the top)

Info :

There should be 54 sts total around the entire breadβ€”do not fasten off.

R1 :

Still using tan, sc around in the BLO (54)

R2-10 :

sc around (54) f/o and weave in yarn tail

β€” Back of Loaf :

R1 :

ch 13, sc across starting in the 2nd ch from the hook (12) ch 1 and turn

R2-10 :

sc across. (12) ch 1 and turn

R11 :

(top of the loaf) 2 HDC in one st, dc, dc, tr, tr, dc & HDC in one st, HDC & dc in one st, tr, tr, dc, dc, 2 HDC in last st (16)

Info :

Now you will crochet around the piece.

Instruction :

ch 1 and put a st marker in the ch 1 (it counts as a st) then sc 9 down the side

Instruction :

inc in corner

Instruction :

sc 10 across bottom

Instruction :

inc in corner

Instruction :

sc 10 up the other side

Info :

Change to tan

Instruction :

inc in the first st along the top, sc in the next 14 sts, inc in the last st

Info :

You are now back at the st marker... you are going to finish sc around the bread with tan.

Instruction :

sc 10 down the side

Instruction :

inc in corner

Instruction :

sc 12 across the bottom

Instruction :

inc in corner

Instruction :

sc 10 up the other side (you will reach the tan yarn that is across the top of the loaf)

Info :

There should be 54 sts total around the entire bread. F/O and leave a long tail for sewing.

β€” Assembly :

Info :

Place safety eyes between rows 7&8, approx. 3 sts apart

Info :

Embroider mouth with black thread

Info :

Attach arms to edge of bread, between rows 5&6

Info :

Correct side outβ€”the stitches should look like little v's.

Instruction :

Now you will crochet around the bread to form the loaf. Remove your st marker and place it in the beginning st of this next row as instructed above.

Instruction :

Whip stitch attachment: To attach, line up the front with the back and whip stitch through the BLO of row 10 on the loaf and both loops on the back. Whip stitch through both loops of the back of the loaf and the back loop only of the main piece when attaching.

Info :

Stuff as you go... as firmly as you prefer.

Info :

If you don't like his arms flapping around and looking crazy, sew or glue them in the position you like!

β€” Making Loafie's Buns :

Instruction :

Poke the needle between rows 8&9 and up through the back through rows 4&5, centered. Repeat twice.

Instruction :

Pull both tails tightβ€”but not too tight (you don't want to see fiber fill poking out).

Instruction :

Tie ends together and knot at the bottom then weave in the tails.

Info :

You are done!

Assembly Instructions

  • Place safety eyes between rows 7 and 8 on the front piece, approximately 3 stitches apart, then embroider a small mouth centered between the eyes with black thread.
  • Line up the front and back pieces with the correct side facing out (stitches look like little v's) and whip stitch through the back loop only (BLO) of row 10 on the front to both loops on the back to form the loaf.
  • Stuff the loaf as you whip stitch around, stuffing gradually so shape stays smooth and even; stuff firmly to your preference before closing the final seam.
  • Attach the small arms to the edge of the bread between rows 5 and 6 using the long tails left from the arms and a yarn/sewing needle; secure with several stitches and weave in ends.
  • Create two buns by poking a needle between rows 8 and 9 and up through rows 4 and 5 centered, pull tails tight, knot at the bottom and weave in the tails.
  • If arms flap or shift, sew or glue them down in your preferred position to secure them permanently.

Important Notes

  • πŸ’‘Use a stitch marker to mark the beginning of rounds and when you ch 1 at the start of the border to keep track of the 54-st count.
  • πŸ’‘Change colors before finishing the last yarn-over of the stitch to avoid an obvious join line between cream and tan.
  • πŸ’‘Stuff gradually as you sew the pieces together so the loaf keeps a smooth, even shape and you can adjust filling as needed.
  • πŸ’‘When attaching front and back, line pieces up by looking from above so the border stitches match and create a neat seam.
  • πŸ’‘Weave in all yarn tails securely after assembly to prevent unraveling and hide ends inside the loaf.

This sweet Loafie the Bread Loaf pattern makes a delightful tiny friend perfect for gifting or shelf display. It combines simple rows and rounds with small shaping and finishing details to create a charming loaf character. Make a set in different colors for a playful kitchen collection. 🧢🍞✨

You ask,

we answer.

FAQs

What size will the finished piece be?

The finished amigurumi measures approximately palm-sized (roughly 8-12 cm) when using worsted weight yarn and a 3.5 mm hook; exact size depends on yarn and tension.

Can I use different yarn weights for this pattern?

Yes, you can use different yarn weights, but it will affect final size and stitch counts; adjust your hook accordingly and expect a larger or smaller finished loaf.

Do I need prior crochet experience for this pattern?

This pattern is rated intermediate because it uses bobble stitches and assembly steps; basic knowledge of single crochet, increases, and working in rounds is recommended.

How long does this project typically take to complete?

Most crocheters complete this project in 2-4 hours, depending on experience and how much time you spend on assembly and finishing details.