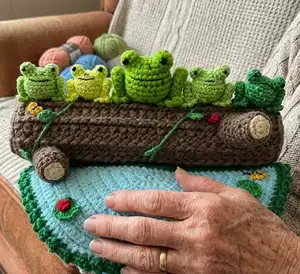
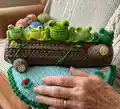
Create a charming Frog Play Set that includes five adorable little frogs, a cozy log for storage, a small pond with lily pads and bugs, and decorative vines and stumps. This pattern guides you through making each frog, the hinged log with plastic canvas insert, and the pond with appliques. You will love the tactile play set that stores neatly inside the log — perfect for gifting or imaginative play.
Progress Tracker
0% Complete
— Frogs :
Info :
I like to make my frogs first, so when it comes time to make the log, I can seat all my frogs side-by-side and judge how long I need to make the log.
Section :
Work with green yarn. Make multiple frogs in varied shades; larger frog can be made with 4ply worsted weight yarn and a 3mm hook for size variation.
— Body :
Round 1 :
Magic circle with 6 scs. (6)
Round 2 :
Inc in each st. (12)
Round 3 :
(Sc, inc) x6. (18)
Round 4 :
(Sc x2, inc) x6. (24)
Round 5-9 :
Sc in each st. (5 rows) (24)
Round 10 :
(Sc x2, dec) x6. (18)
Round 11 :
(Sc, dec) x6. (12) Stuff.
Info :
Sl st in next st. Finish off with long tail to sew hole closed, finish off and weave in end.
— Speckles :
Infos :
There are a few different options for making speckles: Speckled yarn, Embroidery, or Crochet (stitch onto body while crocheting). See details below.
Info - Speckled Yarn :
The most obvious way to make speckles would be to use speckled yarn. The example pictured was made with Red Heart Super Saver: Frosty Green Fleck.
Info - Embroidery :
You can embroider small straight stitches after you have your body assembled. Secure beginning tail inside body and make small straight stitches or French knots where you like, then secure and clip end.
Info - Crochet Speckles :
Join your speckle color on row 5, make 1 stitch, then change back to the main color. Carry the speckle colored strand along and crochet over it until you wish to make another speckle. Continue speckles from rounds 5 thru 9, then drop your speckled color and finish up in the main color.
— Eyes :
Info :
Make 2. With green yarn. Work in continuous rounds.
Round 1 :
Magic circle with 6 scs. (6)
Round 2 :
(Sc, inc) x3. (9)
Round 3 :
Sc in each st. (9)
Info :
Sl st in next st and finish off with long tail for sewing. Using black embroidery floss, secure end inside eye bump. Sew a French knot or embroider a circle for an eye. Note: a 4mm safety eye can be used but eye bump is tight and may require trimming the post to fit.
Info :
Stuff eyes and pin to top of head where you like them. Sew in place with whip stitches. Finish off and hide ends inside body.
— Feet and Legs :
Item Name (P1) :
Make 2. With green yarn.
Step 1 :
(Ch 3, sl st in the 2nd ch from hook and next ch) x3. (3 toes made)
Step 2 :
Ch 1. Sc in the base of each toe. (3)
Step 3 :
Ch 1, turn. Sc in the front loops of each st. Turn and sc in the 3 back loops on the other side of the same row. (6) Begin working in continuous rounds.
Round 5-12 :
Sc in each st. (8 rows) (5) No need to stuff.
Info :
Sl st in the next st and finish off with a long tail. Thread the tail onto your yarn needle and sew the top of the leg opening closed. Fold the leg in half and sew the top of the leg to the back of the ankle with a couple of stitches.
Info :
Position on the sides of the body and pin in place. Sew the leg to the body at the ankle, hip, and about halfway up the leg; on the front and back. Finish off and hide ends inside body.
— Face :
Info :
Using black embroidery floss and yarn needle, secure yarn inside the body by sewing back and forth inside the body so it isn't visible. Embroider the mouth using the photos as a guide. Use simple straight stitches; one long stitch for the straight mouth and three for the smile. For a frown, use one long straight stitch and tack down a tiny stitch at the top center to hold it in place.
Info :
After embroidering the mouth, add a couple of tiny vertical straight stitches for the nostrils. Secure your thread by sewing back and forth inside the body so it isn't visible and then clip the end.
— Log :
Info :
Materials: Worsted Weight Yarn - Brown and Tan (Bernat Super Value in Taupe Heather and Oatmeal). Optional: Contrasting speckled yarn or embroidery floss for speckles. 3.75mm crochet hook. Plastic canvas brown 10.5" x 13.5" piece cut to fit inside log. Scissors, yarn needle, straight pins, thin permanent marker. Optional: sew-on magnet or Velcro dots to keep open end closed. Optional: scrap piece of plastic canvas for reinforcement.
— Log Ends :
Info :
Each end of the log is worked a bit differently. You will be closing one end (Closed End), and the other end you will secure the disk so it will hinge open (Hinged End). You will make two sets of 2 disks each and sandwich them together with a piece of plastic between to reinforce.
Section :
Hinged End - Inside - Work in continuous rounds. With tan yarn:
Round 1 :
Magic circle with 6 scs. (6)
Round 2 :
Inc in each st. (12)
Round 3 :
(Sc, inc) x6. (18)
Round 4 :
(Sc x2, inc) x6. (24) Finish off and weave in ends. Set aside.
Section :
Hinged End - Outside - Work in joined rounds; you'll be changing colors for each row to create the rings.
Outside Round 1 :
With Brown yarn: Magic circle with 6 scs. Join with sl st to first st. Join tan yarn. (6)
Outside Round 2 :
With Tan yarn: Inc in each st. Join with sl st to first st. Join brown yarn. (12)
Outside Round 3 :
With Brown yarn: (Sc, inc) x6. Join with sl st to first st. Join tan yarn. (18)
Outside Round 4 :
With Tan yarn: (Sc x2, inc) x6. Join with sl st to first st, finish off and weave in ends. (24)
Info :
Optional: Cut a circle from plastic canvas or other plastic that will fit between the 2 disks. Place the two disks together, wrong sides facing, with the optional plastic sandwiched between them.
— Closed End :
Inside Round 1 :
With tan yarn: Magic circle with 6 scs. (6)
Inside Round 2 :
Inc in each st. (12)
Inside Round 3 :
(Sc, inc) x6. (18)
Inside Round 4 :
(Sc x2, inc) x6. (24)
Info :
Sl st in next st and finish off. Weave in tails. Set aside.
Outside :
Work in joined rounds; you'll be changing colors for each row to create the rings. 1. With Tan yarn: Magic circle with 6 scs. Join with sl st to first st. Join brown yarn. (6) 2. With Brown yarn: Inc in each st. Join with sl st to first st. Join tan yarn. (12) 3. With Tan yarn: (Sc, inc) x6. Join with sl st to first st. Join brown yarn. (18) 4. With Brown yarn: (Sc x2, inc) x6 Join with sl st to first st, finish off and weave in ends. (24)
Info :
Place the two disks together with wrong sides facing each other and optional plastic canvas sandwiched between. Set aside until after you've created the log.
— Main Trunk of Log :
Info :
At the end of each row, join with sl st to the top of the beginning ch-3. Ch 3 and do not turn (the ch-3 counts as a stitch in each row). With brown or chosen yarn(s). Ch 33. Join with sl st in first ch to form a ring.
Row 1 :
Ch 3 and dc in each ch across. Join with sl st in top of the beginning ch-3. Join with sl st. (33)
Row 2-27 :
Ch 3. Dc in next st, fpdc, (dc x2, fpdc) x10. Join with sl st. (26 rows - see below*) (33)
Row 28 :
Ch 1. Beginning in the same st, (sc x2, fpsc) x11. Join with sl st. (33)
Info :
*Check the length of the log starting at about row 22 by placing your frogs lined up along the log to determine how long you're going to need to make it. Add more rows if you'd like it longer or subtract if you'd like it shorter. Do not finish off. Place a safety pin in your loop to keep from unraveling during the next steps. Weave in starting tail.
— Plastic Canvas Insert :
Info :
In order to cut your plastic canvas insert to the correct size, roll it up tightly and slide inside your log. Push against it from the inside to stretch it out while still inside, and mark overlap points with a permanent marker. Remove and cut so it is 4-6 squares longer than the point where it overlapped. Trim length so it is the same length as the log. Using yarn needle and a 24" piece of brown yarn, use a running stitch to sew the tube together so the edges overlap by 4-6 rows. Stitch over your beginning tail to secure it on the outside of the log.
Info :
Note: It can be difficult getting your hand inside the tube for stitching; bend the plastic slightly and stitch about every 3rd square - it will be tight enough. Secure ending tail by sewing into previous stitches on the outside of the log. Clip end.
— Log Assembly :
Section :
Attaching the Plastic Canvas Tube - Steps:
Step 1 :
Place the plastic canvas tube inside the log, lining up the seam of the canvas tube to the seam of your crocheted log. That seam is considered the 'bottom' of the log. Position the flat portion of the plastic canvas overlap at the bottom of your log.
Step 2 :
Thread your yarn needle with a long piece of brown yarn (about 24").
Step 3 :
Start with the end of the log that you left off on (the same side where you have your safety pin — keep safety pin in place). This will be the 'closed' end of the log.
Step 4 :
Secure the yarn tail to the inside of the yarn log.
Step 5 :
Use a running stitch and sew the end of the yarn log to the plastic canvas sheet. Sew through the posts of the stitches and into the first row on the plastic sheet. Note: By sewing into the posts, you are leaving the ends of the rows of the log free to work into when attaching the log-end disk.
Step 6 :
Finish off, weave in end.
Step 7 :
Repeat for 2nd end (this will be the 'hinged' end). Begin stitches near the top of the log (opposite of the seam).
Step 8 :
Do not finish off. Continue on to securing the first log-end disk.
— Attaching the Log-End Disks :
Hinged End Step 1 :
Continue from attaching the plastic canvas tube. If necessary, feed your yarn up to the top of the log (a few stitches to the right of center).
Hinged End Step 2 :
Using the disk that ends with brown stripe, line it up with the inside of the log.
Hinged End Step 3 :
At the top of the log, use the whip stitch to sew a hinge on the disk - just at the top of the log (about 4-5 stitches). Be sure to sew through all 3 layers: (1) disk, 2) plastic canvas, 3) crocheted log yarn. Test as you go to make sure it flaps open and closed how you like it.
Hinged End Step 4 :
After securing the top of the disk to the end of the log, continue whip stitching around the end opening to give it a nice finish. Do this by whip stitching into both layers: the plastic canvas and the crocheted log yarn.
Hinged End Step 5 :
Secure end and finish off.
Closed End Step 1 :
Place the disk you made for the closed end (the one that ends with a tan stripe) inside the end of the log where you ended your stitching (your safety pin should still be in that last loop).
Closed End Step 2 :
Line up the stitches so you begin working in the last st made on the disk.
Closed End Step 3 :
Remove the safety pin and insert your crochet hook. With the outside of the log facing you, crochet through both layers (both loops of the last row of sts of the log and the BLO of the disk). Special Increases* are made as follows: Sc through next log st and next disk st, and then sc in next log st and same disk st.
Closed End Round :
(Sc x9, special inc*) x3 (33)
Closed End Step 4 :
Secure ends and finish off.
— Adding the Magnet or Velcro Closure :
Info :
Crochet a little stub to sew to the inside of your log to which you will attach the magnet or velcro.
Stub Round 1 :
With brown yarn: Magic circle with 6 scs. (6)
Stub Round 2 :
Sc in each st. (6)
Info :
Finish off with long tail for sewing. Stuff with yarn ends. To attach: Sew one end of your magnet pair, or one side of the velcro to the stub. Hold the stub inside the opening so the flap will match up. Sew the stub to the floor of the inside of the log and the other side of the magnet/velcro to the flap. If desired, attach a ch-6 loop to bottom of flap to grab and open the log.
— Branch Stumps :
Info :
Make 3; use 3.75mm hook. Begin working in joined rounds.
Start with Tan Round 1 :
Magic circle with 6 scs. Join with sl st. (6)
Start with Tan Round 2 :
Ch 1. Inc in each st. (12) Join with sl st and finish off.
Change to Brown Step 3 :
Sl st loosely in each st. Sl st in BLO of first st. Ch 1. (12)
Change to Brown Step 4 :
In BLO: Sc in same st as joining, and each st around. (12) Begin working in continuous rounds. 5-8: Sc in each st for 4 rows. (12) 9. Sl st in next st, ch 1, turn. Beginning in the next st: Sc x6, sl st. Leave remaining sts unworked. 10. Ch 1, turn. Beginning in the next st: (Sc, inc) x2, sc, sl st. (6)
Info :
Finish off with a long tail for sewing. Stuff.
— Attaching the Branch Stumps :
Info :
Begin by pinning the stumps onto the log. Position two stumps towards the bottom of the log on each side for stability and one stump near the top front for appearance. Make sure all stumps point in the same direction for a natural look. Whip stitch in place, adding a bit more stuffing before closing. Finish off and weave in ends.
— Pond/Pool :
Info :
Materials: Worsted Weight Yarn - Light Blue and Green (Bernat Super Value in Cool Blue and Kelly). 3.75mm crochet hook. Scissors, yarn needle.
Instruction Note :
At the end of each row, ch 1 and turn. The chain does not count as a st.
Round 1 :
With Blue: Magic circle with 3 scs (3)
Round 2 :
Inc in each st (6)
Round 3 :
(Sc, inc) x3 (9)
Round 4 :
(Sc x2, inc) x3 (12)
Round 5 :
(Sc x3, inc) x3 (15)
Round 6 :
Sc x2, inc, (sc x4, inc) x2, sc x2 (18)
Round 7 :
(Inc, sc x5) x3 (21)
Round 8 :
Sc x3, inc, (sc x6, inc) x2, sc x3 (24)
Round 9 :
(Sc x7, inc) x3 (27)
Round 10 :
Sc x4, inc, (sc x8, inc) x2, sc x4 (30)
Round 11 :
(Inc, sc x9) x3 (33)
Round 12 :
Sc x5, inc, (sc x10, inc) x2, sc x5 (36)
Round 13 :
(Sc x11, inc) x3 (39)
Round 14 :
Sc x6, inc, (sc x12, inc) x2, sc x6 (42)
Round 15 :
(Inc, sc x13) x3 (45)
Round 16 :
Sc x7, inc, (sc x14, inc) x2, sc x7 (48)
Round 17 :
(Sc x15, inc) x3 (51)
Round 18 :
Sc x8, inc, (sc x16, inc) x2, sc x8 (54)
Round 19 :
(Inc, sc x17) x3 (57)
Round 20 :
Sc x9, inc, (sc x18, inc) x2, sc x9. Ch 1, rotate mat clockwise and work along the flat edge. Sc in the same st and in the sides of each row across. Ch 1 and sl st in first st made. Finish off. (about 80 sts made + 1 ch at each corner)
Round 21 :
Turn mat over and join green with sc in same corner. Sc across flat edge. At corner, sc, ch 1, sc in same st. Rotate mat clockwise and work the following all around the curved edge of the mat: (Ch 3, sc x2) all around the curve until you get to the corner. Sl st to join.
Info :
If your stitches don't come out exactly even, ease the last few sts of the pattern to fit. Finish off and weave in all ends.
— Embellishments :
Info :
Materials: Crochet thread, embroidery floss, or fingering weight yarn (green, red, black, yellow). 2mm crochet hook for embellishments. Scissors, yarn needle. Optional waterproof fabric glue.
Butterflies - Make 2 :
Start with yellow: Magic circle with: Sc, dc, sc, sl st, (sc, tr x2, sc, sl st) x2, sc, dc, sc, sl st. Sl st in first st and finish off with long tail for sewing. Pull circle closed, weave in starting tail. With black: thread a 24" piece of black thread onto your yarn needle and feed down through top center of wings to form antennas. Sew through wings and wrap black yarn to create body. Tie and trim. Use yellow tail to sew butterflies in place or glue as desired.
Ladybugs - Make 3 :
Start with red: Magic circle with 6 scs. Join with sl st to first st. Keep long red tail for sewing and change to black for spots. Ch 1. Sc in same st and next st. Finish off with long tail for sewing. Thread the tail onto the yarn needle and sew through the base of the 2nd black st from front to back. Use tail to make dots or French knots for ladybug spots. Weave in tail and clip. Use long red tail to sew ladybug in place on log or pond.
Lily Pads - Make 3 :
With Green: Magic circle with 6 scs. Do not join. Ch 1, turn. (6) 2. Increase in each st. Do not join. Ch 1, turn. (12) 3. (Sc, inc) x6. Do not join. Ch 1, turn. (18) Finish off with long end for sewing. Pull magic circle closed and weave starting tail into the back. Position and sew into place or glue.
Vine :
With green begin with a long starting tail. Ch 15. Sl st in 2nd ch from hook. In next chains, sc, hdc x2, sc, sl st. Rotate the piece and work on the opposite side of the leaf in the free loops of the foundation chain: Sl st, sc, hdc x2, sc, sl st in end and in the BLO in the first st on the other side. Ch 1. Repeat until vine is desired length. Mine was about 18" and had 17 leaves. Finish with long tail and tack down ends on the log or underside. Test length and adjust before tacking down so vine isn't too floppy.
— Final Assembly and Finishing :
Info :
Sew frogs onto the log, pond, and stumps as desired. Pin all parts before sewing to ensure correct placement. Use whip stitches to attach legs to body, sew eyes or embroider as chosen, and attach embellishments (butterflies, ladybugs, lily pads, vine) with sewing or fabric glue. Hide all ends inside bodies and weaver in tails. Place frogs inside log for storage.
This Frog Play Set is a delightful, hands-on project that combines small amigurumi frogs with a clever storage log and a cozy pond mat. It makes a charming handmade gift or a lovely addition to nursery playtime and imaginative scenes. Enjoy mixing colors, expressions, and tiny accessories to make each set uniquely yours. 🐸🧶