🧢 Beautiful ✨ Detailed πŸ’ Adorable

Fox Booties Pattern

Fox Booties Pattern
4.9β˜… Rating
5-7 Hours Time Needed
3.1K Made This
βœ‚οΈ

Intermediate Level

Ideal for those with basic crochet experience, featuring slightly more advanced stitches and techniques to expand your skills.

⏱️

Weekend Treat

Takes 5-7 hours, making it an enjoyable project to finish over a couple of days.

πŸ‘•

Casual Chic

Relaxed style with a modern twist, perfect for everyday wear while maintaining that handcrafted uniqueness.

About This Fox Booties Pattern

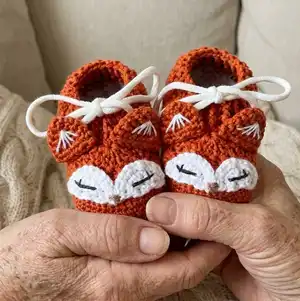
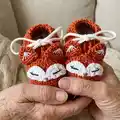
This pattern creates a pair of charming fox-themed baby booties in three baby sizes (0-3, 3-6, 6-9 months). It includes full instructions for soles, sidepieces, toes, uppers, ears, embroidered sleeping eyes and assembly. The design uses simple shaping and post stitches to give a neat shaped upper and cute facial details.

Fox Booties Pattern crochet pattern - detailed view of completed project

Worked in cotton yarn with a small hook for a firm fabric, the pattern is ideal for gifting or newborn photos. Step-by-step photos and stitch counts for each size are provided throughout.

Why You'll Love This Fox Booties Pattern

I absolutely love this pattern because it combines playful detail with practical construction, making it both beautiful and wearable. The fox face is sweet but simple, and the post-stitch upper gives a polished look. I enjoy that the pattern includes multiple sizes so you can make the perfect fit for a baby. Sewing the tiny ears and embroidering the sleepy eyes is a relaxing finish that adds so much personality.

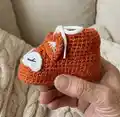
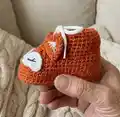
Fox Booties Pattern step 1 - construction progress Fox Booties Pattern step 2 - assembly progress Fox Booties Pattern step 3 - details and accessories Fox Booties Pattern step 4 - final assembly and finishing

Switch Things Up

I love how easy it is to customize these booties by changing colors β€” try soft pastels for a gentle baby palette or bright orange with cream details for playful contrast.

You can change yarn weight and hook size to make larger or smaller versions; bulky yarn and a larger hook will make a chunky, cozy slipper.

I often switch the shoelaces for thin ribbon for a dressier look, or use small leather cords for a rustic finish.

For non-slip soles, sew on small silicone dots or make a thin felt sole and glue or sew it to the bottom for extra grip.

Embroider different eye expressions β€” open eyes, winking or tiny stars β€” to give each pair its own personality.

Make matching accessories like a tiny hat or mittens in the same yarn for a coordinated newborn set.

Try placing the ears slightly angled or closer together to subtly change the fox character and silhouette.

Use variegated or speckled yarn for the main color to create interesting, unique surface texture without changing stitches.

For a more durable pair, reinforce the toe with a second round of stitches or a slipstitch ridge to prevent wear from tiny feet.

I sometimes add tiny buttons or appliques to the sides for a playful accent β€” just make sure they are sewn on securely for baby safety.

Common Mistakes & How to Fix Them

βœ— Not checking gauge; you may end up with booties that are too large or too small, so measure gauge and adjust hook size accordingly. βœ— Skipping stitch markers during rounds; place a marker at the BOR to avoid losing track of the beginning of each round during edging. βœ— Forgetting to measure the baby's foot before starting; always measure the foot and compare to the size chart to ensure proper fit. βœ— Pulling tension too tight on the sole or upper; keep a consistent, moderate tension to retain stretch and comfort while maintaining shape.

Fox Booties Pattern

Make adorable fox baby booties with this detailed crochet pattern. You will love the cozy fit and sweet fox face details that make these perfect for gifting. The instructions guide you through soles, sidepieces, toes, uppers, ears and embroidered eyes step by step. Suitable for intermediate crocheters who want a charming handmade pair.

Intermediate 5-7 Hours

Materials Needed for Fox Booties Pattern

β€” Main Fabric

  • 01
    Vita Lily 100% mercerized cotton, 1.75oz (50g) / 137 yds (125m) - Main color (orange) 1 hank
  • 02
    Contrasting color (white) - approximately 40 yds (30m) for details
  • 03
    Suggested substitute yarn: Scheepjes Catona (cotton), Schachenmayr Catania, Patons Grace - match proportions
  • 04
    Shoelaces: 55 cm macrame cord 100% polyester, 3-4mm (or small ribbon for ties)

β€” Tools Required

  • 01
    Crochet hook C/2 (2.75mm) or B/1 (2.25mm) - pattern suggests 2.5mm or 2mm equivalent (use size to obtain gauge)
  • 02
    Scissors
  • 03
    Tapestry needle or smaller crochet hook for sewing and weaving ends
  • 04
    Stitch marker
  • 05
    Measuring tape to check foot length and gauge

Progress Tracker

0% Complete

β€” Notes :

Infos :

! Number of stitches is provided below according to the size as follows: 0-3months / 3-6 months / 6-9 months. ch 19 / 22 / 25. 0-3 months – foot length approx 3.5”(9 cm). 3-6 months – foot length approx 3.9”(10 cm). 6-9 months – foot length approx 4.3”(11 cm). ! Measure the baby's foot for better fit.

β€” Sole :

Round 1 :

With CC ch 19/22/25. 2dc in the 4th st from the hook, dc in next 14/17/20 sts, 6dc in the last st, cont to work along the opposite side of the chain, dc in next 14/17/20 sts, 3dc in the last st (pic.3). Finish with sl st in ch (pic.4). (40/46/52 sts).

Round 2 :

ch1 (do not count as st), 2sc in the same st, sc in next st (pic.5), 2sc in next st, sc in next 5 sts, hdc in next 2 sts, dc in next 7/10/13 sts, 2dc in each of next 6 st, dc in next 7/10/13 sts, hdc in next 2 sts, sc in next 5 sts, 2sc in next st, sc in next st, 2 sc in the last st. Finish with sl st in 1st sc. (pic.6) (50/56/62 sts).

Round 3 :

ch3 (counts as 1 dc), dc in the same st, [dc in next st, 2dc in next st] 2 times, dc in next 14/17/20 sts, [2dc in next st, dc in next st ] 6 times, dc in next 14/17/20 sts, 2dc in next st, [dc in next st, 2dc in next st] 2 times. Finish with sl st in ch. (pic.7). (62/68/74 sts). Fasten off and cut yarn. The sole is ready.

β€” Sidepiece :

Round 1 :

With MC cont to work starting from BOR with RS facing you, sc, inserting the hook not in the st but under the post of dc of the previous rnd of the sole. RS is inside the bootie. Work as follows: ch1 (counts as sc), sc in next 61/67/73 post of dc. Finish with sl st in ch. (62/68/74 sts)

Round 2 :

ch2 (do not counts as st), dc in next 62/68/74 sts. Finish with sl st in 1st dc. (62/68/74 sts)

Round 3-4 :

ch1 (do not counts as st), sc in every sts. Finish with sl st in 1st sc. (62/68/74 sts). Fasten off and cut yarn. The sidepiece is ready. *If the baby's foot is roly poly or has a high arches, I recommend repeat round 3 1-2 more times to make higher sidepiece.

β€” Toe :

Row 1 (RS) :

Join yarn at 16th/17th/18th st from the BOR, ch2, dc in next st, [dc2tog 15/17/19 times].

Row 2 (WS) :

ch2, turn, dc in next st, [dc2tog 7/8/9 times].

Row 3 (RS) :

ch 2, turn, dc7tog/ dc8tog/ dc9tog. Do not cut yarn. Toe is ready.

β€” The upper part :

Round 1 :

Continue to work with wrong rounds. Ch 2 (counts as 1 dc), turn, dc 5 in horizontal sts of the toe (pic. 20). Work DC's along the whole length until we reach the opposite side toe, dc 6 in horizontal sts of the toe (pic. 22). Finish with sl st post ch. (42/44/48 sts).

Round 2-4 :

Work all next rnds alternating bpdc and fpdc. Ch2 (counts as 1 dc), *bpdc in next st, fpdc in next st; rep from *, round ending with bpdc. (42/44/48 sts). Finish with sl st post ch. Fasten off, cut yarn, weave in all tails. Optionally, you can make another of the same round for size 11cm.

β€” Ears (Make 4) :

Info :

Ears are worked in a continuous spiral with main color. Do not join in the rnd, just work sc in the next st. Place marker or use contrasting color yarn to mark BOR.

Round 1 :

6 sc in magic ring (6)

Round 2 :

[inc, sc 1] * 3 (9)

Round 3 :

[inc, sc 2] * 3 (12)

Round 4 :

[inc, sc 5] * 2 (14)

Round 5 :

[inc, sc 6] * 2 (16)

Info :

Fold the ear in half and sc 7 sts along the edge, by connecting opposite sts. Fasten off. Leave a long tail for sewing. Make embroidery CC yarn as shown in the pic.29. Pic. 30-31 shows how to imperceptibly weave the ends.

β€” Eyes (Make 4) :

Info :

With contrasting color working in rows.

Row 1 :

3 sc in magic ring, ch 1, turn (3)

Row 2 :

[inc] * 3, ch 1, turn (6)

Row 3 :

[inc, sc 1] * 3, ch 1, turn (9)

Row 4 :

[inc, sc 2] * 3 (12)

Info :

Fasten off. Leave a long tail for sewing. Make embroidery of sleeping eyes according to the scheme (pic.34-38). The eyes are ready.

β€” Assembly :

Info :

Sew the eyes to the booties as shown in the pic. 39. Now embroider the nose in brown or black. (pic. 40-41). Sew the ears to the booties (pic. 42-43)

Info :

Using a crochet hook, insert the shoelaces into the last rnd, weaving the shoelaces around the upper part.

Assembly Instructions

  • Sew the embroidered eyes to the front of the bootie as shown in picture 39, positioning them symmetrically over the toe shaping and secure with a few stitches.
  • Embroider the nose using brown or black yarn in the center above the white eye pieces (refer to pics 40-41), knot and weave in ends securely.
  • Sew the ears to the top front of the bootie (pics 42-43), spacing them evenly and securing with small invisible stitches through the base of each ear.
  • Insert the shoelaces into the last round with a crochet hook, weaving the laces through the stitches around the upper part to create ties (pics 44-46).

Important Notes

  • πŸ’‘Check your gauge before starting: 26 dc x 13 rows = 4" (10cm) to ensure the correct finished size.
  • πŸ’‘Measure the baby’s foot and compare to the size chart (0-3, 3-6, 6-9 months) for the best fit before sewing parts together.
  • πŸ’‘Use a stitch marker to mark the BOR when working in a spiral or when instructed to avoid losing your place.

These fox booties are a delightful little project that makes a perfect new-baby gift or photo prop. The pattern includes clear instructions for soles, uppers, ears, eyes and assembly to guide you every step of the way. Give a handmade touch that will be treasuredβ€”happy crocheting! 🧢🦊

You ask,

we answer.

FAQs

What sizes are included in this pattern?

The pattern includes three baby sizes: 0-3 months (ch 19), 3-6 months (ch 22) and 6-9 months (ch 25) with approximate foot lengths listed in the notes.

What yarn and hook do I need to match the pattern?

Use Vita Lily 100% mercerized cotton (50g/137 yds) or similar cotton (Scheepjes Catona, Catania, Patons Grace). Use crochet hook C/2 or B/1 (~2.5mm or 2mm) or adjust to obtain gauge.

Is this pattern suitable for beginners?

This pattern is rated intermediate because it uses post stitches, shaping and small embroidery details; some stitch experience is recommended.

How long will it take to make a pair?

Most crocheters will finish a pair in approximately 5-7 hours, depending on experience and how many finishing details you add.