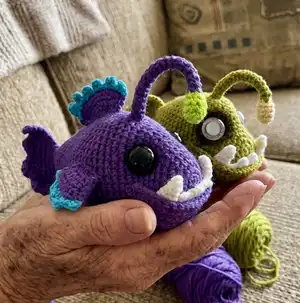
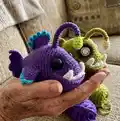
Make your own adorable angler fish amigurumi with clear step-by-step instructions and helpful photos. This pattern guides you through crocheting the head, body, fins, teeth, and light with color-change details. Perfect for gifting or adding a quirky handmade friend to your collection. Follow the assembly tips to create a polished finished piece.
Progress Tracker
0% Complete
— Fish Head and Body :
Info :
Crocheted from front to back. With Color A:
Round 1 :
Make 6 sc into a magic ring = 6
Round 2 :
Increase in each st around = 12
Round 3 :
(sc, inc) x 6 = 18
Round 4 :
(2 sc, inc) x 6 = 24
Round 5 :
(3 sc, inc) x 6 = 30
Round 6 :
sc in each st around
Round 7 :
(inc, sc) x 3, 24 sc = 33
Round 8 :
sc in each st around
Round 9 :
(inc, 2 sc) x 3, 24 sc = 36
Round 10 :
sc in each st around
Round 11 :
(inc, 3 sc) x 3, 24 sc = 39
Info :
Place eyes between rounds 10 and 11, leaving 10 holes between them. 1st Eye is placed 1 hole before the 1st increase. Count 11 holes after the first eye and place the 2nd eye. If you want the sunken eye look, do not place the backs of the eyes on until round 21. TIP! You may need to adjust eye placement depending on yarn you use.
Round 12 :
sc in each st around
Round 13 :
(inc, 4 sc) x 3, 24 sc = 42
Round 14-18 :
sc in each st around
Round 19 :
(dec, 12 sc) x 3 = 39
Round 20 :
(dec, 11 sc) x 3 = 36
Round 21 :
sc in each st around
Info :
Now for the eyes. Stuff the head well. Cut a long piece of yarn and remove the eyes. Place the needle in the hole where the first eye was and thread the needle into a hole next to the eye hole. Go back and forth between each eye hole repeating the process from the first eye. Pull slightly on the yarn after going through each hole. Do this about 3 times on each side until you reach the look you want. Follow the pictures for help. There is also a youtube video for extra help: https://www.youtube.com/watch?v=9XoBnTY6k70&t=55s To place the backs of the eyes you will need to remove most of the stuffing to place the washers on the eyes then re-stuff it.
— Fish Head and Body Continued :
Round 22 :
(dec, 10 sc) x 3 = 33
Round 23 :
(dec, 9 sc) x 3 = 30
Round 24-26 :
sc in each st around
Round 27 :
(3 sc, dec) x 6 = 24
Round 28-30 :
sc in each st around
Round 31 :
(2 sc, dec) x 6 = 18
Round 32-33 :
sc in each st around
Round 34 :
(sc, dec) x 6 = 12
Round 35 :
sc in each st around
Info :
Now you are making the tail: Fold the opening half. Sc the opening closed.
Tail Step 1 :
Ch 1, turn, sc across
Tail Step 2 :
Ch 1, turn, inc, 4 sc, inc = 8
Tail Step 3 :
Ch 1, turn, inc, 6 sc, inc = 10
Tail Step 4 :
Ch 1, turn, sc across
Tail Step 5 :
Ch 1, turn, inc, 8 sc, inc = 12
Tail Step 6 :
Ch 1, turn, inc, 10 sc, inc = 14
Tail Step 7 :
Ch 1, turn, inc, 12 sc, inc = 16
Tail Step 8 :
Ch 5, sc in 2nd ch from hook, hdc in next ch, dc in next ch, tr in last ch, Sl st in same st, 4 sc
Tail Step 9 :
Ch 3, sc in 2nd ch from hook, hdc in next ch, Sl st in same st, 4 sc
Tail Step 10 :
Ch 5, sc in 2nd ch from hook, hdc in next ch, dc in next ch, tr in last ch, Sl st in same st, 4 sc
Tail Step 11 :
Ch 4, sc in 2nd ch from hook, hdc in next ch, dc in last ch, Sl st in same st, 3 sc
Tail Step 12 :
F/O and weave in the tail end
— Teeth (Make 2) :
Round 1 :
Make 3 sc into a magic ring = 3
Round 3 :
sc in each st around
Round 4 :
(inc, sc) x 2 = 6
Info :
Do not stuff the teeth
Round 5-6 :
sc in each st around
Round 7 :
Sc the opening closed. F/O and leave a long tail for sewing
— Front Teeth :
Round 1 :
Sc in 2nd ch from hook and across = 7
Round 2 :
*Ch 3, turn, sl st in same st, sc in next 2 st* Repeat from * to * across
Info :
F/O and leave a long tail for sewing
— Mouth :
Info :
With Color A: Ch 11
Round 1 :
sc in 2nd ch from hook and across = 10
Round 2 :
Ch 1, turn, Inc, 8 sc, inc = 12
Round 3 :
Ch 1, turn, inc, 10 sc, inc = 14
Round 4 :
Ch 1, turn, inc, 12 sc, inc = 16
Round 5 :
Ch 1, turn, inc, 14 sc, inc = 18
Round 6 :
Ch 1, turn, inc, 16 sc, inc = 20
Round 7 :
Ch 1, turn, inc, 18 sc, inc = 22
Round 8 :
Ch 1, turn, inc, 20 sc, inc = 24
Round 9 :
Ch 1, turn, inc, 22 sc, inc = 26
Round 10 :
Ch 1, turn, BLO sc in each st across, sc around the rest of the edges of the mouth. This will give the finished piece a cleaner look.
Info :
F/O and leave an extra long tail for sewing
— Side Fins (Make 2) :
Info :
Starting with Color A: Leave a long tail at the beginning of the ch 5 for sewing. Ch 5
Round 1 :
sc in 2nd ch from hook and across = 4
Round 2 :
Ch 1, turn, inc, 2 sc, inc = 6
Round 3 :
Ch 1, turn, sc in each st across
Round 4 :
Ch 1, turn, inc, 4 sc, inc = 8
Round 5 :
Ch 1, turn, sc in each st across
Info :
Sc around all the edges to give a cleaner look. Change to Color D:
Round 6 :
*Ch 3, sl st in same st, sc in next 2 st* repeat from * to * across
Info :
F/O and weave in the tail ends
— Top Fin Version #1 :
Info :
Starting with Color A: Leave a long tail at the beginning of the ch 9 for sewing. Ch 9
Round 1 :
sc in 2nd ch from hook and across = 8
Round 2 :
Ch 1, turn, inc, 6 sc, inc = 10
Round 3 :
Ch 1, turn, inc, 8 sc, inc = 12
Round 4 :
Ch 1, turn, sc in each st across
Info :
Sc around the side edge, bottom of the fin, and opposite side of the fin. Change to Color D:
Round 5 :
*Ch 5, sl st in same st, sc in next 2 st* Repeat from * to * across
Info :
F/O and weave in the tail end
— Top Fin Version #2 :
Info :
With Black or color of choice: Ch 9
Round 1 :
sl in 2nd ch from hook and across = 8
Round 2 :
BLO Ch 1, turn, 5 sc
Round 3 :
BLO Ch 1, turn, 5 sc
Round 4 :
BLO Ch 1, turn, 5 sc, Ch 4, sl st in 2nd ch from hook and next 2 chains
Round 5 :
BLO Ch 1, turn, 4 sc
Round 6 :
BLO Ch 1, turn, 4 sc
Round 7 :
BLO Ch 1, turn, 4 sc, Ch 2, sl st in 2nd ch from hook
Round 8 :
BLO Ch 1, turn, 3 sc
Round 9 :
BLO Ch 1, turn, 3 sc
Round 10 :
BLO Ch 1, turn dec, sc
Round 11 :
BLO Ch 1, turn, dec
Info :
F/O and leave a long tail for sewing
— Light :
Info :
Starting with Color B:
Round 1 :
Make 4 sc into a magic ring = 4
Round 2 :
Increase in each st around = 8
Round 3 :
sc in each st around
Round 4 :
(2 sc, dec) x 2 = 6
Round 5 :
(sc, dec) x 2 = 4
Info :
I used pipe cleaner to stuff the light piece. That way it could be posable.
Round 6-21 :
Change to Color A: sc in each st around
Info :
F/O and leave a long tail for sewing
This adorable Erebus angler fish pattern brings a whimsical underwater friend to life with playful details and a posable light. Make one in bright colors or spooky tones—each version is unique and full of personality. Share your creation and spread handmade joy! 🧶🐟✨