🧶 Beautiful ✨ Detailed 💝 Adorable

Forest Friends Amigurumi Pattern

Forest Friends Amigurumi Pattern
4.9★ Rating
12-15 Hours Time Needed
1.8K Made This
✂️

Intermediate Level

Ideal for those with basic crochet experience, featuring slightly more advanced stitches and techniques to expand your skills.

⏱️

Multi-Day Project

A rewarding 12+ hour journey—perfect for dedicated crafters who love detailed work.

🧸

Cute Companion

An adorable friend to cherish, handcrafted with love to bring comfort and joy for years to come.

About This Forest Friends Amigurumi Pattern

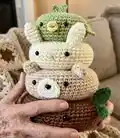
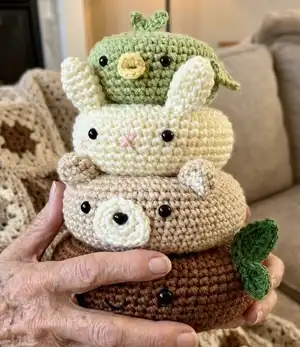
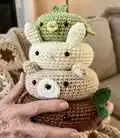
This pattern creates a set of four stacked donut-shaped amigurumi friends: a birdie, bunny, bear and tree. Each piece is worked in the round and finished with safety eyes and small sewn details. The designs are compact and perfect for displaying as a stack or giving as gifts.

Forest Friends Amigurumi Pattern crochet pattern - detailed view of completed project

You'll find detailed row-by-row instructions, material recommendations, and step photos to guide you. A pom-pom tutorial for the bunny tail and leaf instructions for the tree are also included.

Why You'll Love This Forest Friends Amigurumi Pattern

I absolutely love this pattern because it combines simple shapes with charming details to create whimsical friends you can stack and play with. I enjoy how each character is built from the same donut base, allowing you to practice consistent shaping while producing distinct personalities. I find the small accessories—like the birdie beak and tree leaves—especially satisfying to make because they bring the whole set to life. I also love that this design is a great way to use scraps of yarn and try different color combinations.

Forest Friends Amigurumi Pattern step 1 - construction progress Forest Friends Amigurumi Pattern step 2 - assembly progress Forest Friends Amigurumi Pattern step 3 - details and accessories Forest Friends Amigurumi Pattern step 4 - final assembly and finishing

Switch Things Up

I love changing colors to give each friend a different personality; try pastel palettes for a soft nursery set or rich jewel tones for a bold display.

You can change the finished size easily by swapping yarn weight and hook size; bulky yarn with a larger hook will create chunky, cuddle-ready donuts while sport or DK weight yields delicate, smaller versions.

I sometimes swap safety eyes for embroidered eyes for a softer, baby-safe toy—this also allows more expressive placement and shapes.

Try adding tiny crocheted accessories like a mini scarf for the bear, a tiny hat for the birdie, or a felt blush for the bunny for extra charm.

Instead of sewing the donuts closed, you can sew a removable felt circle inside so the stuffing can be adjusted or replaced later.

I also experiment with textured stitches on the outer rounds to create subtle ridges or ridged bark effects for the tree for more visual interest.

If you want posable ears, add a small piece of wire inside the ear before closing; this helps the ears stay in a desired shape.

Make a whole collection by mixing neutrals with one accent color so they look cohesive when stacked together on a shelf.

Turn a single donut into a keychain or ornament by using thinner yarn and adding a metal keyring or small loop at the top while crocheting.

I often embroider small facial expressions to vary moods across the set—experiment with eye shapes and mouth placement until you find the look you love.

Common Mistakes & How to Fix Them

✗ Skipping stitch markers when working in a continuous spiral can make it hard to know where rounds start; place a marker at the first stitch of each round to keep track. ✗ Forgetting to attach safety eyes before stuffing can make positioning difficult; place and secure safety eyes between the rounds specified in the pattern before closing the donut. ✗ Overstuffing the donut shapes can distort their round profile and make sewing edges awkward; stuff gradually and only as firmly as necessary to keep the shape smooth. ✗ Not counting stitches after increases or decreases causes uneven shaping and mismatched stitch counts; count your stitches at the end of rounds where you increase or decrease to confirm accuracy. ✗ Tight decreases or pulling yarn too hard when sewing pieces together can pucker seams; use moderate tension and check placement by pinning parts before stitching.

Forest Friends Amigurumi Pattern

Make a stack of adorable forest friends with this complete amigurumi pattern. You will crochet donut-shaped bodies for a birdie, bunny, bear and tree, then add tiny features and accessories. The pattern includes clear round-by-round instructions, tips for finishing, and a pom-pom tutorial for the bunny tail. Perfect for gifting or creating a cute shelf display.

Intermediate 12-15 Hours

Materials Needed for Forest Friends Amigurumi Pattern

— Main Fabric

  • 01
    Worsted weight yarn (#4), Vanna's Choice recommended (main colors for each piece)
  • 02
    Vanna's Choice 'sweet pea' - used for Birdie body (suggested)
  • 03
    Vanna's Choice 'duckie' - used for Birdie beak (suggested)
  • 04
    Vanna's Choice 'lamb' - used for Bunny body and Bear snout inner color (suggested)
  • 05
    Vanna's Choice 'pink' - used for Bunny nose (suggested)
  • 06
    Vanna's Choice 'beige' - used for Bear body (suggested)
  • 07
    Vanna's Choice 'chocolate' - used for Tree / base donut (suggested)
  • 08
    Vanna's Choice 'kelly green' - used for Tree leaves (suggested)
  • 09
    Use yarn colours of your choice; quantities depend on how many pieces you make and yarn brand

— Tools Required

  • 01
    Crochet hook size 4.25 mm (recommended)
  • 02
    Crochet hook appropriate to your chosen yarn (as needed)
  • 03
    Tapestry needle for sewing and weaving ends
  • 04
    Polyester stuffing (fiberfill, polyfill, etc.)
  • 05
    Safety eyes: 7.5 mm for Birdie (2), 8 mm for Bunny (2), 9 mm for Bear (2), 10.5 mm for Tree (2)
  • 06
    12 mm safety nose for Bear snout (1)
  • 07
    Scissors
  • 08
    Stitch markers (optional but recommended)
  • 09
    Pins for assembly (optional)

Progress Tracker

0% Complete

— Tips :

Info :

Most pieces begin with a "ring". I always use the "magic ring" method as I think this achieves the nicest look.

Info :

When decreasing, I prefer to skip a stitch rather than single crocheting two stitches together - this type of decrease appears more seamless.

Info :

Amigurumi pieces are created by working in one continuous spiral. Mark the last stitch of each round to keep track of where you are.

— Starting Your Donut :

Info :

Ensure that your chain is not twisted when starting the donut.

— Closing Your Donut :

Info :

Fold your work so that the bottom circle aligns with the top circle.

Info :

Start sewing them together. Go through one stitch at bottom and one stitch at the top.

Info :

Sew approximately 10% of the way then start stuffing. From this point forward, sew and stuff the donut as you go.

Info :

Attach safety eyes and face before sewing the donut shut completely.

— Birdie :

Info :

Materials: 7.5 mm safety eyes (placed between R8 and R9). Vanna's Choice yarn: "sweet pea" and "duckie" (beak). In all pieces, fasten off at the end and leave tail for sewing.

Round 1 :

ch 20

Round 2 :

sc 20

Round 3 :

* sc 1, inc 1 * - repeat 10 times (30 st)

Round 4 :

sc 30

Round 5 :

* sc 2, inc 1 * - repeat 10 times (40 st)

Round 6-15 :

sc 40

Round 16 :

* sc 2, dec 1 * - repeat 10 times (30 st)

Round 17 :

sc 30

Round 18 :

* sc 1, dec 1 * - repeat 10 times (20 st)

Round 19 :

sc 20

Birdie Beak :

Create a magic loop with 10 sc

Birdie Wings (make two) :

ch 5. starting at 2nd chain from hook: sc, dc, dc, sc. on the other side of the chain: sc, dc, dc, sc

Birdie Hair :

ch 4, starting at 2nd chain from hook: slst 3. ch 3, starting at 2nd chain from hook: slst 3

Birdie Tail :

ch 5, starting at 2nd loop from hook: slst 4. ch 5, starting at 2nd loop from hook: slst 5. ch 5, starting at 2nd loop from hook: slst 5

— Bunny :

Info :

Materials: 8 mm safety eyes (placed between R10 and R11). Vanna's Choice yarn: "lamb" and "pink" nose. In all pieces, fasten off at the end and leave tail for sewing.

Round 1 :

ch 30

Round 2 :

sc 30

Round 3 :

* sc 2, inc 1 * - repeat 10 times (40 st)

Round 4 :

sc 40

Round 5 :

* sc 3, inc 1 * - repeat 10 times (50 st)

Round 6-17 :

sc 50

Round 18 :

* sc 3, dec 1 * - repeat 10 times (40 st)

Round 19 :

sc 40

Round 20 :

* sc 2, dec 1 * - repeat 10 times (30 st)

Round 21 :

sc 30

Bunny Ears (make two) :

R1 5 sc (magic loop). R2 sc 5. R3 inc 5 (10 st). R4 sc 10. R5 * sc 3, dec 1 * - repeat 2 times (8 st). R6 sc 8. R7 * sc 2, dec 1 * - repeat 2 times (6 st)

Bunny Tail :

Instructions on how to make a pom pom for the bunny's tail can be found on page 9

— Bear :

Info :

Materials: 9 mm safety eyes (placed between R10 and R11). 12 mm safety nose (placed one row below the eyes). Vanna's Choice yarn: "beige" and "lamb" (snout). In all pieces, fasten off at the end and leave tail for sewing.

Round 1 :

ch 40

Round 2 :

sc 40

Round 3 :

* sc 3, inc 1 * - repeat 10 times (50 st)

Round 4 :

sc 50

Round 5 :

* sc 4, inc 1 * - repeat 10 times (60 st)

Round 6-19 :

sc 60

Round 20 :

* sc 4, dec 1 * - repeat 10 times (50 st)

Round 21 :

sc 50

Round 22 :

* sc 3, dec 1 * - repeat 10 times (40 st)

Round 23 :

sc 40

Bear Ears (make two) :

Note in R3 and R4, we switch colours to make the inner ear a different colour. R1 5 sc (magic loop). R2 inc 5 (10 st). R3 sc 10 (make stitches 6 and 7 inner ear colour). R4 sc 10 (make stitches 6, 7 and 8 inner ear colour)

Bear Snout :

R1 6 sc (magic loop). R2 inc 6 (12 st). R3 sc, sc, sc 3 in next sc, sc, sc, sc, sc 3 in next sc, sc, slst

Bear Tail :

R1 5 sc (magic loop). R2 inc 5 (10 st). R3 sc 10. R4 * sc 3, dec 1 * - repeat 2 times (8 st)

— Tree :

Info :

Materials: 10.5 mm safety eyes (placed between R12 and R13). Vanna's Choice yarn: "chocolate" and "kelly green" (leaves). In all pieces, fasten off at the end and leave tail for sewing.

Round 1 :

ch 50

Round 2 :

sc 50

Round 3 :

* sc 4, inc 1 * - repeat 10 times (60 st)

Round 4 :

sc 60

Round 5 :

* sc 5, inc 1 * - repeat 10 times (70 st)

Round 6-21 :

sc 70

Round 22 :

* sc 5, dec 1 * - repeat 10 times (60 st)

Round 23 :

sc 60

Round 24 :

* sc 4, dec 1 * - repeat 10 times (50 st)

Round 25 :

sc 50

Tree Leaves (make two) :

ch 6. on first side of the chain, starting at the 2nd loop from hook: slst, sc, dc, dc, sc. on other side of the chain: sc, dc, dc, sc, sc, slst

— Pom Pom for Tail :

Step 1 :

Wrap yarn around a piece of sturdy paper or cardboard that is 2" wide approximately 12 times.

Step 2 :

Remove the wrapped yarn and tie another piece of yarn around it.

Step 3 :

Pull tight and make a few more knots.

Step 4 :

Cut through all the loops.

Step 5 :

It doesn't look perfect yet!

Step 6 :

Trim the pom pom until it is nice and round.

Step 7 :

Leave tails for sewing onto the bunny's bottom.

Assembly Instructions

  • Fold the donut so the bottom circle aligns with the top circle and start sewing through one stitch on the bottom and one stitch on the top, sewing approximately 10% before beginning to stuff.
  • Attach safety eyes before the donut is fully closed: Birdie eyes go between rounds 8 and 9, Bunny eyes between rounds 10 and 11, Bear eyes between rounds 10 and 11, and Tree eyes between rounds 12 and 13.
  • Sew small features in place before fully closing: attach the birdie beak (magic loop of 10 sc) centered on the face, and sew the bear snout one row below the eyes, securing the 12 mm safety nose.
  • Pin parts in position before sewing: position ears evenly on the head donuts (refer to rounds indicated in each ear section) and sew securely with matching yarn and a tapestry needle.

Important Notes

  • 💡Use the magic ring (magic loop) for a neat, closed center at the start of each donut or small round piece.
  • 💡Work in a continuous spiral for amigurumi and use a stitch marker to mark the start of each round to avoid losing your place.
  • 💡Stuff gradually as you sew the donut closed; sewing about 10% first then stuffing allows you to shape the piece without overstuffing.

Make a stack of handmade forest friends to brighten a shelf or gift box! These donut-shaped amigurumi are playful, quick to customize, and perfect for practicing shaping and small-detail sewing. Share your finished friends or make a whole forest set to collect. 🧶🧸🌲
You ask,

we answer.

FAQs

What size will the finished piece be?

Finished diameters: Birdie 4 inches, Bunny 5 inches, Bear 6 inches, Tree 7 inches; heights are approximately 2 inches based on recommended materials and hook.

Can I use different yarn weights for this pattern?

Yes, you can, but changing yarn weight will affect final size; adjust your hook accordingly and expect the donut diameters and overall height to change.

Do I need prior crochet experience for this pattern?

This pattern is rated intermediate and benefits from familiarity with single crochet, increases, decreases, working in the round and basic finishing techniques.

How long does this project typically take to complete?

Most crafters will spend multiple sessions; the full set is a multi-day project estimated at around 12-15 hours depending on experience and assembly time.