🧢 Beautiful ✨ Detailed πŸ’ Adorable

Christmas Bells Amigurumi Pattern

Christmas Bells Amigurumi Pattern
4.9β˜… Rating
2-4 Hours Time Needed
3.9K Made This
βœ‚οΈ

Intermediate Level

Ideal for those with basic crochet experience, featuring slightly more advanced stitches and techniques to expand your skills.

⏱️

Bite-Sized Project

Finishes in 2-4 hoursβ€”perfect for an afternoon of creative relaxation.

πŸŽ„

Holiday Cheer

Festive fun for the season, bringing handmade magic to celebrations and creating new family traditions.

About This Christmas Bells Amigurumi Pattern

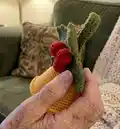
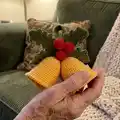
This pattern creates a charming pair of crocheted Christmas bells decorated with holly leaves and berries and a hanging loop. It uses DK weight YarnArt Jeans yarn with simple shaping in continuous spirals and a crab (reverse) stitch edge for a neat finish. You will make two bells, four leaves, three berries and a loop, then assemble them with a tambourine (jingle) inside each bell. Clear step-by-step rounds and helpful photos guide you through every piece.

Christmas Bells Amigurumi Pattern crochet pattern - detailed view of completed project

Perfect for intermediate crocheters who enjoy small holiday projects and giftable decorations. The finished ornament measures roughly 4.7 x 5.1 inches with the loop when made with the suggested materials.

Why You'll Love This Christmas Bells Amigurumi Pattern

I absolutely love this pattern because it transforms simple stitches into a delightful seasonal decoration that feels special and handmade. I enjoy the satisfying shaping of the bells and the neat crab-stitch edge that gives a professional look. The pattern is compact yet rewarding β€” you can finish it in a single afternoon and immediately enjoy displaying it. I also adore how customizable it is: change colors, add beads, or vary the size by using different yarn weights.

Christmas Bells Amigurumi Pattern step 1 - construction progress Christmas Bells Amigurumi Pattern step 2 - assembly progress Christmas Bells Amigurumi Pattern step 3 - details and accessories Christmas Bells Amigurumi Pattern step 4 - final assembly and finishing

Switch Things Up

I love how easy it is to customize these bells β€” I often change the main color to metallic or cream for a different holiday vibe.

I sometimes use a bulkier yarn and a larger hook to make chunky bells that are great for door hangers.

I like to substitute wooden beads or tiny jingle bells for the tambourines when I want a softer sound and lighter weight.

I often embroider veins on the leaves or add a tiny ribbon under the berries to create a vintage look.

I experiment with placement of the berries β€” moving them slightly off-center creates a playful, asymmetrical design.

I sometimes make the bells in sets of three or four and string them together to make a festive garland.

I recommend trying metallic or sparkly yarn for holiday parties β€” it catches the light beautifully on a tree.

I also try color gradients or variegated yarn for the bells to give each piece a unique look and texture.

I occasionally add tiny crocheted bows or a bead at the bell top for extra detail and personalization.

I find assembling a few at once helps me refine placement, so I try different arrangements before sewing anything permanently.

Common Mistakes & How to Fix Them

βœ— Skipping the magic ring or making a loose first round can result in a large hole at the top; always tighten the MR and secure the tail before continuing. βœ— Working with loose tension will cause the stuffing to show through the fabric and distort shapes; maintain firm, consistent tension and check density as you go. βœ— Forgetting to crochet in continuous spirals can create visible seams or misaligned stitches; use a stitch marker to mark round starts and work spirally without turning. βœ— Not stuffing gradually leads to uneven shaping and lumps; add small amounts of stuffing frequently while shaping to keep a smooth form.

Christmas Bells Amigurumi Pattern

Make festive crochet Christmas bells to decorate your home or give as thoughtful handmade gifts. This pattern walks you through crocheting two bells, leaves, berries and a hanging loop with clear step-by-step instructions and photos. You will enjoy simple shaping with single crochet, crab stitch edging, and easy assembly tips to complete a polished ornament. Perfect for adding a handmade touch to your holiday dΓ©cor.

Intermediate 2-4 Hours

Materials Needed for Christmas Bells Amigurumi Pattern

β€” Main Fabric

  • 01
    DK weight yarn - Yarn Art Jeans (55% cotton/45% acrylic; 50 g/160 m)
  • 02
    Yarn Art Jeans No 35 (yellow) - bells (listed on materials page)
  • 03
    YarnArt Jeans No. 03 (yellow) - bells (used in Bells section)
  • 04
    Yarn Art Jeans No 82 (dark green) - leaves
  • 05
    Yarn Art Jeans No 90 (red) - berries
  • 06
    Small amounts of contrasting yarn for hanging thread and details

β€” Tools Required

  • 01
    Crochet hook size 2.25 mm
  • 02
    Smaller crochet hook for pulling thread into tambourine eye (as needed)
  • 03
    Stuffing material (fiberfill/polyester)
  • 04
    Tapestry needle for sewing and tightening holes
  • 05
    Scissors
  • 06
    Stitch marker (a scrap of contrasting yarn)
  • 07
    Tambourine / jingle bells (2 pieces)

Progress Tracker

0% Complete

β€” Bells :

Round 1 :

6 into MR

Round 2 :

6 inc (12)

Round 3 :

(1 sc, inc)*6 (18)

Round 4 :

(2 sc, inc)*6 (24)

Round 5 :

(3 sc, inc)*6 (30)

Round 6-7 :

30 sc (2 rounds)

Round 8 :

(4 sc, inc)*6 (36)

Round 9-14 :

36 sc (6 rounds)

Round 15 :

(5 sc, inc)*6 (42)

Round 16-19 :

42 sc (4 rounds)

Info :

* Crochet the next row with Crab (Reverse) stitch

Round 20 :

42 sc (Crab stitch), 1 sl st

Info :

Break yarn. Pull tightly. Hide the tail inside.

β€” Bell Language :

Info :

Chain 16 with blue yarn. Using a smaller hook, pull the thread into the eye of the bell to grab and pull the thread.

Round 1 :

Start working in the second chain from hook 15 sc

Info :

Break yarn.

β€” Leaf :

Info :

Yarn - YarnArt Jeans No. 82 (dark green)

Round 1 :

Chain 15, crochet to the chain foundation. Start working in the second chain from hook - 13 sc, 3 sc in 1 stitch.

Info :

Continue crocheting on the other side of the chain foundation. - 12 sc, 3 sc in 1 stitch.

Round 2 :

(3 sc, chain 3, 1 sc in the previous stitch)*4, 3 sc, chain 3, 1 sc in the previous stitch, (3 sc, chain 3, 1 sc in the previous stitch)*4, 2 sc, 2 sl st.

Info :

Break yarn, leaving a long tail for sewing.

β€” Berries :

Info :

Yarn - YarnArt Jeans No. 90 (red)

Round 1 :

6 into MR

Round 2 :

6 inc (12)

Round 3-6 :

12 sc (4 rounds)

Info :

Complete stuffing with fiberfill. Tighten the hole using a tapestry needle.

β€” Assembly :

Item 1 (P1) :

Sew four leaves together.

Item 2 (P1) :

Using a needle, remove all the threads from the bell to the back of the sheet and tie them together. We attach the finished language to the bell. Tie all the threads.

Item 3 (P1) :

Tie both bells together.

Item 4 (P1) :

Sew the berries to the center of the leaves and tie all threads securely.

β€” Loop :

Info :

Yarn - YarnArt Jeans No. 82 (dark green)

Round 1 :

Chain 41, turn and continue crocheting on the other side of the chain.

Round 2 :

40 sc, 1 cp, turn

Round 3 :

40 sc

Info :

Cut off the long end of the thread. Use a needle to connect the ends. With the remaining piece of thread, sew the loop to the back of the leaves, thereby hiding all the protruding threads.

Assembly Instructions

  • Sew four leaves together at their bases so they form a cross-shaped leaf cluster, aligning tips symmetrically.
  • Using a needle, pull and remove all internal bell threads to the back of the leaf sheet then tie them together to secure the bells to the leaf cluster.
  • Attach the finished bell language (the short chain inside) to each bell eye and tie all threads; tuck knots and trim excess threads.
  • Sew the three berries to the center of the leaf cluster above the bells, arranging them evenly and securing with multiple passes of the needle.

Important Notes

  • πŸ’‘Yarn consumption, size, and appearance depend on your crochet density and how you hold the yarn; gauge affects final dimensions.
  • πŸ’‘The presented toy is crocheted with V and X look single crochet β€” grab yarn over the hook for the first stitch and under the hook for the second stitch.
  • πŸ’‘Make sure you crochet tight enough; otherwise, the stuffing will show through the holes and distort the bell shape.
  • πŸ’‘Crochet the toy in continuous spirals without turning chains to avoid visible seams and ensure even shaping.
  • πŸ’‘Iron the leaf parts with steam if they are uneven; put a damp cloth on top and steam for a few seconds to even them.

These festive Christmas Bells make a lovely handmade decoration or a thoughtful gift for the holidays. They combine easy amigurumi shaping with classic holiday colors and a cheerful jingle. Display them on your tree, gift packages, or as a bright seasonal accent in your home. πŸŽ„πŸ§Ά

You ask,

we answer.

FAQs

What size will the finished piece be?

The finished ornament measures approximately 4.7 x 5.1 inches with the loop when made with the recommended yarn and hook size.

Can I use different yarn weights for this pattern?

Yes, you can change yarn weight; using a bulkier yarn and larger hook will produce a larger, chunkier bell while thinner yarn with a smaller hook creates a mini bell. Adjust stuffing and tambourine size accordingly.

Do I need prior crochet experience for this pattern?

This pattern is rated intermediate; basic knowledge of single crochet, increases, decreases, working in the round, and simple chain foundation techniques is recommended.

How long does this project typically take to complete?

Most crafters complete this project in 2-4 hours, depending on experience, assembly speed, and how many embellishments you add.