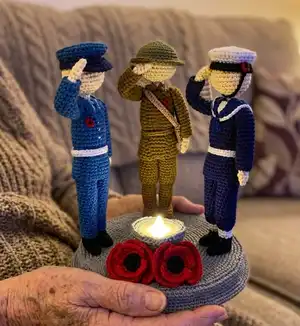
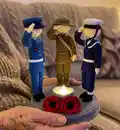
Create a touching trio of crocheted servicemen — Soldier, Sailor and Pilot — perfect for commemorations or meaningful gifts. This pattern walks you through every piece from heads and uniforms to boots, hats and the platform with poppies. You will work in the round with light-weight yarn and small hooks to achieve neat, detailed figures. Follow the clear step-by-step rounds, photos and assembly tips to make a polished, display-ready tribute.
Progress Tracker
0% Complete
— Head and Upper Body :
Row 1 :
6sc in a magic ring with skin color (6)
Row 2 :
inc in every stitch (12)
Row 3 :
*1sc, inc* repeat till end (18)
Row 4 :
*1sc, inc, 1sc* repeat till end (24)
Row 5 :
*3sc, inc* repeat till end (30)
Row 6-10 :
1sc in every stitch (30)
Row 11 :
*3sc, dec* repeat till end (24)
Row 12 :
*1sc, dec, 1sc* repeat till end (18)
Row 13 :
*1sc, dec* repeat till end (12)
Row 15-16 :
1sc in every stitch (6)
Row 17 :
inc in every back loop (12)
Row 18 :
*1sc, inc* repeat till end (18)
Row 19 :
*1sc, inc, 1sc* repeat till end (24)
Row 20 :
*3sc, inc* repeat till end (30)
Row 21 :
5sc, dec twice, 11sc, dec twice, 6sc (26)
Info :
Mark the decrease stitches – they are the shoulders
Row 22-29 :
1sc in every stitch (26)
Row 30 :
1sc, 4 times *2sc, dec, 2sc*, 1sc (22)
Row 31 :
in front loops only: 1sc, 4 times *2sc, inc, 2sc*, 1sc (26)
Info :
Insert a cotton bud into the neck and head till just below the top of the head
Row 33 :
1sc in every stitch (27)
Row 35 :
1sc in every stitch (28)
Row 37 :
1sc in every stitch (29)
— Sleeves and Arms :
Sleeves (make 2) Row 1 :
6sc in a magic ring (6)
Row 2 :
inc in every stitch (12)
Row 3-16 :
1sc in every stitch (12)
Info :
Make 1 sl st in the first stitch. Yarn off. Make the second sleeve the same way. Put aside and make the arms first
Arms (make 2) Row 1 :
6sc in a magic ring with skin color (6)
Row 2-15 :
1sc in every stitch (6)
Row 16 :
*1sc, inc, 1sc* repeat till end (8)
Row 17 :
1sc in every stitch (8)
Info :
Yarn off but leave a long tail. Make the second arm the same way. Pull the arms into the sleeves. Attach the sleeves to the shoulders according to the pictures in the pattern.
— Soldier :
Info :
Make the basic pattern for head and upper body from page 4 in these colors: Row 1-16 with skin color. Row 17-37 with uniform brown.
Boots and legs Row 1 :
Ch8 with brown. Work around the chs now
Row 2 :
start in the second ch from the hook: inc, 5sc, inc twice in the last ch, 5sc, inc (18)
Row 3 :
1sc in every back loop (18)
Row 4 :
6sc, dec 3 times, 6sc (15)
Row 5 :
5sc, dec 3 times, 4sc (12)
Row 6 :
5sc, dec twice, 3sc (10)
Row 7-8 :
1 in every stitch (10)
Row 9 :
1sc, inc, 8sc (11)
Row 10 :
1sc in every stitch (11)
Row 11 :
1sc, inc, 9sc (12)
Row 12-13 :
1sc in every stitch (12)
Row 14 :
1sc, dec twice, 7sc (10)
Row 15 :
in front loops: *1sc, inc* repeat till end (15) with uniform brown
Row 16-23 :
1sc in every stitch (15)
Info :
Mark stitch 1. Yarn off. Stuff the leg. Make the second boot with leg the same with but this time DO NOT yarn off.
Do the following instead to connect the legs Row 24 :
Step 1: 8sc in the SECOND leg. Step 2: 15sc in the FIRST leg (start in the marked stitch). Step 3: 7sc in the remaining stitches of the SECOND LEG. (30sc in total)
Row 25 :
*3sc, dec* repeat till end (24)
Row 26 :
1sc in every stitch (24)
Info :
Make 1 sl st in the first stitch. Yarn off but leave a long tail. Add some more stuffing. Pull the lower part of the soldier’s coat up. Attach the legs to the back loops of row 30 of the coat and make sure the boots are facing the right direction. Pull the lower part of the soldier’s coat down again.
Belt Row 1 :
Ch26 with uniform brown
Row 2 :
start in the second ch from the hook: 1sc in every ch (25)
Info :
Yarn off but leave a long tail. Sew the belt in place around his waist.
Collar Row 1 :
Ch 11 with uniform brown
Row 2 :
start in the second ch from the hook: *1sc, inc* repeat till end (15)
Info :
Yarn off but leave a long tail. Sew the collar in place around the neck with the ends towards the front.
Helmet Row 1 :
6sc in a magic ring (6) with brodie helmet color
Row 2 :
inc in every stitch (12)
Row 3 :
*1sc, inc* repeat till end (18)
Row 4 :
*1sc, inc, 1sc* repeat till end (24)
Row 5 :
*3sc, inc* repeat till end (30)
Row 6 :
*2sc, inc, 2sc* repeat till end (36)
Row 7 :
in front loops only *5sc, inc* repeat till end (42)
Info :
Make 1 sl st in the first stitch. Yarn off but leave a long tail. Use the back loops of row 7 to sew the helmet in place.
Bag Row 1 :
Ch 9 with beige. Work around the chs now
Row 2 :
start in the second ch from the hook: 7sc, inc, 7sc (16)
Row 3-6 :
1sc in every stitch (16)
Row 7 :
8sc, ch1 and turn (8) leave the rest of the stitches unworked
Row 8 :
8sc, ch1 and turn (8) leave the rest of the stitches unworked
Row 9 :
dec, 4sc, dec, ch1 and turn (6)
Row 10 :
dec, 2sc, dec (4)
Info :
Yarn off. Re-attach the yarn on the side. Finish the bag and sew in place according to the pictures.
Info :
Sew a poppy on the chest with red yarn. Sew a dot in the middle of the poppy with black yarn. Sew his right hand in place.
— Sailor :
Info :
Make the basic pattern for head and upper body (from page 4) in these colors: Row 1-16 with skin color. Row 17-37 with navy blue.
Shoes and legs Row 1 :
Ch 8 with black. Work around the chs now
Row 2 :
start in the second ch from the hook: inc, 5sc, inc twice in the last ch, 5sc, inc (18)
Row 3 :
in back loops only 1sc in every stitch (18)
Row 4 :
6sc, dec 3 times, 6sc (15)
Row 5 :
5sc, dec 3 times, 4sc (12)
Row 6 :
5sc, dec twice, 3sc (10)
Row 7 :
1 in every stitch (10)
Row 8 :
in front loops: 1sc in every stitch (10) with white
Row 9-10 :
1sc in every stitch (10)
Row 11 :
in front loops: *1sc, inc* repeat till end (15) with navy blue
Row 12-23 :
1sc in every stitch (15)
Info :
Make 1 sl st in the first stitch and mark the first stitch. Yarn off. Stuff the leg. Make the second shoe and leg the same way but this time DO NOT yarn off. Do the following instead to connect the legs (see next page).
Row 24 :
Step 1: 8sc in the SECOND leg. Step 2: 15sc in the FIRST leg (start in the marked stitch). Step 3: 7sc in the remaining stitches of the SECOND LEG. (30sc in total)
Row 25 :
*3sc, dec* repeat till end (24)
Row 26 :
1sc in every stitch (24)
Row 27 :
*5sc, dec, 5sc* repeat till end (22)
Row 28-30 :
1sc in every stitch (22)
Info :
Make 1sl st in the first stitch. Yarn off but leave a long tail. Add some more stuffing. Pull the lower part of the coat up. Attach the legs to the back loops of row 30 of the coat and make sure the legs are facing the right direction. Pull the lower part of the coat down again.
Belt Row 1 :
Ch 26 with white
Row 2 :
start in the second ch from the hook: 1sc in every ch (25)
Row 4 :
start in the second ch from the hook: 1sc in every ch (8)
Info :
Yarn off but leave a tail. Sew the belt in place.
Collar Row 1 :
ch10 with blue
Row 2 :
start in the second ch from the hook: 1sc in every ch, ch1 and turn (9)
Row 3-6 :
1sc in every stitch, ch1 and turn (9)
Row 7 :
3sc, ch1 and turn (3) leave the rest of the stitches unworked for now
Row 8-10 :
1sc in every stitch, ch1 and turn (3)
Row 11 :
dec, 1sc, ch1 and turn (2)
Row 12-14 :
1sc in every stitch, ch1 and turn (2)
Info :
Yarn off. Attach the same blue yarn to the corner. Start in that corner and repeat row 7-15. Turn the piece so it’s in this direction. With that blue yarn make sc along the outer edge of the collar and make 2 extra sc in every corner. Yarn off. Attach white yarn to the corner. With that white yarn make sc along the outer edge again and make 2 extra sc in every corner. Yarn off. Make the shirt piece first now.
Shirt piece Row 1 :
Ch 3 with white
Row 2 :
start in the second ch from the hook: 1sc in every L, ch1 and turn (2)
Row 3 :
1sc in every stitch, ch1 and turn (2)
Info :
Yarn off but leave a tail. Sew this shirt piece and the collar in place.
— Sailor Hat and Strap :
Hat Row 1 :
6sc in a magic ring with white (6)
Row 2 :
inc in every stitch (12)
Row 3 :
*1sc, inc* repeat till end (18)
Row 4 :
*1sc, inc, 1sc* repeat till end (24)
Row 5 :
*3sc, inc* repeat till end (30)
Row 6 :
*2sc, inc, 2sc* repeat till end (36)
Row 7 :
1sc in every back loop (36) place the cardboard in this crochet piece
Row 8 :
*2sc, dec, 2sc* repeat till end (30)
Row 9 :
1sc in every stitch (30)
Row 10 :
1sc in every front loop (30) with black
Row 11 :
1sc in every stitch (30)
Info :
Make 1 sl st in the first stitch. Yarn off but leave a tail. Sew or glue the hat in place. Sew a poppy on the hat. Sew the right arm in place.
— Pilot :
Info :
Make the basic pattern of head and upper body (from page 4) in these colors: Row 1-16 with skin color. Row 17-37 with blue-grey.
Shoes and legs Row 1 :
Ch 8 with black. Work around the chs now
Row 2 :
start in the second ch from the hook: inc, 5sc, inc twice in the last ch, 5sc, inc (18)
Row 3 :
in back loops only 1sc in every stitch (18)
Row 4 :
6sc, dec 3 times, 6sc (15)
Row 5 :
5sc, dec 3 times, 4sc (12)
Row 6 :
5sc, dec twice, 3sc (10)
Row 7 :
in front loops: 9sc, inc (11) with blue grey
Row 8-9 :
1sc in every stitch (11)
Row 11-12 :
1sc in every stitch (12)
Row 14-16 :
1sc in every stitch (13)
Row 18-21 :
1sc in every stitch (14)
Row 23 :
1sc in every stitch (15)
Info :
Make 1 sl st in the first stitch. Mark stitch 6. Yarn off. Stuff the leg. Make the second leg the same way but DO NOT yarn off this time. Do the following instead to connect the legs:
Row 24 :
Step 1: 14sc in the SECOND leg. Step 2: 15sc in the FIRST leg (start in the marked stitch 6). Step 3: 1sc in the last stitch of the SECOND LEG. (=30sc in total)
Row 25 :
*3sc, dec* repeat till end (24)
Row 26 :
1sc in every stitch (24)
Row 27 :
*5sc, dec, 5sc* repeat till end (22)
Row 28-30 :
1sc in every stitch (22)
Info :
Make 1 sl st in the first stitch. Yarn off but leave a long tail. Add some more stuffing. Pull the lower part of the coat up. Attach the legs to the back loops of row 30 and make sure the shoes are pointing in the right direction. Pull the lower part of the coat down again.
This commemorative set is designed to honor the brave men and women who serve and served. Each figure is crafted with tiny details — hats, collars and poppies — to create a respectful display you can be proud of. Make a full trio or customize a single figure as a heartfelt gift. 🧶🇬🇧✨