🧢 Beautiful ✨ Detailed πŸ’ Adorable

FNAF Bonnie Amigurumi Pattern

FNAF Bonnie Amigurumi Pattern
4.3β˜… Rating
5-7 Hours Time Needed
2.1K Made This
βœ‚οΈ

Intermediate Level

Ideal for those with basic crochet experience, featuring slightly more advanced stitches and techniques to expand your skills.

⏱️

Weekend Treat

Takes 5-7 hours, making it an enjoyable project to finish over a couple of days.

🧸

Cute Companion

An adorable friend to cherish, handcrafted with love to bring comfort and joy for years to come.

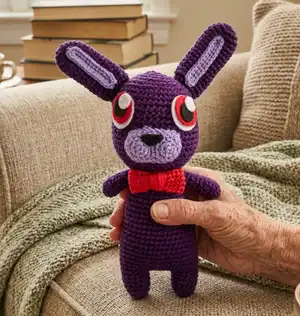
About This FNAF Bonnie Amigurumi Pattern

This pattern creates a plush Bonnie amigurumi inspired by FNAF with clear round-by-round instructions. It includes head, body, legs, arms, ears, eyes, nose and a bow tie with felt accents. The design uses I Love This Cotton yarn and felt for expressive eyes and facial details. Finished piece is a charming handmade collectible.

FNAF Bonnie Amigurumi Pattern crochet pattern - detailed view of completed project

The pattern uses single crochet shaping, increases and decreases for structure. A video tutorial is referenced for making anime-style eyes and finishing techniques.

Why You'll Love This FNAF Bonnie Amigurumi Pattern

I absolutely love this pattern because it brings a beloved character to life with simple but effective shaping. I enjoy how the combination of yarn and felt gives the face lots of expression while keeping construction straightforward. I love adding the bow tie as a fun pop of color and watching the character come together during assembly. This pattern feels rewarding to complete and makes a great gift or shelf companion.

FNAF Bonnie Amigurumi Pattern step 1 - construction progress FNAF Bonnie Amigurumi Pattern step 2 - assembly progress FNAF Bonnie Amigurumi Pattern step 3 - details and accessories FNAF Bonnie Amigurumi Pattern step 4 - final assembly and finishing

Switch Things Up

I love customizing this pattern by changing the yarn colors to suit your room or fandom preferences.

I often make a pastel version for a softer look by swapping the purple for lilac and the red bow for pale pink.

If you want a mini keychain version, use fingering weight yarn and a 2.5mm hook for a tiny, portable Bonnie.

For a chunkier, cuddlier doll, try bulky yarn and a larger hook β€” just remember to scale up your felt eye pieces or substitute safety eyes.

I like to embroider different mouth expressions to give each Bonnie a unique personality, so experiment with smile shapes and eyebrow placement.

Try adding wire inside the arms for a posable character or add a wrapped scarf or removable outfit for variety.

You can also make a set: change the bow tie color and make matching accessories like a tiny guitar or microphone to create themed displays.

I sometimes back the felt eye pieces with a lightweight interfacing for stability when using thinner felt sheets.

Don't be afraid to mix materials β€” a bit of embroidery thread, glossy felt, or yarn with a subtle sheen can add delightful accents.

I recommend testing placement of facial features before permanently sewing so you can tweak spacing to get the perfect expression.

Common Mistakes & How to Fix Them

βœ— Skipping the instruction to keep stitches tight will show stuffing through the fabric; maintain a firm, consistent tension so stuffing does not peek through. βœ— Forgetting to stuff the legs as you go results in floppy legs; stuff incrementally during the rounds to keep shape and firmness. βœ— Not placing the eyes in the recommended rounds can make face placement look odd; place eyes between rounds 13-14 of the head about two inches apart. βœ— Cutting tails too short at the end of the head will make sewing difficult; leave enough yarn to sew into the final six stitches and weave in tails for a secure finish.

FNAF Bonnie Amigurumi Pattern

Make your own plush Bonnie with this detailed amigurumi pattern. You'll get clear step-by-step rounds for the head, body, legs, arms, ears, eyes, nose and bow tie. Perfect for crafters who enjoy character crochet with fun details and felt accents. Follow the instructions to create a cuddly, display-ready Bonnie.

Intermediate 5-7 Hours

Materials Needed for FNAF Bonnie Amigurumi Pattern

β€” Main Fabric

  • 01
    Hobby Lobby 'I Love This Cotton' - Color 252 Purple (main body color, approx 100-150g)
  • 02
    Hobby Lobby 'I Love This Cotton' - Color 250 Amethyst (accent color for muzzle/inner ear, approx 20-30g)
  • 03
    Hobby Lobby 'I Love This Cotton' - Color 60 Red (bow tie and eye detail, approx 10-20g)
  • 04
    Felt sheet - White (for eye highlights and outer eye layer)
  • 05
    Felt sheet - Black (for pupil and nose if desired)
  • 06
    Felt sheet - Pink (optional accent)
  • 07
    Polyester fiberfill for stuffing (enough to firmly stuff head, body, legs and tips of arms)

β€” Tools Required

  • 01
    Crochet hook size D/3.25mm
  • 02
    Polyester fiberfill
  • 03
    Darning needle (yarn needle) for sewing pieces together
  • 04
    Scissors
  • 05
    Stitch markers
  • 06
    Felt sheets (white, black, pink) and fabric glue or sewing needle for attaching felt
  • 07
    Pins for assembly (optional)

Progress Tracker

0% Complete

β€” Head :

Round 1 :

MR and place 6SC (6)

Round 2 :

[INC] x6 (12)

Round 3 :

[SC, INC] x6 (18)

Round 4 :

[SC1, INC, SC1] x6 (24)

Round 5 :

[SC3, INC] x6 (30)

Round 6 :

[SC2, INC, SC2] x6 (36)

Round 7 :

[SC5, INC] x6 (42)

Round 8 :

[SC3, INC, SC3] x6 (48)

Rounds 9-20 :

[SC] across (48)

Info :

TIP: I place eyes between rounds 13-14 two inches apart.

Round 21 :

[SC3, DEC, SC3] x6 (42)

Round 22 :

[SC5, DEC] x6 (36)

Round 23 :

[SC2, DEC, SC2] x6 (30)

Round 24 :

[SC3, DEC] x6 (24)

Round 25 :

[SC1, DEC, SC1] x6 (18)

Round 26 :

[SC1, DEC] x6 (12)

Round 27 :

[DEC] x6 (6)

Info :

Slip stitch off, and make sure you leave enough yarn to sew into last 6 stitches. Weave in tails.

β€” Bow Tie :

Item Name (P1) :

Chain 25, attach first stitch to last with a slip stitch.

Round 1 :

[SC] around for four rounds.

Info :

Slip stitch off, make a long tail (16') and wrap around the center as shown in video tutorial.

β€” Legs :

Info :

TIP: Stuff the legs as you go

Round 1 :

MR, [SC] x5 inside ring and tighten the loop (5)

Round 2 :

[INC] x5 (10)

Round 3 :

[SC1, INC] x5 (15)

Rounds 4-5 :

[SC] across (15)

Round 6 :

[SC] across (15)

Info :

- Break the yarn and fasten off your work. The right leg is done. - Repeat R1-6 with left leg as well, but this time do not fasten off. - Place a stitch marker into the last stitch you made on the left leg. This is your new start for your rounds. - Continue next to the body.

Round 7 :

8SC in the stitches of the left leg, CH9 and join to the right leg with a SC (this counts as the 1st SC of the following SC), SC in the next stitches of the right leg, 9SC in the 9CH, 7SC in the stitches of the left leg. (48)

Round 8 :

[SC] across (48)

Round 9 :

[SC22, DEC] x2 (46)

Round 10 :

[SC] across (46)

Round 11 :

[SC21, DEC] x2 (44)

Round 12 :

[SC] across (44)

Round 13 :

[SC20, DEC] x2 (42)

Round 14 :

[SC] across (42)

Round 15 :

[SC19, DEC] x2 (40)

Round 16 :

[SC] across (40)

Round 17 :

[SC18, DEC] x2 (38)

Round 18 :

[SC] across (38)

Round 19 :

[SC17, DEC] x2 (36)

Round 20 :

[SC] across (36)

Round 21 :

[SC16, DEC] x2 (34)

Round 22 :

[SC] across (34)

Round 23 :

[SC15, DEC] x2 (32)

Round 24 :

[SC] across (32)

Round 25 :

[SC14, DEC] x2 (30)

Round 26 :

[SC] across (30)

Round 27 :

[SC3, DEC] x6 (24)

Info :

Break yarn and fasten off.

β€” Body :

Round 1 :

(Body rounds start where legs joined) Follow legs join rounds and continue shaping as written in rounds 8-27 above to complete body shaping and decrease to 24 as final round.

β€” Arms :

Round 1 :

MR with 6SC (6)

Round 2 :

[INC] x6 (12)

Rounds 3-11 :

[SC] across (12)

Info :

TIP: I stuff the tips of the hands up to round 5, but leave the rest of the arms empty.

β€” Eyes :

Round 1 :

With pink yarn, MR with 6SC (6)

Round 2 :

[INC] x6 (12)

Round 3 :

Change to white, [SC1, INC] x6 (18)

Info :

Slip stitch off. I have a tutorial on how to make "anime" eyes which will be linked at the end of this PDF.

β€” Nose :

Round 1 :

MR and place 5SC (5)

Round 2 :

[INC] x5 (10)

Round 3 :

[SC1, INC] x5 (15)

Info :

Repeat 1-3 but this time don't slip stitch off. Sew first piece down the side for 3 stitches on both pieces. Check out our tutorial for further instructions.

Rounds 3-5 :

[SC] around both pieces. (24)

β€” Outer Ear :

Round 1 :

MR with 6SC (6)

Round 2 :

[INC] x6 (12)

Round 3 :

[SC1, INC] x6 (18)

Rounds 4-17 :

[SC] around (18)

Round 18 :

[SC1, DEC] x6 (12)

Info :

Slip stitch off and attach to top of the head.

β€” Inner Ear :

Item Name (P1) :

Chain 13, skip first chain and [SC] inside 11 chains, INC2 in final chain, turn and [SC1, INC2] in the backs of the foundational chains.

Info :

Slip stitch off and attach to the fronts of the ears.

Assembly Instructions

  • Place eyes between rounds 13-14 of the head approximately two inches apart, then attach felt or crocheted eye pieces securely before stuffing the head fully.
  • Sew the outer ears to the top of the head and attach inner ear pieces to the front of each ear; position symmetrically for balance.
  • Attach the nose/muzzle to the front center of the head, sewing the two nose pieces together and down the side for three stitches on both pieces as instructed.
  • Position and sew the arms to the sides of the body at the shoulder rounds, stuffing the tips of the hands up to round 5 and leaving the rest unstuffed for a soft look.
  • Sew the head to the body securely using the tail left from the head slip stitch off, stitching into the final six stitches and weaving in tails.
  • Wrap and secure the bow tie center using the long tail; sew or secure the bow to the neck area centered between the shoulders.

Important Notes

  • πŸ’‘Keep your stitches tight so the stuffing does not show through the fabric while assembling head and body.
  • πŸ’‘When changing yarn size or hook, adjust eye sizes and embroidery accordingly to keep proportions correct.
  • πŸ’‘Stuff legs and appendages gradually as you work so shape stays consistent and seams are easy to join.
  • πŸ’‘Leave long tails at finishing rounds for sewing parts together and weave in ends after assembly.

This Bonnie amigurumi pattern brings a touch of game-inspired charm to your handmade collection. It combines simple crochet shaping with felt details to create a delightful character ready for display or gifting. Follow the rounds and tutorial links for perfect eyes and finishing touches. 🧢✨

You ask,

we answer.

FAQs

What size will the finished piece be?

The finished amigurumi measures approximately 9-12 inches tall when using I Love This Cotton and a 3.25mm hook; exact size varies with tension and yarn choice.

Can I use different yarn weights for this pattern?

Yes, you can use different yarn weights but this will change the finished size; use an appropriate hook and adjust eye sizes and felt pieces accordingly.

Do I need prior crochet experience for this pattern?

This pattern is rated intermediate and assumes familiarity with magic ring, single crochet, increases and decreases, and sewing pieces together.

How long does this project typically take to complete?

Most crocheters complete this project in 5-7 hours, depending on experience level and how much time you spend on details like eyes and assembly.

Are the anime-style eyes included in the pattern?

The pattern includes crochet rounds for the eye base and references a linked video tutorial for creating anime-style eyes and precise felt cutting.