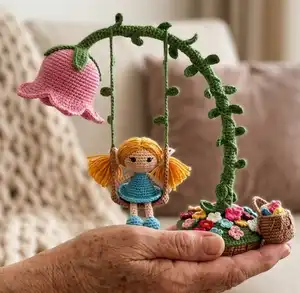
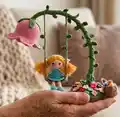
Create a whimsical Flower Garden Lamp with this detailed crochet pattern. You will make a lamp base, stem, hanging swing with a tiny doll, flowers, leaves and LED lighting for a magical touch. The pattern uses reverse single crochet technique and includes step-by-step rounds, materials and assembly photos to guide you.
Progress Tracker
0% Complete
— Round Log Piece :
Info :
with light brown colour yarn crochet hook: 2.00 mm
Round 1 :
6 sc in the mr =6sc
Round 3 :
(1 sc, inc)*6 =18sc
Round 4 :
sc, inc,(2sc, inc)*5, sc =24sc
Round 5 :
(3sc, inc)*6 =30sc
Round 6 :
2sc, inc,(4sc, inc)*5,2sc =36sc
Round 7 :
(5sc, inc)*6 =42sc
Round 8 :
3sc, inc,(6sc, inc)*5,3sc =48sc
Round 9 :
(7sc, inc)*6 =54sc
Round 10 :
4sc, inc,(8sc, inc)*5,4sc =60sc
Round 11 :
(9sc, inc)*6 =66sc
Round 12 :
5sc, inc,(10sc, inc)*5,5sc =72sc
Round 13 :
(11sc, inc)*6 =78sc
Round 14 :
6sc, inc,(12sc, inc)*5,6sc =84sc
Round 15 :
(13sc, inc)*6 =90sc
Round 16 :
7sc, inc,(14sc, inc)*5,7sc =96sc
Round 17 :
(15sc, inc)*6 =102sc
Round 18 :
(FP) 102sc =102sc
Round 19 :
23.102sc (5 rounds)
Round 24 :
(FP) 102sc =102sc Cut the same size plastic part as the base as in the picture.
Round 25 :
(15sc, dec)*6 =96sc
Round 26 :
7sc, dec,(14sc, dec)*5,7sc =90sc Cut plastic strip for the edge
Round 27 :
(13sc, dec)*6 =84sc
Round 28 :
6sc, dec,(12sc, dec)*5,6sc =78sc
Round 29 :
(11sc, dec)*6 =72sc
Round 30 :
5sc, dec,(10sc, dec)*5,5sc =66sc
Round 31 :
(9sc, dec)*6 =60sc
Round 32 :
4sc, dec,(8sc, dec)*5,4sc =54sc
Round 33 :
(7sc, dec)*6 =48sc
Round 34 :
3sc, dec,(6sc, dec)*5,3sc =42sc
Round 35 :
(5sc, dec)*6 =36sc
Round 36 :
2sc, dec,(4sc, dec)*5,2sc =30sc You fill the aquarium stone inside the piece. (It is slightly curved upwards)
Round 37 :
(3sc, dec)*6 =24sc
Round 38 :
sc, dec,(2sc, dec)*5, sc =18sc
Round 39 :
(sc, dec)*6 =12sc
Info :
With dark brown colour yarn, you embroider lines on the edges of the log with the needle-back stitch technique (6sc apart).
— Flower Stem Part :
Info :
Let's leave the starting yarn a little long, you'll use it for sewing. (with green colour yarn, crochet hook: 2.00 mm)
Round 1 :
8 ch, connect both ends with slst
Round 2 :
8 sc on the chains =8sc
Round 3 :
71.8sc=8sc (69 rounds)
Round 72 :
(3sc, inc)*2 =10sc
Round 73-76 :
10sc =10sc (4 rounds)
Round 77 :
(4sc, inc)*2 =12sc
Round 78-82 :
12 sc =12sc (5 rounds)
Round 83 :
(5sc, inc)*2 =14sc
Round 84-87 :
14sc =14sc (4 rounds)
Round 88 :
(6sc, inc)*2 =16sc
Round 89-92 :
16sc =16sc (4 rounds)
Round 93 :
(7sc, inc)*2 =18sc
Round 94-113 :
18sc =18sc (20 rounds)
Round 114 :
(Flo) sc, inc,(2sc, inc)*5, sc =24sc
Round 115 :
(3sc, inc)*6 =30sc
Round 116 :
2sc, inc,(4sc, inc)*5,2sc =36sc
Round 117 :
(5sc, inc)*6 =42sc
Round 118 :
3sc, inc,(6sc, inc)*5,3sc =48sc
Round 119 :
(7sc, inc)*6 =54sc
Round 120 :
4sc, inc,(8sc, inc)*5,4sc =60sc
Round 121 :
(9sc, inc)*6 =66sc
Round 122 :
5sc, inc,(10sc, inc)*5,5sc =72sc
Round 123 :
(11sc, inc)*6 =78sc
Round 124 :
6sc, inc,(12sc, inc)*5,6sc =84sc
Round 125 :
(13sc, inc)*6 =90sc
Round 126 :
7sc, inc,(14sc, inc)*5,7sc =96sc
Round 127 :
(15sc, inc)*6 =102sc
Round 128-129 :
102sc =102sc (2 rounds) Cut the long tail yarn and you'll use it when sewing it to the round piece.
— Small Piece of Billet :
Info :
You'll put the battery part of the led light inside. (With light brown colour yarn, crochet hook: 2.00 mm)
Round 1 :
continue beginning from 2nd stitch, inc ,4sc in the same stitch, continue crocheting the other side chain,4sc,inc =16sc
Round 2 :
2inc,4sc,4inc,4sc,2inc =24sc
Round 3 :
(sc, inc)*2,4sc,(sc, inc)*4,4sc,(sc, inc)*2 =32sc
Round 5-31 :
32sc =32sc (27 rounds) You embroider lines with dark brown colour yarn with needle back stitch technique.
— Swing :
Info :
with brown colour yarn, crochet hook: 2.00 mm
Round 1 :
continue beginning from 3rd stitch, 15 dc 2 ch turn back
Round 2 :
15 dc 2 ch turn back
Round 3 :
15 dc 2 ch turn back
Round 4 :
15 dc 2 ch turn back
Round 5 :
15 dc ,cut the yarn. Crochet the second part in the same way, we don't cut the yarn. Put the pieces on top of each other and crochet the edge with sc. Place the plastic part that you cut in accordance with the part in between. Pull the yarn to the corner 51 ch, connect it with sc to the other corner, 1 ch and turn back, 51 slst on the chain. Crochet the same in the other corner.
— Ivy :
Info :
18 ch, continue beginning from 2nd stitch, slst,5 dc, slst In this way, crochet 2 ivy, 20 and 21 leaves.
— Doll (Head-Body) :
Info :
(with skin colour yarn, crochet hook:2.00 mm) (Attach the eyes 3sc apart between the 8th and 9th rounds.)
Round 1 :
6 sc in the mr =6sc
Round 3 :
(sc, inc)*6 =18sc
Round 4 :
(2sc, inc)*6 =24sc
Round 5 :
(3sc, inc)*6 =30sc
Round 6-11 :
30sc =30sc (6 rounds)
Round 12 :
(3sc, dec)*6 =24sc
Round 13 :
(2sc, dec)*6 =18sc Fill the fiber
Round 14 :
(sc, dec)*6 =12sc
Round 17-18 :
12sc =12sc (2 rounds) Change turquoise colour yarn
Round 19 :
(sc, inc)*6 =18sc
Round 20-21 :
18sc =18sc (2 rounds)
Round 22 :
(2sc, inc)*6 =24sc
Round 23-24 :
24sc =24sc (2 rounds)
Round 25 :
(3sc, inc)*6 =30sc
Round 27 :
(3sc, dec)*6 =24sc
Round 28 :
6dec collect the all remaining stitches with the needle. Attach the yarn on the 27th round flo stitch. Head will look down, (sc, dc, sc)*30 cut the yarn and hide it. Embroider eyebrows on the 5th and 6th rounds 3sc apart. Embroider lips between the 11th and 12th rounds.
— Arm :
Info :
with skin colour yarn, crochet 2 pieces. crochet hook: 2.00 mm
Round 1 :
6 sc in the mr =6sc
Round 3-4 :
12sc =12sc (2 rounds)
Round 7 :
7 ch, combine it between the 16th and 17th rounds of the body
— Leg :
Info :
with turquoise colour yarn, crochet 2 pieces, crochet hook: 2.00mm
Round 1 :
6 sc in the mr =6sc
Round 3 :
(sc, inc)*6 =18sc
Round 4-6 :
18sc =18sc (3 rounds)
Round 7 :
(sc, dec)*6 =12sc fill the fiber a little
Info :
change skin colour yarn. 13 ch, you fix it to the appropriate place on the body
— Wig :
Info :
With mustard yellow colour yarn, crochet hook: 2.00 mm
Round 3 :
(sc, inc)*6 =18sc
Round 4 :
(2sc, inc)*6 =24sc
Round 5 :
(3sc, inc)*6 =30sc
Round 6-9 :
30sc =30sc (4 rounds)
Round 10 :
18slst. Let's leave the yarn a little long towards the middle point, you'll use it for sewing. Let's cut 66 pieces of 15cm long yarns. You fold it in half and attach it to the right and left of the slst's you made on the 9th round and in the middle of the wig. You tie the ribbon and cut the ends to the same extent and fix them.
— Lamp Flower :
Info :
With pink colour yarn, crochet hook: 2.00 mm
Start :
8 ch, connect the two ends with slst
Round 1 :
8 sc in the chain =8sc
Round 3 :
(sc, inc)*8 =24sc
Round 4 :
sc, inc(2sc, inc)*7 sc =32sc
Round 5 :
(3sc, inc)*8 =40sc
Round 6 :
2sc, inc,(4sc, inc)*7,2sc =48sc
Round 7 :
(5sc, inc)*8 =56sc
Round 8 :
3sc, inc,(6sc, inc)*7,3sc =64sc
Round 9-23 :
64sc =64sc (15 rounds)
Round 24 :
(flo)16 sc 1 ch turn back
Round 25 :
sc, dec,10sc, dec, sc =14sc 1 ch turn back
Round 26 :
14sc 1 ch turn back
Round 27 :
sc, dec,8sc, dec, sc =12sc 1 ch turn back
Round 28 :
12sc 1 ch turn back
Round 29 :
sc, dec,6sc, dec, sc =10sc 1 ch turn back
Round 30 :
10sc 1 ch turn back
Round 31 :
sc, dec,4sc, dec, sc =8sc 1 ch turn back
Round 32 :
8sc 1 ch turn back
Round 33 :
sc, dec,2sc, dec, sc =6sc 1 ch turn back
Round 34 :
6sc 1 ch turn back
Round 35 :
sc,2dec, sc =4sc 1 ch turn back
Round 36 :
4sc 1 ch turn back
Round 37 :
2dec 1 ch turn back
Round 38 :
2sc 1 ch turn back
Round 39 :
dec cut the yarn.
— Flower Sepal :
Info :
with green colour yarn, crochet hook:2.00 mm
Start :
8 ch, connect both ends with slst
Round 1 :
8 sc on the chain
Round 3 :
13 ch, continue beginning from 2nd stitch , sc, 11 dc, skip 3 stitches, combine with slst. You crochet repeat the 3rd round process, 3 times. You cut the yarn and fix it.
— Small Flowers :
Info :
Use pink, fushia, mustard yellow, white, turquoise colour yarns. You separate the 2 layers of the yarn and make 3 layers of yarn, crochet hook:1.5 mm
Round :
make a mr, 3 ch, 2 dc, 3 sc... * repeat as the same process 4 times closed mr, cut the yarn and fix it. You crochet the same with 4-petal flowers.
— Small Piece of Billet (Assembly Part) :
Info :
You sew the flower sepal to the big stem you crochet. You pass the led light through the big steam.
— Assembly :
Item (P1) :
You pass through the led light flower. You pass the galvanized wire through the hole of the mica ball. Then you pass 2 layers of wire through the flower and stem.
Item (P2) :
You collect the excess led lights into the mica ball, you close the ball. You pull the wire and insert the ball into the flower. You wrap the excess wire on the base and fix it, tape the end of the wire.
Infos :
Let's pay attention to the fact that the on-off button of the LED lights comes to the outer part. Let's glue the small log piece to the round log. Let's glue the cup part of the flower to the flower. (21 leaves of ivy will be on the lamp side) Let's fix the end of the ivy by centering the swing handle. You sew the swing strings to the flower stem. You glue the leaves and flowers to the floor. Let's glue the baby on the swing.
Thank you for making this Flower Garden Lamp — a handmade treasure full of light and charm! 🌸🕯️
This pattern brings together amigurumi techniques and simple wiring to create a magical bedside or display lamp. Enjoy customizing colors and tiny details to make it truly yours. 🧶✨
Happy crocheting and bright nights ahead!