Create a beautiful handcrafted floral headband using raffia yarn and simple crochet techniques. This pattern guides you step-by-step to make poppies, camomiles and cornflowers, assemble centres and add glittered details. Perfect for gifting or special occasions, the pattern includes clear photos and glue/assembly tips to finish a polished headband you'll love to wear.
Progress Tracker
0% Complete
— Camomile :
Info :
Corolla (base). Crochet 2 CH.
Round 1 :
1 row. Crochet 6 SC in the 2nd loop from the hook.
Round 2 :
2 row. 1 Inc*6 = 12, SlSt.
Round 3 :
3 row. (6 CH, 3 DC from the 3rd loop of the hook, 1 SC, skip one loop of the 2nd row, SlSt) * 6
Info :
Cut the thread, pull out the end. Tighten the end in the 1st CH of the row to the wrong side. Tie the knot, hide the ends.
Info :
Slightly compress the centre so that it takes the shape of a ball. Steam the corolla with an iron. Glue on the centre with the PVA glue.
Info :
Crochet four more camomiles.
— Camomile centre :
Info :
Centre. Crochet 2 CH.
Round 1 :
1 row. 6 SC in the 2nd loop from the hook, SlSt.
Round 2 :
2 row. 1 Inc*6 in the hole (= 12).
Info :
Cut the thread, pull out the end. Close this row: Insert the hook under the 1st loop of the row, pull out the end, tighten the end back to the wrong side. Strengthen and hide the end.
Info :
Slightly compress the centre so that it takes the shape of a ball. Steam the corolla with an iron. Glue on the centre with the PVA glue.
— Poppy :
Info :
Crochet the poppy. Corolla 1. Crochet 2 CH.
Round 1 :
1 row. 6 SC in the 2nd loop from the hook.
Round 2 :
2 row. 1 Inc*6 = 12, SlSt.
Round 3 :
3 row. (8 CH, 3 DC from the 3rd loop of the hook, 1 SC, skip one loop of the 2nd row, SlSt) * 6
Info :
Cut the thread, pull out the end. Tighten the end in the 1st CH of the row to the wrong side. Tie the knot, hide the ends.
Info :
Corolla 2. Crochet 2 CH.
Round 1 :
1 row. 6 SC in the 2nd loop from the hook.
Round 2 :
2 row. (1 SC, 1 Inc) * 3 = 9, SlSt.
Round 3 :
3 row. (6 CH, 7 SC on the back loop only from the 2nd loop of the hook, SlSt in the loop of the 2nd row, turn) Repeat across petals: 7 SC on the back loop only, CH, 7 SC on the back loop only, SlSt, 7 SC on the back loop only, CH, 7 SC on the back loop only, SlSt) * 3 as indicated.
Info :
Cut the thread, pull out the end. Tighten the end in the 1st CH of the row to the wrong side. Tie the knot, hide the ends.
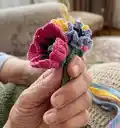
Info :
Centre. Take two pieces of the raffia yarn of 2 inches (5 cm) each. Straighten both pieces. Cut the fringe on both sides, leaving 10 mm uncut in the middle.
Info :
Glue on the pieces from below to the centre crosswise. Dip the ends in the PVA glue and immediately in the glitter.
Info :
Glue on the centre in the 2nd corolla, then the 2nd corolla - in the 1st corolla with the PVA glue.
Info :
Crochet two more poppies.
— Cornflower :
Info :
Crochet the cornflower. Corolla. Crochet 4 CH. Connect in the circle with SlSt.
Round 1 :
1 row. (3 CH, 3 DC in the hole) turn, 3 CH, SlSt, 3 CH, SlSt, 3 CH, SlSt ... follow the photo sequence to make six petals (3 DC clusters separated by SlSts). The instruction sequence shown: 3 DC in the hole, turn, 3 CH, SlSt, 3 CH, SlSt, 3 CH, SlSt.
Round 2 :
turn, fold the petal in half and connect with SlSt, SlSt in the hole) * 6 across the corolla.
Info :
Cut the thread, pull out the end. Tie the knot on the wrong side, hide the ends.
Info :
Centre. Wrap two fingers four times with a piece of the raffia yarn. Grab in the middle with the loop. Wrap the fold with the ends. Cut the ends of the tassel. Make the centre tassel as shown.
— Cornflower finishing :
Info :
Cut the thread, pull out the end. Tie the knot on the wrong side. Hide the ends. The cornflower motif is now complete.
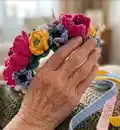
— Assembly & Finishing :
Info :
Paint or decorate the plastic clamps if desired (gold spray paint or nail polish used in sample). Use adjustable plastic clamps to attach flowers to the headband prior to final glueing.
Info :
Glue the flower corollas with their centres using PVA glue. Glue the centres into corollas and secure with glue gun where needed. Let dry fully.
Info :
Attach tapes at ends of the headband (optional) and secure with glue. Arrange flowers and secure with glue and/or sewn stitches. Hide any visible ends and trim excess raffia or glue strings.
This Floral Headband Pattern brings a bouquet of handmade blooms to life using raffia yarn and simple crochet motifs. Layered poppies, camomiles and cornflowers combine with glittered stamen and gold-painted clamps for a showstopping finish. Make one for a wedding, festival or as a thoughtful handcrafted gift — and enjoy the happy crafting process! 🌸✨🧶