About This Cactus Amigurumi Pattern
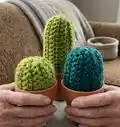
This pattern makes charming mini cactus amigurumi in three sizes (small, medium, large) designed to sit in tiny terracotta pots. The technique uses simple chains and single crochet worked through the back loop to give a textured ribbed look. Youll find the finishing steps easy to follow for closing, shaping, and placing the cactus into a pot.
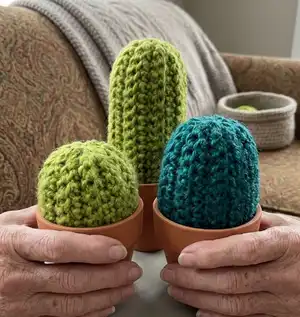
Perfect for beginners and quick makes, these cactuses are ideal as gifts, desk decor, or craft market items. The pattern includes clear materials, terminology, and finishing instructions.
Why You'll Love This Cactus Amigurumi Pattern
I absolutely love this pattern because it turns simple stitches into a sweet, sculpted cactus that looks professional and polished. I enjoy how quickly you can make a full set — it is satisfying to finish one in a single sitting. The back-loop-only rows create such a nice ribbed texture with almost no extra effort, which is one of my favorite little tricks. I also love that these fit into tiny pots and make charming gifts or display pieces that brighten up any space.
Switch Things Up
I love customizing these cactuses by changing yarn colors to create a whole family of succulents; try variegated yarn for a unique look.
I often make them larger or smaller by altering the starting chain; adding or removing chains changes the circumference and final height.
I sometimes use a chunkier yarn and a larger hook to create plush, chunky cactuses that are extra squishy and bold.
I also add tiny embroidered spines with a contrasting yarn to give a more realistic cactus effect.
I like to glue or lightly sew small beads or seed beads to the top as decorative flowers for a sparkly touch.
I recommend trying different pot sizes and depths — a shallow dish gives a different silhouette than a deeper terracotta pot.
I occasionally insert a short piece of floral wire into the center before stuffing to make a slightly posable cactus spike or to support a taller shape.
I enjoy grouping several sizes and colors together to create a mini desktop garden that looks intentional and playful.
I sometimes experiment with surface crochet or slip-stitch vertical ridges for additional texture beyond the back-loop rows.
I like to convert one cactus into a pincushion by using denser stuffing and a sturdier base — it becomes both cute and useful.
Common Mistakes & How to Fix Them
✗ Working with loose tension can allow stuffing to show through the stitches; maintain a tighter gauge and smaller hook if necessary so stuffing does not peek out.
✗ Skipping the back loop-only instruction will lose the ribbed texture effect; be sure to work R1-2 through the back loop only to create the intended look.
✗ Failing to sew the chain row and final row together neatly can leave a visible seam; sew the chain row to the 20th row carefully, matching stitches as you go to close the shape.
✗ Not pulling the tail through every other row when shaping the top can result in a flat top; place the darning needle through the top stitch of every other row and pull the tail 2-3 times to shape properly.