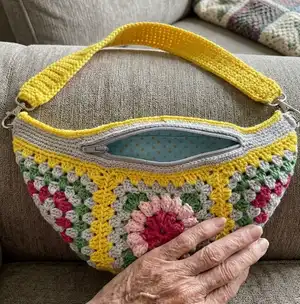
Make a cheerful Floral Crossbody Bag using four granny squares and simple assembly. This pattern walks you through granny square construction, a floral center square, seaming, a top border with a zipper opening, and a fabric lining so your bag looks finished inside and out. Perfect for using cotton yarn scraps and making a colorful, hands-free bag for summer.
Progress Tracker
0% Complete
— Instructions :
Granny Square color changes :
This is the color order that was used in each of the regular Granny squares in this project: C4, C4, C1, C4, C3, C4, C5
Regular Granny Square Directions (make 3) :
See notes for color changing tips.
Set-up Rnd :
With C4 and smaller hook, ch 4, sl st in first ch to join into a ring.
Round 1 :
Ch 3 (counts as the first DC of rnd), 2 DC in center of ring, [ch 2, 3 DC in ring] 3 times, HDC into top of beginning ch-3 to join.
Round 2 :
Continuing with C4, ch 3 (counts as first DC of rnd), 2 DC in corner sp (this is the space created by the joining HDC from end of previous rnd), *skip next 3 DC, [3 DC, ch 2, 3 DC] in next ch-2 sp, repeat from * twice more, skip next 3 DC, 3 DC into first corner sp, HDC into top of ch-3 to join, pull up loop of C1 to change color, pull on old color until the last loop of old color disappears. Do not cut C4.
Round 3 :
Continuing with C1, ch 3 (counts as first DC of rnd), 2 DC in same corner sp, *skip next 3 DC, 3 DC into sp before next set of 3 DC sts, skip next 3 DC, [3 DC, ch 2, 3 DC] in next ch-2 sp, repeat from * twice more, skip next 3 DC, 3 DC into sp before next set of 3 DC sts, skip next 3 DC, 3 DC into first corner sp, HDC into top of ch-3 to join, fasten off.
Round 4 :
Insert hook into ch-2 sp (or space made by joining HDC) at corner of square, YO with C4 and pull up loop, ch 3 (counts as first DC of rnd), 2 DC in same ch-2 sp, *3 DC into each sp between 3-DC groups across to next ch-2 sp, [3 DC, ch 2, 3 DC] in ch-2 sp, repeat from * twice more, 3 DC into each sp between 3-DC groups across to first corner sp, 3 DC in corner sp, HDC into top of ch-3 to join, yo with C3 and pull up loop, pull on C4 yarn tail until the last loop of C4 disappears. Do not cut C4.
Round 5 :
Continuing with C3, ch 3 (counts as first DC of rnd), 2 DC in same corner sp, *3 DC into each sp between 3-DC groups across to next ch-2 sp, [3 DC, ch 2, 3 DC] in ch-2 sp, repeat from * twice more, 3 DC into each sp between 3-DC groups across to first corner sp, 3 DC in corner sp, HDC into top of ch-3 to join, fasten off.
Round 6 :
Repeat Rnd 4, changing to C5 at the end of rnd.
Round 7 :
With C5, repeat Rnd 5.
Info :
Fasten off leaving long tail for sewing, weave in all ends except last yarn tail.
Floral Square color changes :
This is the color order that was used in the Floral Granny square in this project: C1, C2, C3, C4, C4, C5, C5,
Floral Granny Square Directions (make 1) :
With C1, ch 6, sl st in first ch to join into a ring.
Round 1 :
Ch 3 (does not count as a st), [PP, Tr] 8 times in center of ring, join with sl st to top of first Tr of rnd. Fasten Off. (Note: the first Tr of rnd is the Tr between the first PP and the second PP). 8 PP with 8 Tr (between each PP).
Round 2 :
Note: in this rnd, all sts are worked into the Tr between the PP; all popcorn sts are skipped). Begin with slipknot of C2 on hook, sl st into any Tr from first rnd to join. Ch 3 (does not count as a st), beginning with same Tr, [PP, Tr, PP, Tr] into each Tr around, join with sl st to top of first Tr of rnd. Fasten Off. (Note: the first Tr of rnd is the Tr between the first PP and the second PP). 16 PP with 16 Tr (between each PP).
Round 3 :
Begin with slipknot of C3 on hook, sl st to any Tr from first rnd to join. [beg 3-DC cl, ch 2, 3-Tr cl, ch 2, 3-DC cl] in same Tr, place marker in the second ch-2 sp made, *ch 12, skip each of the next 4 PP and the next 3 Tr between these 4 PP, [3-DC cl, ch 2, 3-Tr cl, ch 2, 3-DC cl] into the next Tr, repeat from * twice more, ch 12, skip each of the next 4 PP and the next 3 Tr, join with sl st to to top of beg 3-DC cl. Fasten off. Eight 3-DC cl, four 3-Tr cl, 7 ch-2 sps, 8 ch-2 sps, 4 ch-12 sps.
Round 4 :
Begin with slipknot of C4 on hook, sl st to marked ch-2 sp, ch 1(does not count as st), 3 SC into same ch-2 sp, *skip the next 3-DC cl, working over the long chain from the previous round (this will encase it as you stitch), and skipping the next 3 PP sts between, 3 DC into each of the next 3 Tr from Rnd 2, skip the next 3-DC cl, 3 SC into the next ch-2 sp, ch 2, skip 3-Tr cl, 3 SC in next ch-2 sp, repeat from * twice more, skip the next 3-DC cl, working over the long chain from the previous round (this will encase it as you stitch), and skipping the next 3 PP sts between, 3 DC into each of the next 3 Tr from Rnd 2, skip the next 3-DC cl, 3 SC into next ch-2 sp, HDC into first SC of rnd to join. 24 SC, 36 DC, and 4 ch-2 sps.
Round 5 :
Continuing with C4, ch 2 (counts as the first DC of Rnd), 2 DC into the same corner sp, *skip next 3 SC, [3 DC in space before next group of 3 DC, skip next 3 DC] 3 times, 3 DC in space before next 3 SC, skip next 3 SC, [3 DC, ch 2, 3 DC] into ch-2 sp at corner, repeat from * twice more, skip next 3 SC, [3 DC in space before next group of 3 DC, skip next 3 DC] 3 times, 3 DC in space before next 3 SC, 3 DC in first corner space, HDC into top of beg ch-2 to join (counts as a ch-2 sp), fasten off. Twenty-four 3-DC groups, and 4 ch-2 sps.
Round 6 :
Beginning with a slipknot of C5 on hook, sl st to any corner ch-2 sp, ch 2, (counts as the first DC of Rnd), 2 DC into the same corner sp, *skip next 3 DC, [3 DC in space before next group of 3 DC, skip next 3 DC] 5 times, [3 DC, ch 2, 3 DC] into ch-2 sp at corner, repeat from * twice more, skip next 3 DC 5 times, 3 DC in first ch-2 space, HDC into top of beg ch-2 to join, fasten off. Twenty-eight 3-DC groups, and 4 ch-2 sps.
Info :
Weave in all ends except for ending yarn tail.
Info :
If squares seem un-even, you may want to block each square so that they are the same size. Alternatively, you can wait until the top border is finished to block the bag.
Square Assembly :
Arrange squares as shown in the photo and seam pieces together using a whipstitch or seam of choice. After making the "T" shape seen in the photo, sew the remaining two seams together where indicated in the photo by the yellow arrows and the green arrows. Weave in ends.
Top Border - Round 1 :
Pull up loop of C5 in ch-2 sp at either corner of Bag, ch 1 (does not count as a stitch), SC into same ch-2 sp, SC into each of the next 21 DC sts, 2 SC into each of the next 2 corner sps, continue working SC around the top edge of the bag in this manner - making a SC into the top of each DC and making 2 SC into each corner ch-2 sp of each square, ending with one SC in the same ch-2 sp where the first SC of the round was made, sl st to first SC to join, Fasten off. 146 sts.
Top Border - Round 2 :
Pull up loop of C4 from first st of previous rnd, ch 1 (does not count as a st), SC into each st around, join with a sl st to top of first SC of rnd. Do not fasten off, but place stitch marker in working loop. Top Border will be continued later.
Make Lining :
Fold fabric so that it is doubled with RS together. Place Bag on top of doubled fabric and trace around all edges as shown in photo. Be sure that there is about 1/2" of seam allowance around all sides. Cut out lining, leaving 1/2" seam allowances around all edges. Sew on the line of the bottom curve of the bag using a straight stitch on a sewing machine, or a sturdy back-stitch if sewing by hand. Set aside lining.
Continuing with Top Border - Round 3 :
Continuing with working loop of C4, ch 1 (does not count as a st), beginning with the same st as join, SC into each st around, join with a sl st to the top of first SC of rnd.
Info :
Decide where you want the zipper to end and begin and place a stitch marker at the beginning and end of the zipper. In the sample, markers were placed with 40 stitches between them. Make sure that the zipper opening looks visually centered across the Top Border.
Top Border - Round 4 (zipper opening) :
Ch 1 (does not count as a st), beginning with the same st as join, SC into each st, ending with marked st, skip all sts between markers, ch the same number of chains as stitches that are being skipped, continuing with the marked stitch, SC in each st to end, join with a sl st to the top of first SC of rnd.
Top Border - Round 5 :
Ch 1 (does not count as a st), beginning with the same st as join, SC into each st around, join with a sl st to the top of first SC of rnd. Tip: work into each of the chs that were made in the previous round, instead of into the chain space.
Top Border - Round 6 :
Ch 1 (does not count as a st), beginning with the same st as join, SC into each st around, join with a sl st to the top of first SC of rnd, fasten off.
Top Border - Round 7 :
Hold bag so that the front of the bag is facing you (the side with the Floral Granny Square). Pull up loop of C5 from the stitch at the far right corner of the bag (or the far-left, if left handed), ch 1 (does not count as a st), SC into each st around, join with a sl st to top of first SC of rnd.
Info :
Place a stitch marker in the working loop, and install the zipper and lining before finishing.
Installing the Zipper :
Using sewing needle and thread, stitch the top and bottom of zipper ends closed (if they didn’t come that way) so that the top and bottom of the zipper cannot separate. Pin zipper into the opening in the bag as shown. With RS-facing, stitch zipper into opening using a backstitch through the edge of crocheted fabric near the zipper teeth, but leaving enough space for the zipper pull to slide by. With WS-facing, whip stitch around the edges of the zipper tape to secure into the WS of the fabric.
Attach the lining :
With WS of lining facing outward, slip lining inside the bag. Fold the raw edge of fabric at the top edge of the lining, toward the outside, with about 1/2" of seam allowance. The folded edge of the lining should align with the top of the first rnd of C4 that was made in the Top Border. The lining should fit just below the zipper teeth. Make sure there is enough space between zipper teeth and lining for the zipper pull to pass through. Pin in place to inside of bag. Using a needle and thread, whip-stitch the folded edge in place to the inside of the bag.
Seam Top Edge of Bag :
Hold bag with Front of Bag facing (with Floral Granny square visible). Fold the bag flat with the working loop at folded edge of bag. Place hook back in working loop and slip stitch through both layers held together to seam top edge of bag. Fasten off. Weave in ends.
D-Ring attachment pieces (make 2) :
Using C4, ch 7.
Row 1 :
Beginning with the second ch from hook and working into the bottom of the chain, SC in each ch across. 6 sts.
Rows 2-6 :
Ch 1 (does not count as a st), turn, SC into each st across. Fasten off leaving long tail for sewing.
Finishing :
Slip one end of D-Ring Attachment piece through D-ring. Line up ends and sew both layers to the back of the bag along one side of the Top Border as shown in photos. Sew around all edges of the Attachment piece, and across the attachment pieces right next to the D-ring so that the D-ring is very snug, and cannot spin out of place. Repeat for remaining D-ring. Weave in all ends. Clip purchased crossbody strap onto D-rings.
Special Stitches - Popcorn Petal (PP) :
Ch 1, work 5 Tr into indicated st, remove hook from working lp, insert hook from RS to WS through chain st just before first Tr, replace working lp on hook and draw through st (1 PP made).
Special Stitches - Beginning 3-Double crochet cluster (beg 3-DC cl) :
Ch 2 (beginning ch counts as the first leg of cluster), *yo, insert hook into designated sp, yo and pull up lp, yo and pull through two lps on hook, repeat from * once more (3 lps on hook), yo and pull through all 3 lps on hook (1 beg 3-DC cl made).
Special Stitches - 3-Double crochet cluster (3-DC cl) :
*Yo, insert hook into designated sp, yo and pull up lp, yo and pull through two lps on hook, repeat from * twice more (4 lps on hook), yo and pull through all 4 lps on hook (one 3-DC cl made).
Special Stitches - 3-Treble crochet cluster (3-Tr cl) :
*Yo twice, insert hook into designated sp, yo and pull up lp, [yo and pull through two lps on hook] twice, repeat from * twice more (4 lps on hook), yo and pull through all 4 lps on hook (one 3-Tr cl made).
Color changing tips for granny squares :
If you switch to a new color, but plan to go back to the old color (C4) on the following round, let the old color (C4) hang to the WS of your work. Then after the last st of the new color is complete, fasten off. Then insert hook into the space at the corner of the square (just below the joining HDC), YO with the C4 and pull up loop, then ch 2 (counts as the first DC of Rnd), and continue in established granny square pattern.
Optional technique :
If you are interested in learning the technique for reducing the amount of yarn tails to weave in on a granny square, refer to the tutorial for the Picnic Blanket Tote or the blog post and video tutorial on the Creative Crochet Corner for tips.
This Floral Crossbody Bag pattern turns simple granny squares into a delightful, wearable accessory you can finish in a weekend. It includes full granny square and floral square instructions, zipper and lining steps, and tips for neat color changes. Make one in bright cottons for summer or customize colors for a unique handmade gift. 🌸🧶