🧶 Beautiful ✨ Detailed 💝 Adorable

Finger Puppets Set Teremok Amigurumi Pattern

Finger Puppets Set Teremok Amigurumi Pattern
4.0★ Rating
12-15 Hours Time Needed
1.8K Made This
✂️

Intermediate Level

Ideal for those with basic crochet experience, featuring slightly more advanced stitches and techniques to expand your skills.

⏱️

Multi-Day Project

A rewarding 12+ hour journey—perfect for dedicated crafters who love detailed work.

🧸

Cute Companion

An adorable friend to cherish, handcrafted with love to bring comfort and joy for years to come.

About This Finger Puppets Set Teremok Amigurumi Pattern

This pattern set creates a group of small finger puppets — Mouse, Frog, Bunny and Fox — plus instructions for the Teremok wooden house and simple accessories. Each puppet is made in thin cotton yarn with clear round-by-round shaping and small decorative elements. The pattern focuses on compact amigurumi techniques, color changes and tiny assembly details.
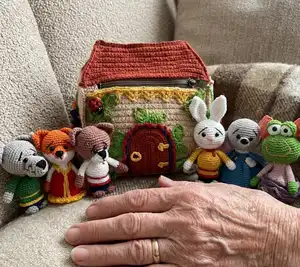
Finger Puppets Set Teremok Amigurumi Pattern crochet pattern - detailed view of completed project

Youll find full stitch counts, shaping rounds and assembly notes for each piece. Perfect for crafters who enjoy detailed miniatures and charming character work.

Why You'll Love This Finger Puppets Set Teremok Amigurumi Pattern

I absolutely love this pattern because it captures so much personality in tiny, pocket-sized puppets. I enjoyed designing clear, repeatable rounds so you can easily follow the shaping. The set mixes simple amigurumi techniques with colorwork and small decorative finishing, which keeps the project interesting but not overwhelming. I take pride in including assembly tips and photo references so your finished puppets look neat and polished. Making the full Teremok set is so rewarding — it becomes a little world you can display or gift.

Finger Puppets Set Teremok Amigurumi Pattern step 1 - construction progress Finger Puppets Set Teremok Amigurumi Pattern step 2 - assembly progress Finger Puppets Set Teremok Amigurumi Pattern step 3 - details and accessories Finger Puppets Set Teremok Amigurumi Pattern step 4 - final assembly and finishing

Switch Things Up

I love how easy it is to personalize each puppet by changing yarn colors and adding tiny accessories like bows or tiny beads.

I often swap the skirt colors or make ruffles in contrasting tones to give each puppet a unique outfit.

If you want a larger puppet, I recommend using a sport or DK weight yarn and increasing hook size by 2-3 mm and adjusting the stitch counts accordingly.

I sometimes embroider different facial expressions — a small curved mouth or higher/lower eyebrows — to change the characters personality.

You can replace bead eyes with French knots or safety eyes for a different look and texture; always secure small parts well for childrens toys.

I like to add felt accents, like tiny collars or pocket appliques, glued and stitched in place for extra detail.

For a more durable puppet, consider lining the house base with cardboard as recommended, or use a slightly stiffer yarn for the house walls.

I have also combined two puppets as a sibling pair by making matching outfits with tiny differences like buttons or trims.

Try metallic or sparkly yarn for small trims to add a festive touch for holiday versions of the puppets.

I sometimes make themed sets by altering colors: pastel for baby sets, traditional folk palette for a Teremok look, or bold brights for playful versions.

Common Mistakes & How to Fix Them

✗ Skipping stitch counts during increases leads to incorrect shaping; recount your stitches at the end of each round and mark the start with a stitch marker. ✗ Changing color without securing the last loop causes loose ends and messy transitions; carry color neatly or fasten off and weave ends before continuing. ✗ Overstuffing small parts like eyes and limbs makes the puppets lumpy and hard to sew; add small amounts of stuffing gradually for a smooth finish. ✗ Not sewing ears and limbs evenly will make the puppet look lopsided; pin parts in place and check symmetry before sewing securely. ✗ Crocheting too tightly with thin yarn results in stiff fabric and hard-to-assemble pieces; maintain a consistent, slightly loose tension suitable for 1.2–1.5mm hooks.

Finger Puppets Set Teremok Amigurumi Pattern

Make a charming set of Teremok finger puppets inspired by a wooden house fairy tale. This collection includes step-by-step instructions for mouse, frog, bunny, fox and the little house details so you can crochet a complete playset. Youll enjoy tiny shaping, color changes and decorative finishes tailored for small toys. Ideal for gifting, imaginative play, or creating a whimsical display.

Intermediate 12-15 Hours

Materials Needed for Finger Puppets Set Teremok Amigurumi Pattern

— Main Fabric

  • 01
    Thin yarn Vita Cotton Iris (25 gr/150 meters) colors: white, red, yellow, blue, grey, green, brown, orange, pink, light blue and some black – small amounts of each
  • 02
    Worsted/Aran weight yarn for the wooden house CHARM VITA (50g/106 m) or Sport weight/4ply yarn YarnArt Jeans or GAZZAL baby cotton for house (brown and beige shades)
  • 03
    Extra colors for details and skirts: pastel pink, purple and contrast colors for ruffles
  • 04
    12 beads to make the eyes 1.5 – 2 mm
  • 05
    Toy stuffing (hollow fiber) – small amount for each puppet

— Tools Required

  • 01
    Crochet hook size 1.2 - 1.5 mm (for thin yarn Iris)
  • 02
    Crochet hook size 2.0 mm (for the house base or heavier yarn)
  • 03
    Scissors
  • 04
    Yarn needle for sewing and weaving ends
  • 05
    Stitch markers
  • 06
    Pins for assembly
  • 07
    Small beads for eyes (1.5–2 mm)
  • 08
    Cardboard paper (for house structure)
  • 09
    Small piece of cotton cloth approx. 12 x 16 cm (for house furnishing)
  • 10
    Tule or organza size 7 x 7 cm and lace 9 cm long (decorative accessories)

Progress Tracker

0% Complete

— Mouse the finger puppet :

Head :

Work in grey yarn color

Round 1 :

Start 6sc in a mr

Round 2 :

(1 sc, inc) x 3 times (9)

Round 3 :

(2 sc, inc) x 3 times (12)

Round 4-5 :

12 sc in the round

Round 6 :

3 sc, 6 inc, 3 sc (18)

Round 7 :

3 sc, (1 sc, inc) x 6 times, 3 sc (24)

Round 8 :

(3 sc, inc) x 6 times (30)

Round 9 :

(4 sc, inc) x 6 times (36)

Round 10 :

36 sc in the round

Round 11 :

(5 sc, inc) x 6 times (42)

Round 12 :

42 sc in the round

Round 13 :

(6 sc, inc) x 6 times (48)

Round 14-20 :

48 sc in the round (7 rounds)

Round 21 :

(6 sc, dec) x 6 times (42)

Round 22 :

(5 sc, dec) x 6 times (36)

Round 23 :

(4 sc, dec) x 6 times (30)

Round 24 :

(3 sc, dec) x 6 times (24)

Info :

Stuff.

Round 25 :

(2 sc, dec) x 6 times (18)

Round 26 :

(1 sc, dec) x 6 times (12)

Round 27 :

6 dec

Section :

Ears (make 2) Work in pink yarn color

Round 1 :

Start 6sc in a mr

Round 2 :

6 inc (12)

Round 3 :

(1 sc, inc) x 6 times (18)

Round 4 :

(2 sc, inc) x 6 times (24)

Round 5 :

(3 sc, inc) x 6 times (30)

Round 6 :

(4 sc, inc) x 6 times (36)

Info :

Fasten off, cut the yarn.

Section :

Back ear (make 2) Work in grey yarn color

Round 1 :

Start 6sc in a mr

Round 2 :

6 inc (12)

Round 3 :

(1 sc, inc) x 6 times (18)

Round 4 :

(2 sc, inc) x 6 times (24)

Round 5 :

(3 sc, inc) x 6 times (30)

Round 6 :

(4 sc, inc) x 6 times (36)

Info :

Put 2 parts together and crochet sc in the round (36 sc).

— Body :

Make 18 stitches on the head (use light blue yarn color). Follow the instructions: 2sc on the back, 1sc obliquely, 3sc on the sideline, 1sc obliquely, 4 sc in front of the work, 1 sc obliquely, 3 sc on the sideline, 1 sc obliquely, 2 sc on the back.

Round 1-6 :

18 sc

— Crochet top skirt :

Round 7 :

into front loops only 18 inc (36)

Round 8 :

36 inc (72)

Round 9-20 :

72 sc (12 rounds)

— Use white color to crochet lower skirt :

Info :

Go back to the 7th round, work into back loops only

Round 1 :

(5 sc, inc) x 3 times (21)

Round 2-5 :

in the round 21 sc (4 rounds)

Round 6 :

(6 sc, inc) x 3 times (24)

Round 7-13 :

in the round 24 sc (7 rounds)

Round 14 :

crochet a round to decorate, (ch1, sc) x 24 times

— Front legs :

Round 1 :

Start 6sc in a mr

Round 2 :

(1 sc, inc) x 3 times (9)

Round 3-4 :

9 sc in the round

Round 5-15 :

change yarn to light blue color and crochet 9 sc in the round (11 rounds)

Info :

Do not stuff the legs

Round 15 :

put together and crochet 4sc through the loops of both sides. Cut the yarn, leaving a tail to sew.

— Decoration and assembly :

Info :

Fold the ears in half; sew 4 stitches through the loops of both sides. Pin the ears to the head in the 15-16th rounds, sew the ears. Embroider the nose, the eyebrows; sew the eyes (beads). Sew the arms on the border where the head and the body meet.

— The flower on the dress :

Info :

15 ch, start working from the 2nd stitch from hook, 14 inc, between each sc 1 ch, roll the flower into two tiers, in the middle you can sew a bead.

— Frog the finger puppet :

Head :

Work in green yarn color

Round 1 :

ch11, start working from the 2nd stitch from hook 9 sc, 3 sc into last stitch, continue into the unused loops on the opposite side of the chain 8 sc, inc (22)

Round 2 :

inc, 8 sc, 3 inc, 8 sc, 2 inc (28)

Round 3 :

1 sc, inc, 8 sc, (1 sc, inc) x 3 times, 8 sc, (1 sc, inc) x 2 times (34)

Round 4 :

2 sc, inc, 8 sc, (2 sc, inc) x 3 times, 8 sc, (2 sc, inc) x 2 times (40)

Round 5 :

3 sc, inc, 8 sc, (3 sc, inc) x 3 times, 8 sc, (3 sc, inc) x 2 times (46)

Round 6-13 :

46 sc (8 rounds)

Round 14 :

3 sc, dec, 8 sc, (3 sc, dec) x3 times, 8 sc, (3 sc, dec) x2 times (40)

Round 15 :

2 sc, dec, 8 sc, (2 sc, dec) x3 times, 8 sc, (2 sc, dec) x2 times (34)

Round 16 :

1 sc, dec, 8 sc, (1 sc, dec) x3 times, 8 sc, (1 sc, dec) x2 times (28)

Round 17 :

dec, 8 sc, 3 dec, 8 sc, 2 dec (22). Stuff.

Round 18 :

dec, 6 sc, 2 dec, 8 sc, dec (18)

Info :

Fasten off, cut the yarn, leaving a tail and sew the opening. Use remained yarn tail.

— Eyes (make 2) :

Round 1 :

Start 6 sc in a mr

Round 2 :

6 inc (12)

Round 3 :

(1 sc, inc) x 6 times (18)

Round 4-6 :

18 sc (3 rounds)

Info :

Add some stuffing.

Round 7 :

(1 sc, dec) x 6 times (12)

Round 8 :

6 dec; cut the yarn and hide inside the work. Sew the beads to whites; pull the thread a little to place whites deeper inside the eyes

— Eyelid :

Round 1 :

Start 6sc in a mr

Round 2 :

6 inc (12)

Round 3 :

(1 sc, inc) x 6 times (18)

Round 4 :

(2 sc, inc) x 6 times (20)

Round 5-6 :

work in the round 20 sc

Info :

Install whites inside eyelid, sew. Sew the eyes together and sew to the head.

— Dress :

Round 1 :

make 18 stitches on the head.

Round 2-6 :

work in the round 18 sc (5 rounds)

Round 7 :

BLO 18 sc

Round 8 :

(5 sc, inc) x 3 times (21)

Round 9-10 :

21 sc

Round 11 :

BLO 21 sc

Round 12 :

21 sc

Round 13 :

(6 sc, inc) x 3 times (24)

Round 14 :

24 sc

Round 15 :

BLO 24 sc

Round 16-20 :

24 sc (5 rounds)

Info :

Cut the yarn, hide inside the work.

— Now crochet ruffled ending :

Info :

Go back to the 6th round and work into front loops only.

Round 1 :

ch 3, 18 dc inc, sl st (36)

Round 2 :

ch 3, 36 dc inc, sl st

Round 3 :

attach another yarn color and crochet sc in the round. Also I recommend you to crochet 2 ruffled endings in the 10th and the 14th rounds.

— Front legs (make 2) :

Round 1 :

Start 6sc in a mr

Round 2 :

6 inc (12)

Round 3-5 :

work in the round 12 sc (3 rounds)

Round 6 :

(2 sc, dec) x 3 times (9)

Round 7-15 :

change yarn to pink color and crochet 9 sc in the round (9 rounds). Add some stuffing inside the hands.

Round 16 :

put together and crochet 4sc through the loops of both sides. Cut the yarn, leaving a tail to sew.

— Decoration and assembly :

Info :

Embroider the mouth and the nostrils. Sew front legs. Also I recommend you to sew a bow.

— Bunny :

Head :

Work in white yarn color

Round 1 :

Start 6 sc in a MR

Round 2 :

6 inc (12)

Round 3 :

(1 sc, inc) x 6 times (18)

Round 4 :

(2 sc, inc) x 6 times (24)

Round 5 :

(3 sc, inc) x 6 times (30)

Round 6 :

(4 sc, inc) x 6 times (36)

Round 7 :

(5 sc, inc) x 6 times (42)

Round 8 :

(6 sc, inc) x 6 times (48)

Round 9-16 :

48 sc (8 rounds)

Round 17 :

(6 sc, dec) x 6 times (42)

Round 18 :

(5 sc, dec) x 6 times (36)

Round 19 :

(4 sc, dec) x 6 times (30)

Round 20 :

(3 sc, dec) x 6 times (24). Stuff

Round 21 :

(2 sc, dec) x 6 times (18)

Round 22 :

BLO (1 sc, dec) x 6 times (12)

Round 23 :

6 dec, tighten the hole and weave in the yarn ends.

— Body :

Round 1 :

in red color through front loops of round 21 of the head, 18 sc

Round 2 :

18 sc

Round 3 :

change color to white, BLO 18 sc

Round 4-6 :

18 sc (3 rounds)

Round 7 :

(5 sc, inc) x 3 times (21)

Round 8-11 :

21 sc (4 rounds)

Round 12 :

(6 sc, inc) x 3 times (24)

Round 13 :

change color to blue, BLO 24 sc

Round 14-19 :

24 sc (6 rounds)

Round 20 :

23 sc, 1 sl st

Info :

TIP – crochet in the last round a little bit more to hide the yarn in the leg.

— Shirt :

Round 1 :

18 sc (return to round 2 of the body, crochet in yellow color through front loops)

Round 2 :

(2 sc, inc) x 6 times (24)

Round 3 :

(3 sc, inc) x 6 times (30)

Round 4 :

(4 sc, inc) x 6 times (36)

Round 5-9 :

36 sc (5 rounds)

Round 10 :

(4 sc, dec) x 6 times (30)

Round 11 :

(3 sc, dec) x 6 times (24). Stuff the tummy slightly.

Round 12 :

crochet through stitches on the shirt and front loops of round 13 of the body: 24 sc

Round 13 :

(1 sc, inc) x 12 times (36)

Round 14 :

36 sc

Round 15 :

change color to red, 35 sc, 1 sl st, fasten off, do not cut the yarn, pull it to round 13 and crochet the belt with sl st. Cut the yarn, weave in the yarn end in the shirt. Embroider a collar on the shirt in red color.

— Arms (2 pcs.) :

Round 1 :

Start 6 sc in a MR (work in white yarn color)

Round 2 :

6 inc (12)

Round 3-5 :

12 sc (3 rounds)

Round 6 :

(2 sc, dec) x 3 times (9)

Round 7-15 :

change color to yellow, 9 sc (9 rounds). Stuff the palms slightly.

Round 16 :

fold the arm in half and crochet 4 sc through both sides. Cut the yarn, leaving a long tail for sewing.

— Legs :

Round 1 :

Start 6 sc in a MR (work in white yarn color)

Round 2 :

6 inc (12)

Round 3-4 :

12 sc (2 rounds)

Round 5 :

fold the arm in half and crochet 6 sc through both sides. Cut the yarn, leaving a long tail for sewing.

— Ears (2 pcs.) :

Round 1 :

Start 6 sc in a MR (crochet in white color)

Round 2 :

(1 sc, inc) x 3 times (9)

Round 3 :

9 sc

Round 4 :

(2 sc, inc) x 3 times (12)

Round 5 :

(3 sc, inc) x 3 times (15)

Round 6 :

(4 sc, inc) x 3 times (18)

Round 7 :

(5 sc, inc) x 3 times (21)

Round 8-10 :

21 sc (3 rounds)

Round 11 :

(5 sc, dec) x 3 times (18)

Round 12 :

(4 sc, dec) x 3 times (15)

Round 13 :

(3 sc, dec) x 3 times (12)

Round 14-15 :

12 sc. Cut the yarn, leaving a long tail for sewing.

— Assembly and decoration :

Info :

Sew on the legs. Sew the arms approximately to round 2 of the shirt. Place the ears on the head as you like more, sew them on. Sew on eyes, inserting the needle at the back between the stitches. Fix the eyes and exit the needle through the starting point. Tie a knot, pulling tightly. The eyes should drown a little. Next, embroider a mouth and eyebrows. You can apply blush with pastel pencils or shadows.

— Fox :

Head :

Work in orange yarn color

Round 1 :

Start 6 sc in a MR

Round 2 :

6 inc (12)

Round 3 :

(1 sc, inc) x 6 times (18)

Round 4 :

(2 sc, inc) x 6 times (24)

Round 5 :

(3 sc, inc) x 6 times (30)

Round 6 :

(4 sc, inc) x 6 times (36)

Round 7 :

(5 sc, inc) x 6 times (42)

Round 8-12 :

42 sc (5 rounds)

Round 13 :

(6 sc, inc) x 6 times (48)

Info :

Change color to white.

Round 14-16 :

48 sc (3 rounds)

Round 17 :

(6 sc, dec) x 6 times (42)

Round 18 :

(5 sc, dec) x 6 times (36)

Round 19 :

(4 sc, dec) x 6 times (30)

Round 20 :

(3 sc, dec) x 6 times (24). Stuff

Round 21 :

(2 sc, dec) x 6 times (18)

Round 22 :

BLO (1 sc, dec) x 6 times (12)

Round 23 :

6 dec, tighten the hole and weave in the yarn ends.

— Muzzle :

Round 1 :

Start 6sc in a MR (orange yarn color)

Round 2 :

3 inc orange yarn color, 3 inc white yarn color (12)

Round 3-4 :

6 sc orange yarn color, 6 sc white yarn color (12)

Info :

It may help to close last loop of color changing in new yarn color. As a result, color changing looks neat (as pictured).

Round 5 :

(3 sc, inc, 2 sc) orange yarn color, (2sc, inc, 2 sc, inc) white yarn color (15)

Round 6-7 :

7 sc orange yarn color, 8 sc white yarn color (15)

Info :

Cut the yarn, leaving a long tail for sewing. Stuff.

— Ears (2 pcs.) :

Round 1 :

Start 6 sc in a MR (crochet in orange color)

Round 2 :

6 sc

Round 3 :

(1 sc, inc) x 3 times (9)

Round 4 :

(2 sc, inc) x 3 times (12)

Round 5 :

(3 sc, inc) x 3 times (15)

Round 6 :

(4 sc, inc) x 3 times (18)

Round 7-9 :

work in the round as shown (7-9 Rnd – 24 sc (3 rounds) visible in pattern), cut the yarn leaving tail. Do not stuff.

— Arms (2 pcs.) :

Round 1 :

Start 6 sc in a MR (crochet in orange color)

Round 2 :

6 inc (12)

Round 3-5 :

12 sc (3 rounds)

Round 6 :

(2 sc, dec) x 3 times (9)

Round 7-15 :

change color to white, 9 sc (9 rounds). Stuff the palms slightly.

Round 16 :

fold the arm in half and crochet 4 sc through both sides. Cut the yarn, leaving a long tail for sewing.

— Petticoat / Top skirt (fox) :

Round 1 :

in white color through front loops of round 21 of the head, 18 sc

Round 2 :

18 inc (36)

Round 3-14 :

36 sc (12 rounds)

Round 15 :

change color to yellow, 36 sc

Round 16 :

(1 sc, ch 3) x 36 times

Assembly Instructions

  • Fold each ear in half and sew 4 stitches through the loops to shape; pin ears to the head at the position between rounds 15-16 and sew securely.
  • Sew the arms to the body where the head and body meet, aligning the top of the arm with the seam and anchoring firmly with small running stitches.
  • Attach the front legs by sewing the base to the lower body opening; when legs are paired, crochet through both sides as instructed to close and secure.
  • Stitch eyes (beads) through the white eye pieces, pull slightly to set them deeper, then sew the completed eyes to the head in symmetrical positions.
  • For the frog and dress ruffles, sew skirts to the body rings and secure ruffled tiers with small hidden stitches so the ruffles sit evenly around the waist.

Important Notes

  • 💡Use stitch markers to mark the start of each round to keep track of increases and decreases, especially when switching colors.
  • 💡Weave and hide yarn tails inside the work as you go to keep small parts neat and reduce finishing time.
  • 💡Stuff small parts gradually; for tiny puppets a little stuffing goes a long way—avoid overstuffing to maintain proper shape.
  • 💡When joining two round pieces (ears, cuffs), align edges carefully and crochet or slip stitch evenly around to avoid puckering.

This Teremok finger puppet set brings a little wooden-house story to life with tiny, detailed amigurumi puppets full of personality. Each character is carefully shaped with clear round-by-round instructions so you can recreate them with confidence. Perfect as gifts, play toys, or a whimsical handmade display to delight kids and collectors alike. 🧶🎁✨

You ask,

we answer.

FAQs

What size will the finished piece be?

Each finger puppet measures approximately 3.15 inches (8 cm) tall when made with thin Vita Cotton Iris yarn and hooks of 1.2–1.5 mm.

Can I use different yarn weights for this pattern?

Yes, you can use different yarn weights but this will change the final size—use a larger hook for bulkier yarns and adjust counts as needed.

Do I need prior crochet experience for this pattern?

This pattern is rated intermediate; basic amigurumi experience, working in the round, increases, decreases and color changes are recommended.

How long does this project typically take to complete?

Completing the full Teremok set typically takes 12-15 hours, depending on experience and how many characters you make.