🧢 Beautiful ✨ Detailed πŸ’ Adorable

Round Bag with T-shirt Yarn Pattern

Round Bag with T-shirt Yarn Pattern
4.3β˜… Rating
5-7 Hours Time Needed
3.0K Made This
βœ‚οΈ

Beginner Friendly Level

Perfect for those just starting their crochet journey, with clear instructions and simple techniques

⏱️

Weekend Treat

Takes 5-7 hours, making it an enjoyable project to finish over a couple of days.

✨

Stylish Touch

An elegant detail to elevate any look, combining traditional crochet techniques with contemporary accessory design for a chic handmade finish.

About This Round Bag with T-shirt Yarn Pattern

This pattern teaches you how to crochet a compact round bag using t-shirt yarn and a 6 mm hook. The design includes detailed instructions for the circular base, edge trim, joining two halves, attaching hardware and making a matching tassel. It is designed with beginners in mind and includes helpful notes for finishing and ironing the canvas.

Round Bag with T-shirt Yarn Pattern crochet pattern - detailed view of completed project

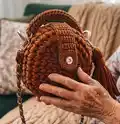
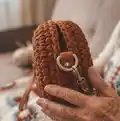
You will create two identical halves and join them with slip stitches, then add a leather valve, chain strap and a decorative tassel. The finished bag measures approximately 7-8 inches (18-20 cm) in diameter.

Why You'll Love This Round Bag with T-shirt Yarn Pattern

I absolutely love this pattern because it turns simple t-shirt yarn into a polished, wearable accessory with minimal tools. I enjoy how quickly a round base grows and how effective the split single stitch is at producing a tight, textured canvas. The assembly and tassel make the bag feel boutique-made, and you can customize colors and hardware to suit your style. Sharing a simple, satisfying project that looks expensive is one of my favorite things about teaching crochet.

Round Bag with T-shirt Yarn Pattern step 1 - construction progress Round Bag with T-shirt Yarn Pattern step 2 - assembly progress Round Bag with T-shirt Yarn Pattern step 3 - details and accessories Round Bag with T-shirt Yarn Pattern step 4 - final assembly and finishing

Switch Things Up

I love customizing this pattern by changing yarn color and hardware for a fresh look each time.

I sometimes swap the t-shirt yarn for a slightly thinner ribbon yarn and use a smaller hook to make a more delicate purse.

I increase the base rounds to make a larger bagβ€”add two extra increase rounds and keep the same increase pattern for a wider diameter.

To make a compact coin pouch, reduce the number of increase rounds and shorten the strap before attaching hardware.

I add a simple fabric lining for extra structure and to prevent small items from slipping through the stitches.

Try different strap options: a leather strap for a refined finish, a long chain for crossbody styling, or a braided crochet strap for a boho vibe.

Swap the tassel for a pompom, leather fringe, or a crocheted flower to match seasonal outfits.

I often embroider initials or add a small pocket to the lining for practical personalization.

To make the bag more structured, use interfacing inside the lining and steam the outside canvas thoroughly through a damp cloth.

I recommend playing with button/valve placementsβ€”moving the closure slightly changes the bag’s profile and accessibility.

Mix metals and leathers from thrifted supplies to create a unique, eclectic strap and fastening combination I love to wear.

When I want a festive gift, I use bright multicolor t-shirt yarn and a contrasting tassel to make the bag pop and feel special.

Common Mistakes & How to Fix Them

βœ— Taking yarn from the inside of the bobbin rather than the outside causes twisting problems; always pull the thread from the outside so loops lie flat and untwisted. βœ— Skipping the split single stitch technique will leave holes and an uneven edge; insert the hook between the legs of each stitch and split carefully as described to create a tight canvas. βœ— Overstuffing or failing to steam the circle may distort the shape; steam the circle through a damp cloth and shape gently for a flat, professional base. βœ— Not hiding and securing the starting end after the second row leaves a visible hole; pull the end through all stitches of the first row from the wrong side, tighten and hide the end. βœ— Crocheting with inconsistent tension leads to wavy or uneven seams; maintain consistent tension and check stitch counts after each round to keep the circle even.

Round Bag with T-shirt Yarn Pattern

Make a stylish round crochet bag using t-shirt yarn β€” a fun beginner-friendly project that results in a sturdy, textured purse. You will learn circle construction, split single stitch technique, base trimming, and simple assembly with hardware. Perfect for creating a custom accessory with tassel and chain strap that looks professional and handmade.

Beginner Friendly 5-7 Hours

Materials Needed for Round Bag with T-shirt Yarn Pattern

β€” Main Fabric

  • 01
    T-shirt yarn, width 7-9 mm, 131 yard (120 meters) - main quantity (example pictured: brown)
  • 02
    Extra t-shirt yarn for tassel and trim, approximately 20-50g depending on tassel size

β€” Tools Required

  • 01
    Crochet hook N6 - 6 mm
  • 02
    Set of hardware: chain (47 inches / 120 cm); valve with button; 2 snap hook-rings; 3 snap hooks
  • 03
    Sewing thread (color matched to yarn)
  • 04
    Sewing needle
  • 05
    Needle with large eyelet (for threading yarn through chain links)
  • 06
    Scissors
  • 07
    Iron and damp cloth (for steaming the circle and edges)
  • 08
    Yarn needle for weaving and finishing

Progress Tracker

0% Complete

β€” Base (circle) :

Info :

Crochet 2 CH.

Round 1 :

1 row. Crochet 6 SC in the 2nd loop from the hook. In the 1st SC crochet CH like on the video. (6)

Round 2 :

1 Inc * 6 = 12, CH. (12)

Round 3 :

(1 SC, 1 Inc) * 6 = 18, CH. (18)

Round 4 :

(2 SC, 1 Inc) * 6 = 24, CH. (24)

Round 5 :

(3 SC, 1 Inc) * 6 = 30, CH. (30)

Round 6 :

(4 SC, 1 Inc) * 6 = 36, CH. Don't cut the thread. (36)

Info :

Steam the circle with an iron through a damp cloth at high setting. T-shirt yarn can withstand high temperatures. Iron through a damp cloth so that the canvas does not shine.

Round 7 :

36 SC, CH. (36)

Round 8 :

36 SC. Don't cut the thread. (36)

β€” Base trim :

Info :

Pull the loop under 1st SC, pull out on the wrong side under last SC. Crochet the base trim SlSt in each loop. Cut the end. Pull the end under 1st SlSt, pull back on the wrong side. Strengthen and hide the end. Steam the edge with an iron through a damp cloth.

Info :

Similarly, crochet the second part of the bag (make the second identical circle following the same rounds and finishing steps).

β€” Assembly :

Step 1 :

Join the 2 parts of the bag with the edges. Insert the hook in the loops of the previous row of both parts of the bag. Pull out the loop. Again, insert the hook in the loops of the previous row of both parts of the bag. Pull out the next loop, crochet SlSt. Each time, insert the hook, first in one part, then in the other. Crochet SlSt, leave unconnected 7-8 inches (18-20 cm). Strengthen and hide both ends of the thread on the wrong side.

Step 2 :

Insert the snap hook-rings in the places where the connecting seam ends.

Step 3 :

Sew on the valve. Sew on the top part of the valve. Then, position the lower part of the valve to where it is supposed to be and sew on it.

Step 4 :

Cut off the piece of the yarn 48 inches (122 cm) long. Pass the piece of the yarn through each link of the chain with the needle with large eyelet. Sew in the ends with the sewing needle and the sewing thread with the color of the yarn. Fasten the shoulder strap to the snap hook-rings.

β€” Make the tassel :

Step 1 :

Cut off 20-25 pieces of the yarn 13-14 inches (33-35 cm) long. Intercept with a longer piece in the middle. Put a snap hook on the piece of the yarn.

Step 2 :

Wrap the bundle with a long piece several times. Tie the ends, hide them under the turns.

Step 3 :

Spread the tassel with hands, cut off the ends exactly. Hang the tassel on any snap hook-ring.

Info :

Congratulations! Your cute bag is ready πŸ‘

Assembly Instructions

  • Join the 2 crocheted circular halves by inserting the hook into the loops of the previous row of both parts, pull up loops and work SlSt through both layers, leaving an opening 7-8 inches (18-20 cm) for access; secure and hide ends on the wrong side.
  • Insert snap hook-rings at the locations where the connecting seam ends so the strap hardware lines up symmetrically with the bag opening.
  • Sew the valve (leather strap with snap) to the bag top: sew the top part first, then position and sew the lower part so the snap aligns correctly.
  • Thread the chain: cut yarn 48 inches (122 cm), pass it through each link of the chain using a needle with a large eyelet, then sew and secure the yarn ends to the chain to finish the strap.
  • Attach the tassel to any snap hook-ring by wrapping and tying the tassel bundle, hiding the knot under the wrap, trimming ends evenly, and fastening the snap hook onto the ring.

Important Notes

  • πŸ’‘Take the thread from the outside of the bobbin, not from the middle; this reduces twisting and makes crocheting easier.
  • πŸ’‘When crocheting with t-shirt yarn use split single stitch by inserting the hook between the legs of the stitch to avoid holes and create a dense canvas.
  • πŸ’‘Steam the circle and edges through a damp cloth at a high setting to shape and flatten the base without making the canvas shine.
  • πŸ’‘Hide and strengthen all starting and finishing ends on the wrong side after pulling the end through the first-row stitches so the hole is removed.

Thank you for making this round t-shirt yarn bag with me β€” I hope it becomes a favorite accessory in your collection. 🧢 This pattern is perfect for gifting or selling finished bags and makes a great craft weekend project. ✨ Happy crocheting and have fun customizing your colors and hardware! 🧡

You ask,

we answer.

FAQs

What size will the finished piece be?

The finished bag has a diameter of approximately 7-8 inches (18-20 cm) and a width of about 4 3/8 inches (11 cm) when made with the recommended t-shirt yarn and 6 mm hook.

Can I use different yarn weights for this pattern?

You can use other yarn weights, but this will change the final size and texture; choose an appropriate hook size and expect differences in stitch counts and finished dimensions.

Do I need prior crochet experience for this pattern?

This pattern is beginner friendly; basic knowledge of single crochet and increases is helpful, and the instructions include tips for working split single stitches and finishing.

How long does this project typically take to complete?

Most crocheters finish this bag in about 5-7 hours, depending on experience and how much time you spend on sewing hardware and making the tassel.