🧶 Beautiful ✨ Detailed 💝 Adorable

Farm Finger Puppet Amigurumi Pattern

Farm Finger Puppet Amigurumi Pattern
4.7★ Rating
12+ Hours Time Needed
3.4K Made This
✂️

Intermediate Level

Ideal for those with basic crochet experience, featuring slightly more advanced stitches and techniques to expand your skills.

⏱️

Multi-Day Project

A rewarding 12+ hour journey—perfect for dedicated crafters who love detailed work.

🧸

Cute Companion

An adorable friend to cherish, handcrafted with love to bring comfort and joy for years to come.

About This Farm Finger Puppet Amigurumi Pattern

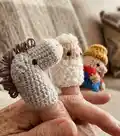
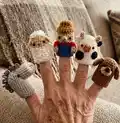
This pattern creates a full Farm Finger Puppet set of 10 tiny amigurumi characters perfect for play and storytelling. Each puppet is worked mostly in rounds using the BLO (back loop only) technique for a thin, tidy finish. You will find clear, repeatable rounds for the body of each puppet plus small parts like noses, ears, beaks, and accessories.
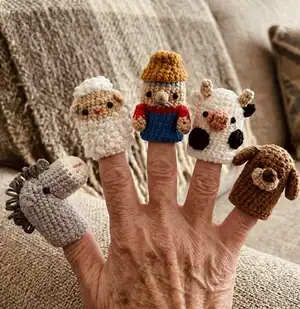
Farm Finger Puppet Amigurumi Pattern crochet pattern - detailed view of completed project

Includes materials lists, abbreviations, and detailed assembly instructions for accurate placement of features. Ideal for making a themed set for kids, gifts, or a playful handmade collection.

Why You'll Love This Farm Finger Puppet Amigurumi Pattern

I absolutely love this pattern because it brings an entire farm to life in a compact, delightful form that fits on your fingertips. I enjoy how quick each character works up while still offering opportunities for little details like embroidered noses and looped manes. I wrote the instructions to be consistent so you can speed through multiple characters with confidence. I also love that these puppets make a perfect gift set or classroom storytelling tool that every child can enjoy.

Farm Finger Puppet Amigurumi Pattern step 1 - construction progress Farm Finger Puppet Amigurumi Pattern step 2 - assembly progress Farm Finger Puppet Amigurumi Pattern step 3 - details and accessories Farm Finger Puppet Amigurumi Pattern step 4 - final assembly and finishing

Switch Things Up

I love how easy it is to customize these puppets by swapping yarn colors; try pastel palettes for a nursery set or bright colors for a playful classroom group.

To make a pocket-sized keychain version, use thinner yarn and a smaller hook and attach a keyring to the top after finishing.

If you want chunkier, cuddlier puppets, choose a bulkier yarn and larger hook — the character proportions remain charming at any scale.

I sometimes embroider additional facial details like freckles or eyebrows to give each puppet unique personality and expression.

Change eye style between small beads, French knots, or embroidered dots for different looks and safety preferences.

For a textured lamb or sheep, use loop stitch or intentionally leave knitted loops while sewing fur as described to create a fluffy coat.

Add tiny accessories like scarves, hats, or tiny crocheted props to tell a story with the set — a tractor, basket, or tiny carrot add fun detail.

I also enjoy mixing felt pieces with crochet for quick, flat details — felt ears or patches sewn on create crisp shapes without extra crochet work.

If you want posable puppets, add a thin wire inside the body (carefully secured) to bend necks or tails for extra play possibilities.

Practice making one mascot first (like Old McDonald) to get rhythm, then speed up production by making multiple identical bodies in one sitting and finishing details afterwards.

Common Mistakes & How to Fix Them

✗ Skipping the back loop only (BLO) instruction will change the shape and thickness; always work BLO where directed to achieve the flat finger-puppet profile. ✗ Forgetting to change colors at specified rounds causes uneven color bands; change yarn at the end of the round and hide the tail neatly on the inside. ✗ Not fastening off and weaving ends securely results in loose pieces during play; secure all ends and weave them inside the puppet before final assembly. ✗ Placing eyes without counting stitches can make the face look lopsided; count stitches and follow the recommended round and stitch spacing for symmetrical features. ✗ Overstuffing or under-stuffing small parts distorts the shape; fill tiny noses and snouts sparingly and shape as you sew to keep proportions correct.
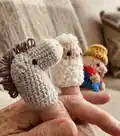
Farm Finger Puppet Amigurumi Pattern

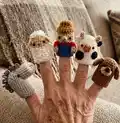
Create an entire barnyard of adorable finger puppets with this comprehensive crochet pattern. You will make ten cute characters — Old McDonald, cow, chicken, cat, duck, pig, dog, horse, donkey and lamb — each sized for tiny hands and storytime fun. The pattern uses back loop only (BLO) technique to create a flat, neat finish and includes step-by-step rounds, small parts, and assembly notes. Perfect for gift-making, play sets, or a cheerful collection to brighten your day.

Intermediate 12+ Hours

Materials Needed for Farm Finger Puppet Amigurumi Pattern

— Main Fabric

  • 01
    Cream yarn (for faces, nose details and Old McDonald skin)
  • 02
    Grey yarn (for cat, donkey, Old McDonald top)
  • 03
    Orange yarn (for Old McDonald hat, beaks and small details)
  • 04
    Red yarn (for Old McDonald trim, comb, wattle)
  • 05
    Blue yarn (for Old McDonald overalls)
  • 06
    White yarn (for cow, chicken, lamb body)
  • 07
    Dark grey yarn (for donkey mane and accents)
  • 08
    Pink yarn (for pig, nose details)
  • 09
    Black yarn (for cow patches and small details)
  • 10
    Brown yarn (for dog, horse body)
  • 11
    Dark brown yarn (for horse mane and accents)
  • 12
    Yellow yarn (for duck body)

— Tools Required

  • 01
    Crochet hook size 3.0 mm (no. 3)
  • 02
    Needle to sew (yarn needle)
  • 03
    Small black beads for eyes (pair each puppet)
  • 04
    Yarn for colors listed
  • 05
    Sewing thread (black, orange, red, pink, white, grey, dark brown, cream)
  • 06
    Toy stuffing (small amount for noses/snouts)
  • 07
    Scissors
  • 08
    Stitch markers (optional)

Progress Tracker

0% Complete

— General Info :

Infos :

All puppets are worked in BLO (back loop only) to create a flat and thin finger puppet. Use small black beads for eyes or embroider eyes as preferred. Start each small part with a magic ring unless otherwise stated.

— Old McDonald :

Body - Start with grey yarn - Round 1 :

5 sc in a magic ring [5]

Round 2 :

inc x 5 [10]

Round 3 :

(sc, inc) x 5 [15]

Round 4 :

(sc 2, inc) x 5 [20]

Round 5 :

(sc 3, inc) x 5 [25]

Info :

Change to cream yarn

Round 6-8 :

sc around [25]

Info :

Change to red yarn

Round 9 :

sc around [25]

Info :

Change to blue yarn

Round 10-14 :

sc around [25]

Round 15 :

slst

Hands (make two) - Start with cream yarn - Round 1 :

4 sc in a magic ring [4]

Round 2 :

inc, sc, inc, sc [6]

Info :

Change to red yarn

Round 3 :

sc 6 [6]

Round 4 :

sc 6 [6]

Round 5 :

slst

Hat - Start with orange yarn - Round 1 :

4 sc in a magic ring [4]

Round 2 :

inc x 4 [8]

Round 3 :

(sc, inc) x 4 [12]

Round 4 :

sc around [12]

Round 5 :

(sc 2, inc) x 4 [16]

Round 6 :

(sc 3, inc) x 4 [20]

Round 7 :

slst

Nose - Start with cream yarn - Round 1 :

4 sc in a magic ring [4]

Round 2 :

slst

— Assembling Old McDonald :

Info :

1. Sew the nose in the center, on the 7th round. 2. Sew the eyes, 7th round, 1 stitches apart from the nose. 3. Embroider the moustache with grey yarn. 4. Sew both hands. 5. Sew the hat.

— Cow :

Body - Start with white yarn - Round 1 :

5 sc in a magic ring [5]

Round 2 :

inc x 5 [10]

Round 3 :

(sc, inc) x 5 [15]

Round 4 :

(sc 2, inc) x 5 [20]

Round 5 :

(sc 3, inc) x 5 [25]

Round 6-13 :

sc around [25]

Round 14 :

slst

Nose - Start with pink yarn - Round 1 :

4 sc in a magic ring [4]

Round 2 :

inc x 4 [8]

Round 3 :

slst

Ears - make two - Ear 1 Start with white yarn :

Make a chain [3], turn. Row 2: sc 2, slst

Ear 2 Start with black yarn :

Make a chain [3], turn. Row 2: sc 2, slst

Horns - make two - Start with cream yarn - Round 1 :

3 sc in a magic ring [3]

Round 2 :

sc x 3 [3]

Round 3 :

sc x 3 [3]

Round 4 :

slst

Black Patch - make two - Patch 1 Start with black yarn - Round 1 :

3 sc in a magic ring [3]

Round 2 :

inc x 3 [6]

Patch 1 End :

slst

Patch 2 Start with black yarn - Round 1 :

4 sc in a magic ring [4]

Round 2 :

inc x 4 [8]

Patch 2 End :

slst

— Assembling Cow :

Infos :

1. Make 2 vertical line on the nose with brown yarn. Sew it on 6th round. 2. Sew the eyes, between the nose. 3. Sew both ears and horns. 4. Sew both black patch.

— Chicken :

Body - Start with white yarn - Round 1 :

5 sc in a magic ring [5]

Round 2 :

inc x 5 [10]

Round 3 :

(sc, inc) x 5 [15]

Round 4 :

(sc 2, inc) x 5 [20]

Round 5 :

(sc 3, inc) x 5 [25]

Round 6-13 :

sc around [25]

Round 14 :

slst

Chicken Beak - Start with orange yarn :

Make a chain [4], turn. Row 2: sc 2, inc, sc 2, slst

Chicken Comb - Start with red yarn :

Make a chain [6], turn. Row 2: sc, dc, slst, dc, sc, slst

— Assembling Chicken :

Infos :

1. Sew the beak on 5th round. 2. Sew the eyes, between the beak. 3. Sew the wattle with red yarn. 4. Sew the comb in the centre of the head.

— Cat :

Body - Start with grey yarn - Round 1 :

5 sc in a magic ring [5]

Round 2 :

inc x 5 [10]

Round 3 :

(sc, inc) x 5 [15]

Round 4 :

(sc 2, inc) x 5 [20]

Round 5 :

(sc 3, inc) x 5 [25]

Round 6-13 :

sc around [25]

Round 14 :

slst

Ears - make two - Start with grey yarn :

Make a chain [3], turn. Row 2: sc 2, slst

— Assembling Cat :

Infos :

1. Sew the eyes, 5th round, 4 stitches apart. 2. Sew the nose with red/black sewing thread. 3. Sew the whiskers beside the eyes. 4. Sew both ears.

— Duck :

Body - Start with yellow yarn - Round 1 :

5 sc in a magic ring [5]

Round 2 :

inc x 5 [10]

Round 3 :

(sc, inc) x 5 [15]

Round 4 :

(sc 2, inc) x 5 [20]

Round 5 :

(sc 3, inc) x 5 [25]

Round 6-13 :

sc around [25]

Round 14 :

slst

Beak - Start with orange yarn :

Make a chain [5], turn. Rnd 1: sc 3, inc, sc 3 [8], slst

— Assembling Duck :

Infos :

1. Sew the nose, 7th round. 2. Sew the eyes, between the nose. 3. Sew the crest on top of the head.

— Pig :

Body - Start with pink yarn - Round 1 :

5 sc in a magic ring [5]

Round 2 :

inc x 5 [10]

Round 3 :

(sc, inc) x 5 [15]

Round 4 :

(sc 2, inc) x 5 [20]

Round 5 :

(sc 3, inc) x 5 [25]

Round 6-13 :

sc around [25]

Round 14 :

slst

Nose - Start with pink yarn - Round 1 :

4 sc in a magic ring [4]

Round 2 :

inc, sc, inc, sc [6]

Round 3 :

slst

Ears - make two - Start with pink yarn :

Make a chain [3], turn. Row 2: sc 2, slst

— Assembling Pig :

Infos :

1. Embroider the nose using cream yarn. Sew it on 6th round. 2. Sew the eyes, between the nose. 3. Sew both ears.

— Dog :

Body - Start with brown yarn - Round 1 :

5 sc in a magic ring [5]

Round 2 :

inc x 5 [10]

Round 3 :

(sc, inc) x 5 [15]

Round 4 :

(sc 2, inc) x 5 [20]

Round 5 :

(sc 3, inc) x 5 [25]

Round 6-13 :

sc around [25]

Round 14 :

slst

Ears - Start with brown yarn - Round 1 :

4 sc in a magic ring [4]

Round 2 :

inc x 4 [8]

Round 3-5 :

sc around [8]

Round 6 :

slst

Snout - Start with cream yarn :

Make a chain [4], turn. Rnd 2: sc, sc, inc, sc, sc, inc [8]. Rnd 3: sc around [8]. slst

Nose - Start with brown yarn - Round 1 :

4 sc in a magic ring [4]

Round 2 :

slst

— Assembling Dog :

Infos :

1. Sew the nose on the snout. Sew it on 6th round. 2. Sew the eyes, above the snout. 3. Sew both ears on round 4.

— Horse :

Body - Start with brown yarn - Round 1 :

5 sc in a magic ring [5]

Round 2 :

inc x 5 [10]

Round 3 :

(sc, inc) x 5 [15]

Round 4 :

(sc 2, inc) x 5 [20]

Round 5 :

(sc 3, inc) x 5 [25]

Round 6-13 :

sc around [25]

Round 14 :

slst

Nose - Start with pink yarn - Round 1 :

5 sc in a magic ring [5]

Round 2 :

inc x 5 [10]

Round 3 :

(sc, inc) x 5 [15]

Round 4 :

(sc 2, inc) x 5 [20]

Info :

Change to brown yarn

Round 5-7 :

sc around [20]

Round 8 :

slst

Ears - make two - Start with brown yarn :

Make a chain [3], turn. Row 2: sc 2. slst

— Assembling Horse :

Infos :

1. Embroider the nose with cream yarn. Fill the nose with toy stuffing, and then sew it to the body. 2. Sew the eyes on each side of the body. 3. Sew both ears, 2 stitches apart from the eyes. 4. Make the mane with dark brown yarn by making a loop.

— Donkey :

Body - Start with grey yarn - Round 1 :

5 sc in a magic ring [5]

Round 2 :

inc x 5 [10]

Round 3 :

(sc, inc) x 5 [15]

Round 4 :

(sc 2, inc) x 5 [20]

Round 5 :

(sc 3, inc) x 5 [25]

Round 6-13 :

sc around [25]

Round 14 :

slst

Nose - Start with white yarn - Round 1 :

5 sc in a magic ring [5]

Round 2 :

inc x 5 [10]

Round 3 :

(sc, inc) x 5 [15]

Round 4 :

(sc 2, inc) x 5 [20]

Info :

Change to grey yarn

Round 5-7 :

sc around [20]

Round 8 :

slst

Ears - make two - Start with grey yarn :

Make a chain [3], turn. Row 2: sc 2, slst

— Assembling Donkey :

Infos :

1. Embroider the nose with pink yarn. Fill the nose with toy stuffing, and then sew it to the body. 2. Sew the eyes on each side of the body. 3. Sew both ears, 2 stitches apart from the eyes. 4. Make the mane with dark grey yarn by making a loop.

— Lamb :

Body - Start with white yarn - Round 1 :

5 sc in a magic ring [5]

Round 2 :

inc x 5 [10]

Round 3 :

(sc, inc) x 5 [15]

Info :

Change to cream yarn

Round 4 :

(sc 2, inc) x 5 [20]

Round 5 :

(sc 3, inc) x 5 [25]

Round 6-7 :

sc around [25]

Info :

Change to white yarn

Round 8-13 :

sc around [25]

Round 14 :

slst

Ears - make two - Start with cream yarn :

Make a chain [3], turn. Row 2: sc 2, ch 1, slst

— Assembling Lamb :

Infos :

1. Sew the fur with white yarn. Leave each stitches loose to create loops. 2. Sew the eyes on 6th round, 4 stitches apart. 3. Embroider the mouth with red sewing thread. 4. Sew both ears.

Assembly Instructions

  • Sew the nose on the center of the head at the round specified in each pattern (commonly round 6 or 7), securing it firmly with small stitches.
  • Position and sew the eyes according to each pattern note (for example, Cat: 5th round, 4 stitches apart; Cow: between the nose), attaching beads or embroidering as preferred.
  • Attach ears, horns, or other small parts on the rounds specified (for example, Cow ears and horns on the sides; Horse ears two stitches apart from the eyes) and sew firmly with matching yarn.
  • Add decorative parts (beaks, combs, hands, hat, patches) in the positions shown in the photos and instructions, using whipstitch or ladder stitch for a neat finish.
  • For noses and snouts that require stuffing, add a small amount of toy stuffing before closing and sewing them to the body to maintain shape and proportion.

Important Notes

  • 💡Work back loop only (BLO) where indicated to achieve the intended flat finger puppet shape and clean color bands.
  • 💡Use small beads or securely embroidered eyes for safety; if making for young children, embroider eyes rather than attaching beads.
  • 💡Change yarn colors at the end of rounds and weave in tails neatly to avoid visible bumps on the surface.
  • 💡Sew pieces in place before trimming ends to make repositioning easier and ensure symmetrical placement.
  • 💡Leave small parts like noses lightly stuffed and shape them as you sew to maintain correct proportions.

This Farm Finger Puppet set includes ten adorable tiny animals and Old McDonald himself, perfect for playtime and storytelling. Each puppet is designed with simple rounds and small, lovable details so you can make a full barnyard collection. Whether you gift the set or keep it for puppet shows, these little friends will bring lots of smiles. 🧶🐄🐷

You ask,

we answer.

FAQs

What size will the finished piece be?

Each finger puppet measures approximately 4-6 cm tall depending on yarn thickness and tension; they are sized to fit most fingertips when worked with a 3.0 mm hook and fingering to DK weight yarn.

Can I use different yarn weights for this pattern?

Yes, you can use different yarn weights but the finished size will change; use a suitable hook for your yarn and adjust eyes/embellishments accordingly.

Do I need prior crochet experience for this pattern?

This pattern is rated intermediate because it uses the magic ring, increasing, working in BLO, and small sewn parts; basic crochet skill is recommended.

How long does this project typically take to complete?

Making the entire 10-piece farm set typically takes 12+ hours; individual puppets can be finished in 30-90 minutes each depending on detail and your speed.