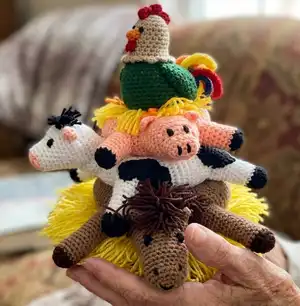
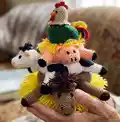
Create a charming stack of farm animals with this detailed amigurumi pattern that guides you through a cone base, hay skirt and four adorable animals. You will build a stable cone foundation, crochet body rings for each animal, and add playful details like manes, tails and hay strands. Perfect for gifting or as a playful home accent, this pattern combines accessible shaping and fun finishing techniques.
Progress Tracker
0% Complete
— Cone Base :
Round 1 :
Ch 3, sl st in first ch to join. Ch 1, work 2 sc in each ch. (6)
Round 2 :
Work 2 sc in each st. (12)
Round 3 :
(Sc in next st, work 2 sc in next st) Rep ( ) around. (18)
Round 4 :
(Sc in next 2 sts, work 2 sc in next st) Rep ( ) around. (24)
Round 5 :
(Sc in next 3 sts, work 2 sc in next st) Rep ( ) around. (30)
Round 6 :
(Sc in next 4 sts, work 2 st in next st) Rep ( ) around. (36)
Round 7 :
(Sc in next 5 sts, work 2 sc in next st) Rep ( ) around. (42)
Round 8 :
– Only if another rnd is needed so piece will completely cover base of cone - Sc in each st. (42) Fasten off, set aside.
— Outer Cone Base :
Beg with Bright Yellow.. (Info) :
Work in Bright Yellow..
Rnd 1 :
Ch 3, sl st in first ch to join. Ch 1, work 2 sc in each ch. (6)
Rnd 2 :
Work 2 sc in each st. (12)
Rnd 3 :
(Sc in next 3 sts, work 2 sc in next st) Rep ( ) around. (15)
Rnd 4 & 5 :
Sc in each st. (15)
Rnd 6 :
(Sc in next 4 sts, work 2 sc in next st) Rep ( ) around. (18)
Rnd 7 & 8 :
Sc in each st. (18)
Rnd 9 :
(Sc in next 5 sts, work 2 sc in next st) Rep ( ) around. (21)
Rnd 10 & 11 :
Sc in each st. (21)
Rnd 12 :
(Sc in next 6 sts, work 2 sc in next st) Rep ( ) around. (24)
Rnd 13 & 14 :
Sc in each st. (24)
Rnd 15 :
(Sc in next 7 sts, work 2 sc in next st) Rep ( ) around. (27)
Rnd 16 & 17 :
Sc in each st. (27)
Rnd 18 :
(Sc in next 8 sts, work 2 sc in next st) Rep ( ) around. (30)
Rnd 19 & 20 :
Sc in each st. (30)
Rnd 21 :
(Sc in next 9 sts, work 2 sc in next st) Rep ( ) around. (33)
Rnd 22 & 23 :
Sc in each st. (33)
Rnd 24 :
(Sc in next 10 sts, work 2 sc in next st) Rep ( ) around. (36)
Rnd 25 & 26 :
Sc in each st. (36)
Rnd 27 :
(Sc in next 11 sts, work 2 sc in next st) Rep ( ) around. (39)
Rnd 28 & 29 :
Sc in each st. (39)
Rnd 30 :
(Sc in next 12 sts, work 2 sc in next st) Rep ( ) around. (42)
Rnd 31 - 36 :
Sc in each st. (42) -- don’t fasten off.
— Assemble Cone Base and Cover :
Info :
* Note: I prefer to leave the packaging plastic cover on my styrofoam cone. I remove the label, but I feel the cone is less likely to break when the plastic is left on. It also makes it easier to slip the cone cover onto the cone. But this is my preference, but do whichever works best for you.
Round 37 :
Slip Outer Cone Cover onto Cone. Holding right side of Cone Base on bottom of Cone, and with the top of Cone towards you, join pieces by working through sts of Rnd 36 of Outer Cone Cover and last Rnd of Base. Work (sc in next 6 sts, work 2 sc in next st) Rep ( ) around. (48 sc) Join with sl st in first st.
Round 38 :
Work in bk lps only, for this rnd and each rnd to end. Ch 3 -counts as first dc in each rnd - dc in next 2 lps, inc (dc in next 3 lps, inc) Rep ( ) around. (60) Sl st in top of ch 3 to join.
Round 39 :
Ch 3, dc in next 3 lps, inc, (dc in next 4 lps, inc) Rep ( ) around. (72) Sl st in top of ch 3 to join.
Round 40 :
Ch 3, dc in next 4 lps, inc, (dc in next 5 lps, inc) Rep ( ) around. (84) Sl st in top of ch 3 to join.
Round 41 :
Ch 3, dc in next 5 lps, inc, (dc in next 6 lps, inc) Rep ( ) around. (96) Sl st in top of ch 3 to join.
Round 42 :
Ch 3, dc in next 6 lps, inc, (dc in next 7 lps, inc) Rep ( ) around. (108) Sl st in top of ch 3 to join.
Round 43 :
Ch 3, dc in next 7 lps, inc, (dc in next 8 lps, inc) Rep ( ) around. (120) Sl st in top of ch 3 to join. Fasten off.
— Hay Strands :
Info :
Cut several strands of Bright Yellow 6-1/2" long. (Hint: I wrap my yarn around a pack of Post-It Notes for the ideal length)
Instruction :
Beg with outer rnd of strands, knot 1 strand of yarn in each fr lp of sts of Rnd 43. Knot 1 strand of yarn in each rem lp of sts of Rnds 37 - 42. Strands shouldn’t need to be trimmed but that’s up to you if you choose to do so.
Note :
When working the Body Rings, the length of the ring should be long enough for the stuffed ring to go around the cone and have the ends meet without stretching the piece too much. If you need to work a couple of extra rnds or a couple less than what the instructions state, that’s perfectly fine.
— DIRECTIONS FOR HORSE :
Body Ring - Work in Cafe Latte :
Rnd 1: Ch 26, sl st in first ch to join. Ch 1, sc in each ch around. (26)
Rnd 2 - 78 :
Sc in each st. (26) Fasten off, leave tail for sewing. Stuff. Sew Rnd 1 to Rnd 78.
Neck - Work in Cafe Latte :
Leave long tail at beg of ch. Rnd 1: Ch 24, sl st in first ch to join. Ch 1, sc in each ch. (24) Rnd 2 - 5: Sc in each st. (24) Fasten off, leave long tail for sewing. Stuff. Sew to Body Ring as shown in photo, so Neck is angling upwards
Head - Work in Cafe Latte :
Rnd 1: Ch 3, sl st in first ch to join. Ch 1, work 2 sc in each ch. (6)
Round 2 :
Work 2 sc in each st. (12)
Round 3 :
(Sc in next st, inc) Rep ( ) around. (18)
Round 4 :
(Sc in next 2 sts, inc) Rep ( ) around. (24)
Round 4 - 10 :
Sc in each st. (24)
Round 11 :
(Sc in next 7 sts, inc) Rep ( ) around. (27)
Round 12 :
Sc in each st. (27)
Round 13 :
(Sc in next 8 sts, inc) Rep ( ) around. (30)
Round 14 :
Sc in each st. (30)
Round 15 :
(Sc in next 9 sts, inc) Rep ( ) around. (33)
Round 16 :
(Sc in next 10 sts, inc) Rep ( ) around. (36)
Round 17 & 18 :
Sc in each st. (36) Stuff as you work.
Round 19 :
(Sc in next 2 st, dec) Rep ( ) around. (24)
Round 20 & 21 :
(Sc next 2 sts tog) Rep ( ) around. (12)(6)
Round 22 :
Sl st in every other st 3 times. Fasten off. Work in ends.
Info :
Sew Head to top of Neck as shown in photo.
Ears (Make 2) :
Work in Cafe Latte. (Ch 5, sl st in 2nd ch from hk, sc in next ch, hdc in next ch, dc in last ch) Rep ( ) twice. Fasten off, leave tail for sewing. Place wrong sides tog, whipstitch pieces tog, leaving bottom (dc end) unsewn. Sew Ears 1” apart to Rnd 18 of Head.
Legs (Make 4) :
Beg with Coffee. Rnd 1: Ch 6, sl st in first ch. Ch 1, work 2 sc in each ch. (6)
Round 2 :
Work 2 sc in each st (12)
Round 3 :
(Sc in next 3 sts, inc) Rep ( ) around. (15) Break Coffee, attach Cafe Latte.
Rounds 4 - 14 :
Sc in each st. (15)
Round 15 :
(Sc in next 4 sts, inc) Rep ( ) around. (18)
Round 16 & 17 :
Sc in each st. (18)
Round 18 :
(Sc in next 5 sts, inc) Rep ( ) around. (21)
Round 19 :
(Sc in next 6 sts, inc) Rep ( ) around. (24) Fasten off, leave tail for sewing. Stuff. Sew Legs to Body Ring as shown in photo.
Tail :
Cut about 28 strands of Coffee 11” long. Wrap 1 strand around center of strands, knot tightly. With ends of strand, attach Tail to back end of Body Ring. Trim if desired.
Mane :
Cut several strands of Coffee 8” long. Holding 2 strands tog, knot 2 to 3 rows of strands from Rnd 16 of Head (between the Ears) to the bottom of Neck. Trim strands as desired. Strands between Ears should be shorter than the rest.
Facial Features - Eyes :
With Black and yarn needle, work 4-5 vertical str sts over Rnds 12 & 13 of Head, 1-1/4” apart.
Nostrils :
With Black and yarn needle, work 2 vertical str sts for each Nostril, working over Rnd 5 of Head, about 1” apart.
Mouth :
With Black and yarn needle, working in rev st, work smiley mouth at the end of Muzzle, about 3/4” across. Secure and work in all ends.
— DIRECTIONS FOR COW :
BODY RING - Work in White :
Rnd 1: Ch 24, sl st in first ch to join. Ch 1, sc in each ch around. (24)
Rnd 2 - 68 :
Sc in each st. (24) Fasten off, leave tail for sewing. Stuff. Sew Rnd 1 to Rnd 68.
Neck - Work in White :
Leave long tail at beg of ch. Rnd 1: Ch 24, sl st in first ch to join. Ch 1, sc in each ch. (24) Rnd 2 - 4: Sc in each st. (24) Fasten off, leave long tail for sewing. Stuff. Sew to Body Ring as shown in photo, so Neck is angling upwards
Head - Beg with Peach :
Rnd 1: Ch 5, work 2 sc in 2nd ch from hk, sc in next 2 chs, 3 sc in last ch. Turn to work down other side of ch; sc in next 2 chs, sc in same sp as first 2 sts. (10)
Round 2 :
Work 2 sc in next 2 sts, sc in next 2 sts, 2 sc in next 3 sts, sc in next 2 sts, 2 sc in last st. (16) Break Peach, attach White.
Rounds 3 - 5 :
Sc in each st. (16)
Round 6 :
(Sc in next 7 sts, inc) Rep twice. (18)
Round 7 :
Sc in each st. (18)
Round 8 :
(Sc in next 2 sts, inc) Rep ( ) around. (24)
Round 9 :
(Sc in next 3 sts, inc) Rep ( ) around. (30)
Round 10 :
Sc in each st. (30)
Round 11 :
(Sc in next 4 sts, inc) Rep ( ) around. (36)
Round 12 & 13 :
Sc in each st. (36)
Round 14 :
(Sc in next 4 sts, dec) Rep ( ) around. (30)
Round 15 :
Sc in each st. (30) Stuff as you work.
Round 16 :
(Sc in next 3 sts, dec) Rep ( ) around. (24)
Round 17 :
(Sc in next 2 sts, dec) Rep ( ) around. (18)
Round 18 :
(Sc in next st, dec) Rep ( ) around. (12)
Round 19 :
(Sc next 2 sts tog) Rep ( ) around. (6)
Round 20 :
Sl st every other st 3 times. Fasten off. Work in ends. Sew Head to top of Neck as shown in photo, having the beg ch going horizontally.
Horns (Make 2) :
Work in Peach. Rnd 1: Ch 3, sl st in first ch to join. Ch 1, work 2 sc in each ch. (6) Rnd 2 & 3: Sc in each st. (6) Fasten off, leave tail for sewing. Stuff slightly. Sew Horns to top of Head 2” apart.
Ears (Make 2) :
Work in White. Leave 4” tail at beg of ch. Ch 6, hdc in 3rd ch from hk and in next 2 chs, sl st in last ch. Fasten off, leave 4” tail. With tails, attach Ears to sides of Head just below Horns, with right side facing forward.
Legs (Make 4) :
Beg with Black. Rnd 1: Ch 3, sl st in first ch to join. Ch 1, work 2 sc in each ch. (6)
Round 2 :
Work 2 sc in each st. (12)
Round 3 :
Ch 1, work in bk lps only - Sc in each st. (12) Break Black, attach Peach.
Rounds 4 - 10 :
Sc in each st. (12) Fasten off, leave tail for sewing. Stuff. Sew Legs to Body Ring as shown in photos.
Rounds 6 - 11 (continued) :
Sc in each st. (15)
Round 12 :
(Sc in next 4 sts, inc) Rep ( ) around. (18)
Rounds 13 - 15 :
Sc in each st. (18) Fasten off, leave tail for sewing. Stuff. Sew Legs to Body Ring as shown in photo.
Tail :
Leave 4” tail at beg of ch. Ch 11, working in bk bumps only; sc in 2nd ch from hk and in each ch across. Fasten off, leave 4” tail. With tails, attach Tail to back end of Body Ring.
Tail Ends :
Cut 3 strands of Black 8” long. Holding all strands tog, knot onto the end sp of the Tail. Trim ends as desired.
Patches (Make 5) :
Work in Black. Row 1: Ch 4, sc in 2nd ch from hk and in each ch across. (3) Turn.
Row 2 :
Ch 1, inc, sc in next st, inc. (5) Turn.
Row 3 :
Ch 1, inc, sc in next 3 sts, inc. (7) Turn.
Row 4 :
Ch 1, inc, sc in next 4 sts, inc. (9) Turn.
Row 5 :
Ch 1, dec, sc in next 4 sts, inc. (7) Turn.
Row 6 :
Ch 1, sc in each st. (6) Turn.
Row 7 :
Ch 1, sc in next 4 sts, dec. (5) Turn.
Row 8 :
Ch 1, sc in next 5 sts. (5) Turn.
Row 9 :
Ch 1, inc, sc in next 3 sts, inc. (7) Turn.
Row 10 :
Ch 1, sc in next 6 sts, inc. (8) Turn.
Row 11 :
Ch 1, dec, sc in next 4 sts, dec. (6) Turn.
Row 12 :
Ch 1, dec, sc in next 2 sts, dec. (4) Turn.
Row 13 :
Ch 1, dec 2 times. (2) Fasten off, leave tail for sewing. Sew Patches to Body Ring and Legs as desired, having the Patches turned different ways.
Mane :
Cut a few strands (about 9) of Black yarn 5” long. Knot strands to top of Head between Horns. Trim ends as desired.
Facial Features - Eyes :
With Black and yarn needle, work 4-5 vertical str sts over Rnds 8 & 9 of Head, 1” apart.
Nostrils :
With Black and yarn needle, work 2 vertical str sts for each Nostrils, on front of Muzzle (Peach) area, about 1/2” apart.
— DIRECTIONS FOR PIG :
Body Ring - Work in Peach :
Rnd 1: Ch 20, sl st in first ch to join. Ch 1, sc in each ch around. (20)
Rnd 2 - 50 :
Sc in each st. (20) Fasten off, leave tail for sewing. Stuff. Sew Rnd 1 to Rnd 50.
Head - Work in Peach :
Rnd 1: Ch 3, sl st in first ch to join. Ch 1, work 2 sc in each ch. (6)
Rounds 2 & 3 :
Work 2 sc in each st. (12)(24)
Round 4 :
(Sc in next 3 sts, inc) Rep ( ) around. (30)
Rounds 5 - 8 :
Sc in each st. (30) Fasten off, leave tail for sewing. Sew Head to one end of Body Ring.
Snout - Work in Peach :
Rnd 1: Ch 3, work 2 sc in 2nd ch from hk, sc in next 3 chs, 3 sc in last ch. Turn and work down other side of ch; sc in next 3 sts, end with sc in same sp as first 2 sts. (12)
Round 2 :
Sc in next st, inc, sc in next 3 sts, inc, sc in next st, inc, sc in next 3 sts, inc. Sl st to join.
Round 3 :
Ch 1, work in bk lps only - Sc in each lp. (16) Sl st to join. Fasten off, leave tail for sewing. Stuff. Sew Snout to front of Head as shown in photo, having the beg ch going horizontally.
Ears (Make 2) :
Work in Peach. (Right Side) Ch 6, sl st in 2nd ch from hk, sc in next ch, hdc in next ch, dc in last ch. Fasten off, leave tail for sewing. Sew hdc end of Ears to top of Head, 1-3/4” apart so Ears “flop” out to the sides.
Legs (Make 4) :
Beg with Black. Rnd 1: Ch 3, sl st in first ch to join. Ch 1, work 2 sc in each ch. (6)
Round 2 :
Work 2 sc in each st. (12)
Round 3 :
Ch 1, work in bk lps only - Sc in each st. (12) Break Black, attach Peach.
Rounds 4 - 10 :
Sc in each st. (12) Fasten off, leave tail for sewing. Stuff. Sew Legs to Body Ring as shown in photos.
Tail :
Work in Peach. Leave 4” tail at beg of ch. Ch 6, work 3 sc in 2nd ch from hk and in each ch across. Fasten off, leave 4” tail. With tails attach Tail to back end of Body Ring. “Curl” tail.
Facial Features - Eyes :
With Black and yarn needle, work 3-4 vertical str sts just above Snout, about 1/2” apart.
Nostrils :
With Black and yarn needle, work 2 vertical str sts for each Nostril, on front of Snout about 1/4” apart.
— DIRECTIONS FOR ROOSTER :
Body - Inner Body (Work in Paddy Green) :
Rnd 1: Ch 3, sl st in first ch to join. Ch 1, work 2 sc in each ch. (6)
Round 2 :
Work 2 sc in each st. (12)
Round 3 :
(Sc in next st, inc) Rep ( ) around. (18)
Round 4 :
(Sc in next 2 sts, inc) Rep ( ) around. (24)
Rounds 5 - 10 :
Sc in each st. (24) Fasten off. Set aside.
Outer Body - Beg at Head with Buff :
Rnd 1: Ch 3, sl st in first ch to join. Ch 1, work 2 sc in each ch. (6)
Round 2 :
Work 2 sc in each st. (12)
Round 3 :
(Sc in next st, inc) Rep ( ) around. (18)
Rounds 4 - 9 :
Sc in each st. (18)
Round 10 :
(Sc in next 5 sts, inc) Rep ( ) around. (21)
Round 11 :
Sc in each st. (21)
Round 12 :
(Sc in next 6 sts, inc) Rep ( ) around. (24) Turn.
Round 13 :
Sl st in next st. Turn.
Ruffle :
With top of Head away from you and working in bk lps only (Ch 3 sl st in next 2 lps) Rep ( ) around. Fasten off.
Round 14 :
With top of Head towards you, join Paddy Green in any rem lp of Rnd 13. Sc in each lp. (24)
Round 15 :
(Sc in next 7 sts, inc) Rep ( ) around. (27)
Round 16 :
Sc in each st. (27)
Round 17 :
(Sc in next 8 sts, inc) Rep ( ) around. (30)
Round 18 :
Sc in each st. (30)
Round 19 :
(Sc in next 9 sts, inc) Rep ( ) around. (33)
Round 20 :
Sc in each st. (33)
Round 21 :
(Sc in next 10 sts, inc) Rep ( ) around. (36)
Round 22 & 23 :
Sc in each st. (36)
Round 24 :
(Sc in next 2 sts, dec) Rep ( ) around. (24)
Assemble Body :
Stuff Head and Body leaving unstuffed area in center of Body so Inner Body may be inserted. Insert Inner Body into Outer Body, add more stuffing around Inner Body if needed, but making sure Inner Body will slip onto the top of Cone when done. Working through both pieces, sc around to close. (24) Sl st to join. Fasten off. See photos for detail.
Rooster Hay :
Cut 48-50 strands of Bright Yellow 6” long. Holding 2 strands held tog and with the bottom of Body towards you, knot strands on fr lps only of Rnd 24. Trim if desired.
Tail - Work in Paddy Green :
Rnd 1: Ch 3, sl st in first ch to join. Ch 1, work 2 sc in each ch. (6)
Round 2 :
(Sc in next st, inc) Rep ( ) around. (9)
Round 3 :
(Sc in next 2 sts, inc) Rep ( ) around. (12)
Round 4 :
(Sc in next 3 sts, inc) Rep ( ) around. (15)
Round 5 :
(Sc in next 4 sts, inc) Rep ( ) around. (18)
Round 6 - 8 :
Sc in each st. (18)
Round 9 :
(Sc in next st, dec) Rep ( ) around. (12)
Round 10 :
(Sc next 2 sts tog) Rep ( ) around. (6) Sl st in next st. Ch 1, close top of Wing by working 3 sc across Rnd 10. Fasten off, leave tail for sewing. Sew Wings to sides of Body below Neck Ruffle, having Wings on a slight slant, pointing towards back of Body.
Tail Feathers (Make 12) :
- 3 Cherry Red, 3 Bright Yellow, 2 Pumpkin, 2 Royal, 2 Paddy Green. Leave 5” tail at beg of ch. Ch 17, sl st in 2nd ch from hk, sc in next ch, hdc in next 13 chs, sc in last ch. Fasten off, leave 5” tail. With tails and wrong side facing up, attach Feathers to end area of Tail. Try to not have 2 of the same color right next to each other.
Beak :
Work in Pumpkin. (Ch 4, sl st in 2nd ch from hk, sc in next ch, dc in next ch) Rep ( ) twice. Fasten off, leave tail for sewing. Sew dc sts tog (this will be the inside of Beak) and sew to front of Head between Rnds 6 & 7.
Comb :
Work in Cherry Red. Ch 8, sc in 2nd ch from hk, 4 dc in next ch, sc in next ch, 4 dc in next ch, sc in next ch, 4 dc in next ch, sc in last ch. Fasten off, leave tail for sewing. Sew Comb to top of Head, centering 3 rnds above Beak.
Eyes :
With Black and yarn needle, work 4 vertical str sts for each eye just above the Beak, about 1/4” apart.
Waddle :
Work in Cherry Red. Leave 5” tail at beg of ch. Ch 5, hdc in 3rd ch from hk, sc in next ch, sl st in last ch. Fasten off, leave 5” tail. With tails, attach Waddle to Head directly below Beak with wrong side facing up.
Wings (Make 2) :
Work in Paddy Green. Rnd 1: Ch 3, sl st in first ch. Ch 1, work 2 sc in each ch. (6) Rnd 2: (Sc in next st, inc) Rep ( ) around. (9) Rnd 3: (Sc in next 2 sts, inc) Rep ( ) around. (12) Rnd 4: (Sc in next 3 sts, inc) Rep ( ) around. (15) Rnd 5: (Sc in next 4 sts, inc) Rep ( ) around. (18) Rnd 6 - 8: Sc in each st. (18) Rnd 9: (Sc in next st, dec) Rep ( ) around. (12) Rnd 10: (Sc next 2 sts tog) Rep ( ) around. (6) Sl st in next st. Ch 1, close top of Wing by working 3 sc across Rnd 10. Fasten off, leave tail for sewing. Sew Wings to sides of Body below Neck Ruffle, having Wings on a slight slant, pointing towards back of Body.
Feet (Make 2) :
Work in Pumpkin. Leave 5” tail at beg of ch. Ch 9, sl st in 2nd ch from hk and in next 2 chs, (ch 4, sl st in 2nd ch from hk and in next 2 chs) Rep ( ) twice, sl st in last 5 chs of ch 9. Fasten off, leave 5” tail. With tails attach Legs to bottom of Body directly above Hay with wrong side facing up.
This set brings a little handmade farm to life with a playful stack of animals and a fluffy hay skirt. Each animal is designed to sit neatly and stack on the cone for charming display and imaginative play. Have fun personalizing colors and details to make your own farmyard family. 🧶🐄🪶