🧢 Beautiful ✨ Detailed πŸ’ Adorable

Doll - organizer Amigurumi Pattern

Doll - organizer Amigurumi Pattern
4.4β˜… Rating
8-10 Hours Time Needed
2.1K Made This
βœ‚οΈ

Intermediate Level

Ideal for those with basic crochet experience, featuring slightly more advanced stitches and techniques to expand your skills.

⏱️

All-Day Adventure

Requires 8-10 hours, ideal for a full day of immersive crocheting.

🧸

Cute Companion

An adorable friend to cherish, handcrafted with love to bring comfort and joy for years to come.

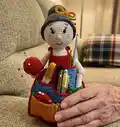
About This Doll - organizer Amigurumi Pattern

This pattern creates a functional doll organizer with a crocheted doll body, apron with pockets, and a needle ball. It includes full round-by-round instructions for the head, torso, base, arms, hair, needle ball and pocket pieces. The finished piece is decorative and useful β€” a sweet helper at your craft table.

Doll - organizer Amigurumi Pattern crochet pattern - detailed view of completed project

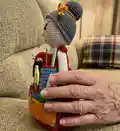
The pattern uses simple amigurumi shaping techniques and clear join instructions to assemble the parts. Youll also make a cardboard-reinforced base and ribbon ties for a stable, attractive organizer.

Why You'll Love This Doll - organizer Amigurumi Pattern

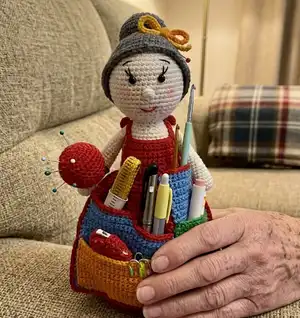
I absolutely love this pattern because it blends adorable amigurumi shaping with practical functionality that crafters will use every day. I enjoy the contrast of soft toy-making techniques with the clever pocketed apron design that stores needles and small tools. The shaping for the head and dress is satisfying and gives a polished finished look that I am proud to display. It is a warm, useful gift idea that invites customization and playful color choices.

Doll - organizer Amigurumi Pattern step 1 - construction progress Doll - organizer Amigurumi Pattern step 2 - assembly progress Doll - organizer Amigurumi Pattern step 3 - details and accessories Doll - organizer Amigurumi Pattern step 4 - final assembly and finishing

Switch Things Up

I love to customize the colors for each doll I make; try pastel tones for a soft, vintage look or bright primaries for a playful helper.

I often change yarn weight and hook size to make a tiny keychain version or a jumbo table-top organizer; adjust hook and yarn consistently to keep proportions correct.

I sometimes add pockets of different sizes and placements to hold more tools, like adding a pen sleeve or scissors loop for convenience.

I embroider different facial expressions and use felt or tiny buttons for unique eyes to change the dolls personality quickly.

I enjoy mixing textured yarns on the apron for contrast, such as using boucle or cotton blends for pockets that need more durability.

Try adding a removable felt lining inside the big pocket for delicate items, or a zipper if you prefer enclosed storage.

I recommend experimenting with metallic thread or small beads for decorative accents on the apron and hair accessories.

To make it more gift-ready, embroider initials or small motifs onto the apron pocket to personalize each doll organizer.

If you want a fully functional pincushion, enlarge the needle ball and fill with denser stuffing and crushed walnut shells or emery for rust prevention.

I sometimes replace the cardboard base with a thin wooden disk for durability and paint it to coordinate with the yarn colors for a polished finish.

Common Mistakes & How to Fix Them

βœ— Placing safety eyes too low or high will change the facial expression; place eyes exactly between rounds 12 and 13 and keep 8 stitches between them. βœ— Forgetting to add filler during shaping causes collapsed areas later; stuff gradually while crocheting and shape as you go to maintain form. βœ— Cutting the thread prematurely when instructed not to will make joining difficult; follow the instructions and only break yarn at the specified steps. βœ— Skipping the cardboard base or glass beads will cause instability; insert the cardboard circle and 5-10 glass balls before closing the base for proper standing balance.

Doll - organizer Amigurumi Pattern

Make a charming doll organizer that doubles as a practical sewing caddy. This pattern guides you through crocheting a detailed doll with pockets, an apron, and a removable needle ball. Youll enjoy shaping the head, dress, hair and thoughtful pockets for needles and tools. Perfect as a handmade gift or a cheerful addition to your craft table.

Intermediate 8-10 Hours

Materials Needed for Doll - organizer Amigurumi Pattern

β€” Main Fabric

  • 01
    Acrylic yarn 50 g / 125 m (beige for head/torso, brown for dress and base, gray for hair)
  • 02
    Additional colors: red yarn (apron), blue yarn (large pocket), orange yarn (small pocket), green yarn (small pocket), accent colors as desired β€” approx 20-50 g each
  • 03
    Fiberfill stuffing for head, body and arms β€” small bag (~50 g)
  • 04
    Embroidery thread for facial details (black) β€” small amount
  • 05
    Glass beads or balls 5-10 pieces for base weight
  • 06
    Cardboard or plastic circle to fit the crocheted base

β€” Tools Required

  • 01
    Crochet hook size 2.0 mm
  • 02
    Sewing/embroidery needle
  • 03
    Scissors
  • 04
    Eyes 8 mm (2 pieces)
  • 05
    Polyester fiberfill
  • 06
    Tapestry needle for sewing pieces and weaving ends
  • 07
    Cardboard or plastic circle for base
  • 08
    5-10 glass balls (marbles) to weight the base
  • 09
    Pins for assembly and positioning

Progress Tracker

0% Complete

β€” Head and torso (thread color beige) :

Round 1 :

(6 sc) into MR

Round 2 :

(inc) x 6 = 12 sc

Round 3 :

(1sc, inc) x 6 = 18

Round 4 :

(2sc, inc) x 6 = 24

Round 5 :

(3sc, inc) x 6 = 30

Round 6 :

(4sc, inc) x 6 = 36

Round 7 :

(5sc, inc) x 6 = 42

Round 8 :

(6sc, inc) x 6 = 48

Round 9 :

(7sc, inc) x 6 = 54

Round 10-19 :

= 54 sc (10 rounds)

Info :

Place your eyes between the 12th and 13th rows. Distance between eyes 8 loops.

Round 20 :

(7sc, dec) x 6 = 48

Round 21 :

(6sc, dec) x 6 = 42

Round 22 :

(5sc, dec) x 6 = 36

Round 23 :

(4sc, dec) x 6 = 30

Round 24 :

(3sc, dec) x 6 = 24

Round 25 :

(2sc, dec) x 6 = 18

Info :

In the process of crocheting, put filler inside the doll.

Round 26 :

Sl st = 18

Round 27 :

BLO (2sc, inc) x 6 = 24

Round 28 :

(3sc, inc) x 6 = 30

Round 29 :

(9sc, inc) x 3 = 33

Round 30 :

(10sc, inc) x 3 = 36

Round 31 :

= 36 sc

Info :

Change the color of the yarn to brown. This will be the color of the dress.

Round 32-37 :

= 36 sc (6 rounds)

Round 38 :

(10sc, dec) x 3 = 33

Round 39 :

= 33 sc

Round 40 :

(9sc, dec) x 3 = 30

Round 41 :

Sl st = 30

Round 42 :

BLO (4sc, inc) x 6 = 36

Round 43 :

(5sc, inc) x 6 = 42

Round 44 :

(6sc, inc) x 6 = 48

Round 45 :

(7sc, inc) x 6 = 54

Round 46 :

(8sc, inc) x 6 = 60

Round 47-78 :

= 60 sc (32 rounds)

Round 79 :

(9sc, inc) x 6 = 66

Round 80 :

(10sc, inc) x 6 = 72

Info :

To break yarn.

β€” The base of the doll (crochet yarn color brown) :

Round 1 :

(8 sc) into MR

Round 2 :

(inc) x 6 = 16 sc

Round 3 :

(1sc, inc) x 6 = 24

Round 4 :

(2sc, inc) x 6 = 32

Round 5 :

(3sc, inc) x 6 = 40

Round 6 :

(4sc, inc) x 6 = 48

Round 7 :

(5sc, inc) x 6 = 56

Round 8 :

(6sc, inc) x 6 = 64

Round 9 :

(7sc, inc) x 6 = 72

Info :

Do not cut the thread!

Round 1 (join base and body) :

(8sc, inc) x 8, sl st = 80 Crochet 2 loops together: 1 body loop and 1 base loop

Round 2 :

(1sc, 2 ch, 1 sc) - in 1 loop, loop 2 do not crochet, (1sc, 2 ch, 1 sc) - in 3 loop, loop 4 do not crochet, repeat to the end of the row, sl st.

Info :

Cut a circle out of hard cardboard or plastic. The size of the circle should be the same size as the crocheted circle. Also put 5 to 10 glass balls inside. This is necessary for the doll to stand well.

Info :

When crocheting half of the circle, place a cardboard or plastic circle inside the doll. Crochet the circle to the end. To break yarn.

β€” Hands (2 parts) :

Round 1 :

(6 sc) into MR

Round 2 :

(inc) x 6 = 12 sc

Round 3 :

(3sc, inc) x 3 = 15

Round 4-8 :

= 15 sc (5 rounds)

Round 9 :

(2sc, dec) x 5 = 10

Round 10-24 :

= 10 sc (15 rounds)

Round 25 :

(dec) x 5 = 5

Info :

Fasten off. To break yarn. Attach arms to the torso.

β€” Hair (gray yarn) :

Round 1 :

(6 sc) into MR

Round 2 :

(inc) x 6 = 12 sc

Round 3 :

(1sc, inc) x 6 = 18

Round 4 :

(2sc, inc) x 6 = 24

Round 5 :

(3sc, inc) x 6 = 30

Round 6 :

(4sc, inc) x 6 = 36

Round 7-11 :

= 36 sc (5 rounds)

Round 12 :

(4sc, dec) x 6 = 30

Round 13 :

Sl st = 30

Round 14 :

FLO (4sc, inc) x 6 = 36

Round 15 :

(5sc, inc) x 6 = 42

Round 16 :

(6sc, inc) x 6 = 48

Round 17 :

(7sc, inc) x 6 = 54

Round 18-26 :

= 54 sc (9 rounds)

Round 27 :

(1sc, 1 ch, 1 sc) - in 1 loop, loop 2 do not crochet, (1sc, 1 ch, 1 sc) - in 3 loop, loop 4 do not crochet, repeat to the end of the row, sl st.

Info :

Crochet a hair band: 20 ch or 40 ch. See how long the tape will be beautiful. Sew the hair to the head. Tie the ribbon around your hair. Sew the tape to the hair. Embroider the eyebrows on the face with black thread. Embroider the nose. Embroider the mouth. See the photo.

β€” Needle ball :

Round 1 :

(6 sc) into MR

Round 2 :

(inc) x 6 = 12 sc

Round 3 :

(1sc, inc) x 6 = 18

Round 4 :

(2sc, inc) x 6 = 24

Round 5 :

(3sc, inc) x 6 = 30

Round 6 :

(4sc, inc) x 6 = 36

Round 7-9 :

= 36 sc (3 rounds)

Round 10 :

(4sc, dec) x 6 = 30

Round 11 :

(3sc, dec) x 6 = 24

Round 12 :

(2sc, dec) x 6 = 18

Round 13 :

(1sc, dec) x 6 = 12

Round 14-24 (follow up) :

R25. (dec) x 6 = 6. Fasten off. To break yarn. Crochet a tape: 10 ch or 20 ch. See how long the tape will be beautiful. Attach tape to needle ball.

β€” Large apron pocket (blue yarn) :

Info :

Knit in rows (not in a circle). Start each row with 1 chain stitch, turn at the end of the row.

Row 1 :

41 ch, crochet into the 2nd ch from the hook 40 sc, turn knit

Row 2-21 :

40 sc, turn knit

Row 22 :

17 sc, turn knit

Row 23 :

1 ch, loop 1 do not crochet, 16 sc, turn knit

Row 24 :

1 ch, 15 sc, turn knit

Info :

To break yarn. Attach thread from the other side of the pocket as needed for finishing.

β€” APRON (Red yarn) :

Row 1 :

41 ch, crochet into the 2nd ch from the hook 40 sc, turn knit

Row 2-29 :

40 sc, turn knit (28 rounds)

Row 30 :

(8sc, dec) x 4 = 36

Row 31 :

(7sc, dec) x 4 = 32

Row 32 :

(6sc, dec) x 4 = 28

Row 33 :

(5sc, dec) x 4 = 24

Info :

Place the large pocket exactly on the apron. Mark the place where the pocket ends with a marker. Parts will be attached at this point later.

Row 34 :

30 - 40 ch Attach the apron to the doll to find out how long the ribbon is needed.

Row 35 :

Crochet into the 2nd ch from the hook 30 - 40 sl st

Row 36 :

24 sl st crochet on apron

Info :

Crochet sc along the side of the apron. When crochet to marker, crochet apron and large pocket together. Crochet all 3 sides of the apron to attach a large pocket. To break yarn.

Info :

On the 4th side of the apron, attach the thread to the 7th loop. R1. 1 ch, 12 sc, turn knit. R2 - R8. 12 sc, to break yarn. Attach thread from the lower right side of this piece. Crochet 1 side of the part sc. Crochet 30 - 40 ch for the ribbon. Crochet into the 2nd ch from the hook 30 - 40 sl st. Crochet 2 top part sc. Crochet 30 - 40 ch for the ribbon. Crochet into the 2nd ch from the hook 30 - 40 sl st. Crochet 3 side of the part sc. To break yarn.

β€” Small pockets :

Small pocket 1 (orange yarn) - Row 1 :

21 ch, crochet into the 2nd ch from the hook 20 sc, turn knit

Small pocket 1 - Row 2-12 :

20 sc. To break yarn.

Small pocket 2 (green yarn) - Row 1 :

11 ch, crochet into the 2nd ch from the hook 10 sc, turn knit

Small pocket 2 - Row 2-20 :

10 sc. To break yarn.

Info :

Crochet the sides of small pockets sc. In the corners, crochet 3 loops in 1. Divide the large pocket into 3 parts. To do this, sew the pocket to the apron in 2 places at the top of the pocket. Sew small pockets to big pocket. Put an apron on the doll. Tie the ribbons. Place the needle ball on your hand.

Info :

DOLL ORGANIZER READY!

Assembly Instructions

  • Attach the base to the body by crocheting the base and body loops together as described: (8sc, inc) x 8, sl st = 80, crocheting 2 loops together (1 body loop and 1 base loop), and crochet around, inserting the cardboard and glass balls before closing.
  • Sew the arms to the torso on either side at the desired height using a yarn needle and whipstitch; position the arms symmetrically and secure firmly for handling.
  • Sew the hair piece to the head, secure the hair band and ribbon, then embroider eyebrows, nose and mouth with black embroidery thread following the photo reference for placement.
  • Position the large blue pocket on the red apron and mark edges with a stitch marker, then crochet or sew the pocket to the apron and divide it into three sections before attaching the small pockets.
  • Attach the needle ball to the doll's hand by sewing or lightly tacking the tape/ribbon into place so it sits securely on the palm as shown in the photos.
  • Weave in all ends and secure any ribbon ties; pin parts in position before final sewing to ensure correct symmetry and placement.

Important Notes

  • πŸ’‘Place safety eyes between rounds 12 and 13 with approximately 8 stitches between them for correct facial placement.
  • πŸ’‘Insert a cardboard or plastic circle and 5-10 glass balls into the base before closing to ensure the doll stands upright and stable.
  • πŸ’‘Stuff the head and torso gradually while crocheting to maintain the intended shape and avoid lumps.
  • πŸ’‘Do not cut the thread when instructed not to β€” follow the pattern direction to join pieces smoothly and securely.

This delightful Doll Organizer combines a sweet amigurumi doll with a practical apron full of pockets to hold needles and tools. Make it in your favorite color palette and add embroidered details that give the doll personality and charm. Perfect as a gift for sewists, crafters, or anyone who appreciates handmade helpers. 🧡🧢✨

You ask,

we answer.

FAQs

What size will the finished piece be?

The size of the ready pillow/doll organizer is approximately 25 cm / 10 inch when using the recommended yarn and a 2.0 mm hook.

Can I use a different hook or yarn weight?

Yes, but changing yarn weight or hook will alter the final size; use a suitable hook to match yarn and keep consistent tension.

Where should I place the safety eyes?

Place the eyes between rounds 12 and 13 on the head, leaving about 8 loops between them as specified in the pattern.

How do I make the base stable so the doll stands?

Cut a cardboard or plastic circle to fit the crocheted base and place 5 to 10 glass balls inside before closing; this gives weight and stability.