🧶 Beautiful ✨ Detailed 💝 Adorable

Crochet Granny Cross-Body Bag Pattern

Crochet Granny Cross-Body Bag Pattern
4.2★ Rating
2-4 Hours Time Needed
3.3K Made This
✂️

Beginner Friendly Level

Perfect for those just starting their crochet journey, with clear instructions and simple techniques

⏱️

Bite-Sized Project

Finishes in 2-4 hours—perfect for an afternoon of creative relaxation.

🏡

Cozy Accent

A warm touch for your space that transforms ordinary corners into inviting nooks filled with handmade charm.

About This Crochet Granny Cross-Body Bag Pattern

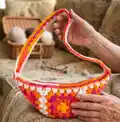
This pattern creates a bright, wearable granny square cross-body bag made from three matched granny motifs and a long crocheted strap. It uses self-striping 'All in One Granny Square' yarn for effortless color changes and charming palette shifts. The bag is finished with a top edging and a sewn-in zipper for a clean, secure opening.

Crochet Granny Cross-Body Bag Pattern crochet pattern - detailed view of completed project

Easy skill level makes this a great project for confident beginners who know basic stitches. The result is a fun, colorful accessory that wears well cross-body or as a shoulder bag.

Why You'll Love This Crochet Granny Cross-Body Bag Pattern

I absolutely love this pattern because it turns classic granny squares into a practical, stylish bag you can wear every day. The self-striping yarn does the colorwork for you, so you can focus on construction and finishing. I enjoy how quickly the three motifs come together and how satisfying the join and edging steps feel when the bag starts to take shape. It is a simple pattern that produces a high-impact accessory, and I love gifting it to friends because it always feels personal and handmade.

Crochet Granny Cross-Body Bag Pattern step 1 - construction progress Crochet Granny Cross-Body Bag Pattern step 2 - assembly progress Crochet Granny Cross-Body Bag Pattern step 3 - details and accessories Crochet Granny Cross-Body Bag Pattern step 4 - final assembly and finishing

Switch Things Up

I love customizing this bag by changing how many motifs I use or arranging them differently—for example I sometimes make a larger front panel by joining more squares for a tote-style piece.

I often swap the self-striping yarn for solid colors and pick contrasting yarn for the edging to make the granny clusters pop visually.

To change the finished size I use a different yarn weight and a correspondingly larger or smaller hook; bulky yarn with a larger hook makes a chunkier, faster-to-make bag and fine yarn makes a daintier version.

I like to experiment with strap styles too: make a wider strap by adding more foundation chains, or create a braided strap from three i-cords for extra texture.

For a polished interior I sometimes add a fabric lining and inner pocket before sewing in the zipper to keep contents secure and neat.

I recommend trying decorative closures rather than a zipper if you prefer a vintage look—buttons, toggles or magnetic snaps work well with the granny aesthetic.

I sometimes embroider initials or small motifs onto the front panel for personalization and to make the bag a special gift.

I also like mixing in metallic or textured yarn for a single round of the motif to add subtle glamour without overwhelming the color sequence.

If you want a crossbody that sits higher or lower, simply adjust where you sew the strap on the top edge and test the length before securing it firmly.

Finally, I enjoy creating matching accessories such as a small granny coin purse or strap tassels to coordinate with the bag and complete the set.

Common Mistakes & How to Fix Them

✗ Starting motifs from the wrong color section can leave you short at the end; begin each Motif with Color 1 from the center of the pull-skein and leave a 4" tail to weave in. ✗ Not checking your gauge causes the finished bag to be too large or small; make a motif and measure it to ensure it is approximately 6" (15 cm) square before continuing. ✗ Joining motifs with inconsistent tension results in uneven seams; hold wrong sides together with stitches aligned and work in back loops only, keeping your tension even as you join. ✗ Crocheting the strap too tightly will make it stiff and uncomfortable; maintain a relaxed tension and check length before fastening off and sewing in place. ✗ Cutting yarn too close to color changes can leave you without enough yarn for edging or strap; when motif is complete cut yarn where Color 5 ends leaving a tail for weaving in and ensure you have the yardage listed for edging and strap.

Crochet Granny Cross-Body Bag Pattern

Make a colorful Granny Cross-Body Bag using self-striping yarn for a playful, modern take on the classic granny square. This easy pattern walks you through making 3 granny motifs, joining them, adding edging and a sturdy strap, then finishing with a zipper for a polished bag. Perfect for gifting or creating a statement accessory, you will love how quickly it comes together. Bright, bold and functional—this bag is a delightful weekend project you can wear with pride.

Beginner Friendly 2-4 Hours

Materials Needed for Crochet Granny Cross-Body Bag Pattern

— Main Fabric

  • 01
    Red Heart All in One Granny Square (Medium #4) - 8.8 oz/250 g; 417 yds/381 m
  • 02
    Color: Citrus Twist (2002) - 1 ball (makes 3 Granny Squares + approx 160 yds/146 m for Edging and Strap) or 250 yds/228 m total
  • 03
    Make 3 Granny Squares (Motifs), approx 6" [15 cm] square each

— Tools Required

  • 01
    Crochet hook size U.S. I/9 (5.5 mm) Susan Bates Silvalume or size needed to obtain gauge
  • 02
    Coats zipper, 12" [30.5 cm] long
  • 03
    Coats sewing thread
  • 04
    Susan Bates steel yarn needle
  • 05
    Tape measure
  • 06
    Scissors
  • 07
    Stitch markers (optional)
  • 08
    Pins for assembly (optional)

Progress Tracker

0% Complete

— Gauge :

Info :

Motif = Approx 6" [15 cm] square.

— Using This Guide :

Infos :

Click on the underlined words throughout the pattern to access our library of helpful tools. Motifs begin with Color 1 (shortest color rep) from center of pull-skein, leaving a 4" [10 cm] tail to weave in. Each color aligns with 1 round (rnd) in the Motif with 5 colors in total. If too much color is left at end of rnd, pull back some stitches (sts) and slightly loosen gauge to re-work sts and finish at color change. If too little color is left, pull back some sts and slightly tighten gauge to re-work sts and finish at color change. When Motif is complete, cut yarn where Color 5 (longest color rep) ends, leaving a tail for weaving in. Begin next Motif with Color 1 and repeat 5 rnds for each Motif. Granny Square how to: https://www.yarnspirations.com/pages/how-to-granny-square-guide

— Motif :

Info :

Make 4.

Infos :

Ch 3 at beg of rnd counts as double crochet (dc). Ch 6 at beg of rnds counts as dc and ch-3 sp. Join all rnds with slip stitch (sl st) to 3rd ch of ch-6 unless otherwise indicated.

Setup :

With Color 1, ch 4. Join with sl st to first ch to form ring. See diagram.

1st rnd :

(RS). Ch 6. (3 dc. Ch 3) 3 times in ring. 2 dc in ring. Join.

2nd rnd :

Sl st in ch-3 sp. Ch 6. 3 dc in same ch-3 sp. *Ch 1. (3 dc. Ch 3. 3 dc) in next ch-3 sp. Rep from * twice more. Ch 1. 2 dc in first ch-3 sp. Join.

3rd rnd :

Sl st in ch-3 sp. Ch 6. 3 dc in same ch-3 sp. *Ch 1. 3 dc in next ch-1 sp. Ch 1. (3 dc. Ch 3. 3 dc) in next ch-3 sp. Rep from * twice more. Ch 1. 3 dc in last ch-1 sp. Ch 1. 2 dc in first ch-3 sp. Join.

4th and 5th rnds :

Sl st in ch-3 sp. Ch 6. 3 dc in same ch-3 sp. *(Ch 1. 3 dc) in each ch-1 sp to next ch-3 sp. Ch 1.** (3 dc. Ch 3. 3 dc) in next ch-3 sp. Rep from * twice more, then from * to ** once. 2 dc in first ch-3 sp. Join.

Info :

Fasten off.

— Assembly :

Infos :

Notes: Join Motifs tog using just white sections of yarn. To work edging and Strap, use yarn as 'self-striping' yarn, allowing colors to change as they appear.

Join Motifs :

Hold WS of 2 Motifs tog with sts aligned. Join white yarn with sl st in ch-2 corners of aligned Motifs at top right. Ch 1. Working in back loops only, work 1 sc in each dc through both thicknessess. Fasten off.

Info :

Join Motifs as shown in diagram.

— Top edging :

1st rnd :

(RS). Join yarn (any section of color) with sl st to top edge of Bag at right corner. Ch 1. Work 1 single crochet (sc) in each st around. Join with sl st to first sc.

2nd and 3rd rnds :

Ch 1. 1 sc in each sc around. Join with sl st to first sc.

Info :

Fasten off.

— Strap :

Setup :

With any color section of yarn, ch 109.

1st rnd :

2 dc in 4th ch from hook. *Skip next 2 ch. 3 dc in next ch. Rep from * to last 3 ch. Skip next 2 ch. (3 dc. Ch 2. 3 dc) in last ch. Working along opposite side of ch, work 3 dc in each ch-2 sp (working around foundation ch), to last ch. 3 dc in first ch of rnd (same ch as first 2 dc). Ch 2. Join with sl st to top of ch 3.

2nd rnd :

Ch 1. 1 sc in same sp as joining sl st. 1 sc in each dc around. Join with sl st to first sc.

Info :

Fasten off. Sew Strap to Bag along top edge at either end as shown.

— Finishing :

Info :

Using sewing thread and needle, sew in zipper along top edge opening.

Assembly Instructions

  • Join Motifs: Hold wrong sides (WS) of two Motifs together with stitches aligned; join white yarn with slip stitch in ch-2 corners at top right, ch 1, then working in back loops only work 1 single crochet in each double crochet through both thicknesses; fasten off.
  • Join all three Motifs as shown in the diagram so the two side Motifs fold in at the top to form the bag shape and seams; align stitches carefully and join with white yarn as above.
  • Top edging: With right side facing, join any section of yarn with slip stitch at the right corner of the top edge; work 1 single crochet in each stitch around, join, then work 2 more rounds of single crochet; fasten off.
  • Strap: With any color section, chain 109 and work the 1st rnd (granny-style shell along foundation chain) then 2nd rnd of single crochet; fasten off and sew the strap to the bag along the top edge at either end as shown.
  • Finishing: Using sewing thread and a needle, sew in the 12" zipper along the top edge opening so the bag closes cleanly.

Important Notes

  • 💡Join Motifs together using only the white sections of yarn so joins blend seamlessly with the motif borders.
  • 💡Use the yarn as self-striping for edging and strap so colors change naturally as they appear in the skein.
  • 💡Make sure your Motif gauge is approx 6" [15 cm] square before assembling for correct finished bag size.
  • 💡When finishing each Motif cut yarn where Color 5 ends and leave a tail for weaving in to make tidy ends.

This cheerful granny cross-body bag combines classic crochet technique with modern, self-striping yarn to make a vibrant wearable accessory. The quick motifs and simple joining create a satisfying make that’s perfect for gifting or everyday use. Finish with a zipper and a long strap for a polished, functional piece you’ll love to wear. 🧶✨

You ask,

we answer.

FAQs

What size will the finished piece be?

Approx 17" [43 cm] wide x 6½" [16.5 cm] deep, excluding Strap.

How many motifs do I need and what size are they?

Make 3 main Granny motifs for the body (pattern also says Make 4 in motif instructions if using alternate layouts); each motif is approximately 6" [15 cm] square when using the recommended yarn and hook.

Can I use a different yarn weight or hook size?

Yes, you can substitute yarn weights, but the finished size will change; adjust hook size to obtain the approximate motif gauge of 6" [15 cm] square.

Is this pattern suitable for beginners?

Yes—this is labeled Easy and is great for confident beginners who know basic stitches like chain, double crochet and single crochet.

How is the strap attached?

The strap is sewn to the bag along the top edge at either end after working the strap; use matching yarn sections and sew securely by hand for durability.