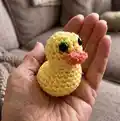
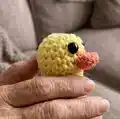
About This Daisy The Duck Amigurumi Pattern
This pattern creates a small, handheld amigurumi duck named Daisy using DK/4ply yarn and a 3.5mm hook. The design focuses on simple single crochet shaping with increases and decreases to form a rounded body and head. It includes clear round-by-round instructions, beak construction, and placement tips for eyes and stuffing.

Ideal for quick makes and gifted keepsakes, Daisy is small, portable, and perfect for practicing basic amigurumi techniques. The pattern is written in plain language and includes helpful notes on shaping and finishing.
Why You'll Love This Daisy The Duck Amigurumi Pattern
I absolutely love this pattern because it turns just a few stitches into a delightful little character with so much personality. I enjoy how quick it is to make — you can crochet a whole Duck in a single afternoon and still have time for other projects. The shaping is simple but effective, giving Daisy a cute rounded body that sits nicely when stuffed correctly. I also love that small adjustments — like adding extra stuffing to the back — make a big difference to the finished look, so every Duck can feel unique.
Switch Things Up
I love how easily this pattern can be customized by changing yarn colors — try soft pastels for a gentle nursery palette or bright primaries for a playful toy.
You can make Daisy larger or smaller by choosing a different yarn weight and adjusting your hook size; bulky yarn with a large hook makes a chunky, cuddly duck, while finer yarn creates a tiny keychain-friendly duck.
I often add embroidered details like a tiny heart on the chest or eyelashes to personalize each duck and give them character.
Swap the safety eyes for embroidered eyes if you prefer a fully handmade, baby-safe toy with no hard parts.
Try adding a small crocheted scarf, bow, or hat for seasonal variations and mini outfits — these accessories are quick to make and add personality.
For a posable version, consider adding a short length of wire inside the neck or body when stuffing, then wrap it securely to avoid poking through.
Change the beak color or shape slightly by increasing the chain length or stitching pattern to create different beak styles, from flat to puffier lips.
I sometimes vary the stuffing amount to adjust how rounded or flat the base is — more stuffing at the rear helps the duck sit upright neatly.
Experiment with textured yarns (like boucle or chenille) for a super-soft, fluffy duck; just be aware that textured yarn can obscure stitch definition during sewing.
Finally, make a whole family of ducks in graduated sizes and colors for a charming display or a set of handmade gifts — it makes a delightful collection!
Common Mistakes & How to Fix Them
✗ Skipping the magic ring and starting with chains can make the centre hole too large; always begin with a magic ring and tighten it securely to avoid gaps.
✗ Not adding enough stuffing to the back end causes the duck to tip forward; add extra stuffing to the rear as instructed to balance the figure properly.
✗ Placing safety eyes too close together gives the face an odd expression; insert the eyes between rows 4 and 5 and space them 4-5 stitches apart for the intended look.
✗ Failing to count stitches after increases or decreases creates uneven shaping; count your stitches at the end of each round to ensure the correct stitch totals and shape.