🧢 Beautiful ✨ Detailed πŸ’ Adorable

Bucket Hat Pattern

Bucket Hat Pattern
4.8β˜… Rating
2-4 Hours Time Needed
4.1K Made This
βœ‚οΈ

Intermediate Level

Ideal for those with basic crochet experience, featuring slightly more advanced stitches and techniques to expand your skills.

⏱️

Bite-Sized Project

Finishes in 2-4 hoursβ€”perfect for an afternoon of creative relaxation.

🧣

Snug Essential

Everyday comfort with practical charm, designed for both functionality and style through changing seasons.

About This Bucket Hat Pattern

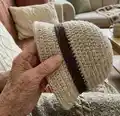
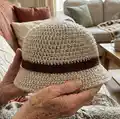
This pattern creates a classic bucket hat crocheted with two strands of worsted-weight yarn held together for a dense, structured fabric. The crown is worked in continuous spiral rounds, with one round of front post single crochet to form a crisp, defined brim. Sizes are included for small, medium, and large, and a removable band is worked separately so you can change the look easily.

Bucket Hat Pattern crochet pattern - detailed view of completed project

The instructions are written round-by-round and include gauge, materials, and a full band pattern. Ideal for crafters who want a durable, wearable hat with simple customization options.

Why You'll Love This Bucket Hat Pattern

I absolutely love this pattern because it turns simple worsted yarn into a polished, wearable hat using a clever two-strand technique. I enjoy how the front-post round instantly creates a structured brim without complicated shaping. I also love that the decorative band is made separately so you can swap colors for different outfits and occasions. The pattern is satisfying to work up quickly and produces a lovely finished piece I proudly wear and gift.

Bucket Hat Pattern step 1 - construction progress Bucket Hat Pattern step 2 - assembly progress Bucket Hat Pattern step 3 - details and accessories Bucket Hat Pattern step 4 - final assembly and finishing

Switch Things Up

I love changing the band color to reinvent the whole hat, so I often make a set of bands in different shades to match outfits.

I sometimes use a lighter fingering yarn held double for a slimmer, dressier version of the hat that still keeps structure.

I have tried bulky yarn held single with a larger hook to make a chunky winter bucket hat that works well as a cozy option.

I also experiment with slightly different chain lengths for the band so I can make it snug or loose; always test the chain around the crown before joining.

I like to add small embroidered details on the band or a sewn-on button to give the hat a vintage feel.

I sometimes create a narrow leather or faux-leather band by crocheting a super-tight strip and then glueing it to the inside for a mixed-material look.

I recommend trying the brim round using front post single crochet in a different color for a subtle contrast that really pops.

I occasionally block the finished hat lightly to shape the brim and crown, which smooths stitches and helps it sit perfectly.

I also add a thin wire to the brim edge for a more sculpted look when I want the brim to hold a specific curve.

I encourage you to swap yarn weights, hooks, and band styles to make versions for every season; I find that small experiments yield delightful new favorites.

Common Mistakes & How to Fix Them

βœ— Using only one strand instead of two strands held together will make the hat too flimsy; hold two strands together throughout for the intended texture and structure. βœ— Skipping the stitch marker when working in a spiral will make it hard to track rounds; place a marker after the first 6 sc and move it up each round to maintain correct stitch counts. βœ— Joining the band incorrectly will change its fit around the hat; try the chain around your hat before joining, and adjust the chain length for a precise fit before finishing. βœ— Not checking gauge can lead to an incorrect hat size; make a gauge swatch with two strands held together and adjust hook size to match 3 sts + 4 rows = 1 inch.

Bucket Hat Pattern

Make a stylish, wearable crochet bucket hat worked in two strands held together for a textured, sturdy fabric. This pattern includes full round-by-round instructions, a stand-out brim made with a front-post round, and a removable decorative band. You can customize the band color or size to create the perfect summer or transitional hat for yourself or as a thoughtful handmade gift.

Intermediate 2-4 Hours

Materials Needed for Bucket Hat Pattern

β€” Main Fabric

  • 01
    Worsted weight yarn (#4) - 4 oz each of two colors (main color and contrasting band color), used held together as two strands for the hat
  • 02
    Additional single strand of worsted weight yarn (same or different color) for the hat band - approx 1-2 oz

β€” Tools Required

  • 01
    Crochet hook size J (6.00 mm)
  • 02
    Stitch marker
  • 03
    Scissors
  • 04
    Yarn needle for weaving ends and sewing band
  • 05
    Measuring tape to check head circumference
  • 06
    Optional: magic ring technique (or chain 2 start) to begin the crown

Progress Tracker

0% Complete

β€” Materials :

Info :

Materials: 4oz each of two colors of worsted weight yarn, size J or 6.00mm crochet hook. Gauge: 3 sts + 4 rows = 1 inch with two strands held together.

β€” Sizes :

Info :

Sizes: small-18\", medium-20\", large-22\"

β€” Abbreviations :

Info :

ch - chain. sc - single crochet. fpsc - front post single crochet (single crochet around the post of the single crochets in the previous round, not the top). Rnd - round.

β€” Notes :

Info :

This hat is made in the round with no joins (spiral) with both strands of yarn held together throughout. To start you can use the magic ring or if you'd like you can just chain 2 and crochet the first 6 single crochets in the second chain from hook. There is one round of front post single crochets to start the brim, this gives it a brim that instantly stands out and doesn't gradually increase. Each increase round adds 2 inches to this hat, for in between sizes (19\", 21\", 23\" etc) you can add a round and only increase by 3 stitches skipping every other increase stitch.

β€” Hat :

Info :

Starting with both strands of yarn held together and magic loop: Single crochet 6 inside ring. Place a marker after this last sc and move it up with every round.

Round 1 :

2 sc in each sc around.

Round 2 :

(sc 1, 2 sc in next sc) around.

Round 3 :

(sc 2, 2 sc in next sc) around.

Round 4 :

(sc 3, 2 sc in next sc) around.

Round 5 :

(sc 4, 2 sc in next sc) around.

Round 6 :

(sc 5, 2 sc in next sc) around.

Round 7 :

(sc 6, 2 sc in next sc) around.

Round 8 :

(sc 7, 2 sc in next sc) around. For small sizes end increase here and skip down to Rnd 11.

Round 9 :

(sc 8, 2 sc in next sc) around. For medium size end increase here and skip down to Rnd 11.

Round 10 :

(sc 9, 2 sc in next sc) around.

Round 11-24 :

sc around.

Round 12 :

(fpsc 10, 2 fpsc in next st) around.

Round 13 :

(sc 11, 2 sc in next st) around.

Round 14 :

sc 6, 2 sc in next st, (sc 12, 2 sc in next st) 5 times, sc to end.

Round 15 :

sc 3, 2 sc in next st, (sc 13, 2 sc in next st) 5 times, sc to end.

Round 16 :

(sc 14, 2 sc in next st) around.

Round 17 :

sc 7, 2 sc in next st, (sc 15, 2 sc in next st) 5 times, sc to end. Break yarn, hide end.

β€” Hat Band :

Info :

With one strand of your choice color of worsted weight yarn and size J or 6.00mm crochet hook.

Round 1 :

ch 66, join with a slip stitch to the first chain. (Try this chain out around your hat to make sure it fits before joining, if it's too long pull out some chains, if it's too short add some. The number of chains is not important here, fit is!)

Round 2 :

ch 1, sc in each ch around, join with a slip stitch to the first SINGLE CROCHET, skipping the ch 1.

Round 3 :

ch 1, sc around, join in the same way.

Round 4 :

Reverse single crochet around.

Round 5 :

You can cut the yarn and rejoin it to the bottom of the band on the chain round or you can slip stitch down the inside of the band and turn it around so that the bottom is the top and continue.

Info :

Reverse single crochet around along the bottom of the band. Cut and hide yarn. Slip this band down around the hat and you can use a strand of the same color of yarn and sew it in place or just let it be there and make a bunch of different colors of bands and change them to match whatever accessories you're wearing that day. : D

Assembly Instructions

  • Place a stitch marker after the initial 6 single crochets and move it up at the end of each round to keep track of the spiral work.
  • Try the chain for the hat band around the finished crown before joining to ensure a snug fit; adjust chain length as needed before joining the band.
  • Slip the completed band down around the hat and either sew it in place with a matching strand of yarn or leave it removable for easy color changes.
  • Weave in and hide all yarn ends securely after finishing the brim and band so the hat looks neat and the band sits flat.

Important Notes

  • πŸ’‘Work the hat in continuous spiral rounds with no joins and use a stitch marker to mark the last stitch of each round for accurate counting.
  • πŸ’‘Hold two strands of worsted weight yarn together throughout the crown and brim to achieve the correct gauge and structure.
  • πŸ’‘For smaller or medium sizes stop increasing at the rounds indicated (stop increases at Rnd 8 for small and Rnd 9 for medium) and then continue with the body rounds.

This Bucket Hat pattern combines simple stitches for a polished, wearable result you can make in an afternoon. Change the band color to match your outfit or make a stack of bands for different looks. The two-strand technique gives great structure so the brim keeps its shape. 🧢🧡

You ask,

we answer.

FAQs

What size will the finished hat be?

The pattern provides three finished sizes: small (18 inches), medium (20 inches), and large (22 inches) circumference using the recommended yarn and hook.

Can I start with chain 2 instead of a magic ring?

Yes, you can start by chaining 2 and working the first 6 single crochets into the second chain from hook as noted in the instructions.

Do I need to hold two strands together the whole time?

Yes, hold two strands of worsted weight yarn together for the crown and brim to achieve the intended texture, gauge, and structure.

How long will this project take to complete?

This is a bite-sized project that typically takes 2-4 hours depending on your speed and familiarity with the stitches.