๐Ÿงถ Beautiful โœจ Detailed ๐Ÿ’ Adorable

Cute Plushies Ghost Amigurumi Pattern

Cute Plushies Ghost Amigurumi Pattern
4.0โ˜… Rating
5-7 Hours Time Needed
2.8K Made This
โœ‚๏ธ

Beginner Friendly Level

Perfect for those just starting their crochet journey, with clear instructions and simple techniques

โฑ๏ธ

Weekend Treat

Takes 5-7 hours, making it an enjoyable project to finish over a couple of days.

๐Ÿงธ

Cute Companion

An adorable friend to cherish, handcrafted with love to bring comfort and joy for years to come.

About This Cute Plushies Ghost Amigurumi Pattern

This pattern creates a soft plush ghost amigurumi using plush (velvet) yarn for a cuddly texture. You will make the body, head, two arms and a little witch hat, then add embroidered eyebrows and a mouth. The instructions are written in US terminology and assume basic crochet knowledge.
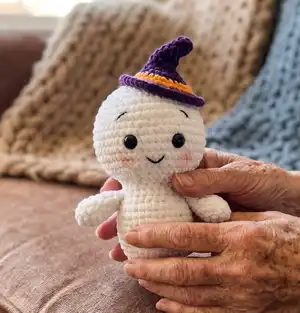
Cute Plushies Ghost Amigurumi Pattern crochet pattern - detailed view of completed project

The finished ghost is approximately 25 cm (10") tall without the hat when made with the recommended materials. The pattern is rated EASY and includes step-by-step rounds and placement tips for eyes and hat.

Why You'll Love This Cute Plushies Ghost Amigurumi Pattern

I absolutely love this pattern because it transforms super-soft plush yarn into a charming, huggable character that brightens any shelf or seasonal display. I enjoy how quickly the simple shapes come together to create a friendly face full of personality. The embroidered details let me add small expressive touches without complicated sewing. It is so satisfying to make a complete toy in just a few evenings and gift it to someone special.

Cute Plushies Ghost Amigurumi Pattern step 1 - construction progress Cute Plushies Ghost Amigurumi Pattern step 2 - assembly progress Cute Plushies Ghost Amigurumi Pattern step 3 - details and accessories Cute Plushies Ghost Amigurumi Pattern step 4 - final assembly and finishing

Switch Things Up

I love how easy it is to customize this ghost by changing yarn colors; you could make pastel versions for nursery decor or bold tones for Halloween.

I often swap the plush yarn for a worsted weight yarn and a smaller hook to make a firmer, smaller amigurumi suitable for keychains.

I like to add tiny crocheted accessories like scarves or a little broom for seasonal personality and character-driven gifts.

Try embroidering different facial expressions by moving the eyes and altering eyebrow placement to change the mood of the ghost.

You can make the hat removable by sewing a small snap or leaving a longer tail to tuck under the back loops rather than sewing directly.

I sometimes use safety eyes with different sizes to create a baby and adult version of the ghost for a coordinated set.

To make a weighted base for better stability, add a small fabric pouch of poly pellets to the bottom before closing the tail end.

For a textured finish, use loop or bouclรฉ yarn for the hat or accent band to add a playful tactile element.

I recommend experimenting with blush placement and intensity to give each ghost a unique personality and charm.

When gifting, consider crochet-wrapping the ghost in a small drawstring bag or pairing it with a matching tiny blanket for a special handmade set.

Common Mistakes & How to Fix Them

โœ— Skipping stuffing until the end can make shaping difficult; stuff as you go and add small amounts gradually for even form. โœ— Placing safety eyes too high or low will change the expression; follow the placement note between rounds 6 and 7 with 8 stitches between eyes. โœ— Not flattening and sewing the arm edges securely can cause floppy arms; flatten the arm and crochet 4 sc through both sides to close firmly. โœ— Cutting the white yarn after joining the body and before the head will interrupt flow; do not cut the white yarn after round 24 so you can continue to the head smoothly.
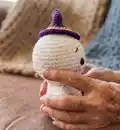
Cute Plushies Ghost Amigurumi Pattern

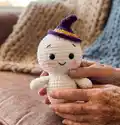
Make an adorable plush ghost with this easy-to-follow amigurumi pattern. You will crochet the body, head, arms and a cute witch hat, then add embroidered features for personality. The design uses plush yarn for a soft, cuddly finish and is perfect for gifting or seasonal decor. Clear photos and complete round-by-round instructions help you create a 25 cm tall ghost.

Beginner Friendly 5-7 Hours

Materials Needed for Cute Plushies Ghost Amigurumi Pattern

โ€” Main Fabric

  • 01
    Plush yarn (100g/120m) White - Himalaya Dolphin Baby 80301 (main color, approx 200-300g depending on size)
  • 02
    Plush yarn (100g/120m) Purple - Himalaya Dolphin Baby 80340 (small amount for hat, approx 25-50g)
  • 03
    Plush yarn (100g/120m) Orange - Himalaya Dolphin Baby 80316 (small amount for hat band, approx 10-20g)
  • 04
    Black thread for embroidery - YarnArt Jeans 53 (small skein for eyebrows and mouth)
  • 05
    Polyester stuffing (polyfill) - enough to firmly stuff head and body (approx 50-100g)

โ€” Tools Required

  • 01
    Crochet hook size 4.00 mm
  • 02
    Safety eyes 14 mm (2 pcs)
  • 03
    Black embroidery thread (YarnArt Jeans 53) and needle
  • 04
    Scissors
  • 05
    Yarn needle for sewing and weaving ends
  • 06
    Stitch markers
  • 07
    Polyester fiber fill (stuffing)
  • 08
    Pins for assembly (optional)

Progress Tracker

0% Complete

โ€” Arms :

Info :

Crochet with the white yarn. Stuff only lower half of the arm.

Round 1 :

6 sc into a magic ring (6)

Round 2 :

6 inc (12)

Round 3-4 :

12 sc (2 rounds)

Round 5 :

(4 sc, dec)*2 (10)

Round 6 :

10 sc

Round 7 :

(3 sc, dec)*2 (8)

Round 8 :

8 sc

Round 9 :

Flatten the arm and crochet 4 sc through both sides.

Info :

Fasten off and cut the yarn.

โ€” Body :

Info :

Crochet with the white yarn. Stuff as you go.

Round 1 :

6 sc into a magic ring (6)

Round 2 :

6 sc (6)

Round 3 :

(sc, inc)*3 (9)

Round 4 :

(2 sc, inc)*3 (12)

Round 5 :

4 inc, 4 dec (12)

Round 6 :

(sc, inc)*6 (18)

Round 7 :

3 sc, 4 inc, 3 sc, 4 dec (18)

Round 8 :

(2 sc, inc)*6 (24)

Round 9 :

6 sc, 4 inc, 6 sc, 4 dec (24)

Round 10 :

(3 sc, inc)*6 (30)

Round 11 :

9 sc, 4 inc, 9 sc, 4 dec (30)

Round 12 :

(4 sc, inc)*6 (36)

Round 13 :

12 sc, 4 inc, 12 sc, 4 dec (36)

Round 14 :

(11 sc, inc)*3 (39)

Round 15-18 :

39 sc (4 rounds)

Round 19 :

(11 sc, dec)*3 (36)

Round 20 :

36 sc

Round 21 :

(4 sc, dec)*6 (30)

Info :

Now we will join the arms:

Round 22 :

7 sc, 4 sc through the first arm and the body, 10 sc, 4 sc through the second arm and the body, 5 sc (30)

Round 23 :

(3 sc, dec)*6 (24)

Round 24 :

24 sc

Info :

Don't cut the white yarn, we will continue with the head.

โ€” Head :

Info :

Continue crocheting with the white yarn. Stuff as you go.

Round 1 :

(sc, inc)*12 (36)

Round 2 :

(2 sc, inc)*12 (48)

Round 3 :

(7 sc, inc)*6 (54)

Round 4 :

4 sc, inc, (8 sc, inc)*5, 4 sc (60)

Round 5-7 :

60 sc (3 rounds)

Round 8 :

4 sc, dec, (8 sc, dec)*5, 4 sc (54)

Round 9-11 :

54 sc (3 rounds)

Info :

Insert the safety eyes between rounds 6 and 7 with 8 stitches between them (6 stitches visible). The marker is in the back of the head.

Round 12 :

(7 sc, dec)*6 (48)

Round 13 :

3 sc, dec, (6 sc, dec)*5, 3 sc (42)

Round 14 :

(5 sc, dec)*6 (36)

Round 15 :

2 sc, dec, (4 sc, dec)*5, 2 sc (30)

Round 16 :

(3 sc, dec)*6 (24)

Round 17 :

sc, dec, (2 sc, dec)*5, sc (18)

Round 18 :

(sc, dec)*6 (12)

Round 19 :

6 dec (6)

Info :

Make sure that the head is stuffed firmly. Close the opening and hide the yarn inside.

โ€” Embroidering :

Info :

With a black thread embroider the eyebrows in round 10. They are 2 st wide and with 8 st between them. Embroider the mouth in round 4. It's 3 st wide. Color the cheeks with pink blush.

โ€” Hat :

Info :

Start crocheting with the purple yarn. Stuff lightly.

Round 1 :

6 sc into a magic ring (6)

Round 2-3 :

6 sc (2 rounds)

Round 4 :

(sc, inc)*3 (9)

Round 5-6 :

9 sc (2 rounds)

Round 7 :

6 sc, 3 inc (12)

Round 8 :

6 sc, (sc, inc)*3 (15)

Round 9 :

9 sc, (sc, inc)*3 (18)

Round 10 :

(2 sc, inc)*6 (24)

Info :

Change the yarn to orange color.

Round 11 :

(3 sc, inc)*6 (30)

Round 12 :

30 sc

Info :

Change the yarn to purple color.

Round 13 :

Front loops only: (sc, inc)*15 (45)

Round 14 :

45 sc

Info :

Make a sl st, fasten off and cut the yarn, leaving a tail for sewing. Sew the hat to the top of the head in the back loops of round 13. I sew it tilted to one side.

Assembly Instructions

  • Insert the safety eyes between rounds 6 and 7 of the head with 8 stitches between them (6 stitches visible) and secure the washers firmly behind the eyes.
  • Attach the arms by joining during Round 22: crochet 4 sc through the first arm and the body, and 4 sc through the second arm and the body as instructed, then continue rounds to secure.
  • Sew the hat to the top of the head in the back loops of round 13, tilting it slightly to one side as shown in the photos; hide the sewing tail inside the hat.
  • Embroider the eyebrows in round 10 using black thread, spacing them 8 stitches apart and 2 stitches wide; embroider the mouth in round 4, 3 stitches wide.
  • Flatten each arm and close the opening by crocheting 4 sc through both sides before fastening off to form a neat seam.
  • Stuff the head and body firmly as you go and close the head opening securely, hiding yarn ends inside for a clean finish.

Important Notes

  • ๐Ÿ’กUse stitch markers to keep track of rounds and the back of the head marker, especially when placing eyes between rounds 6 and 7.
  • ๐Ÿ’กStuff as you go and firm up the head before closing to maintain shape without overstuffing which can distort stitches.
  • ๐Ÿ’กDo not cut the white yarn after round 24 of the body because you will continue directly into the head without breaking yarn.
  • ๐Ÿ’กWhen sewing accessories like the hat, use the back loops of round 13 for a natural seam and secure the tail inside the hat.
  • ๐Ÿ’กWeave in ends and hide sewing tails inside the toy for a tidy finish and safer toy for gifting.

This little ghost is made with soft plush yarn for a cuddly feel and charming personality. ๐Ÿงถ It stands about 25 cm tall and is perfect for seasonal decorations or a sweet handmade gift. ๐ŸŽ Add embroidered details and a tiny hat to make each ghost uniquely yours! โœจ

You ask,

we answer.

FAQs

What size will the finished piece be?

The finished amigurumi measures approximately 25 cm (10") tall when using the recommended Plush Himalaya Dolphin Baby yarn and a 4.00 mm hook, measured without the hat.

Can I use different yarn weights for this pattern?

Yes, you can use different yarn weights but this will affect the final size and texture; choose an appropriate hook size and expect a change in finished dimensions.

Do I need prior crochet experience for this pattern?

This pattern is rated beginner friendly but assumes familiarity with basic stitches like single crochet, increase and decrease; some experience with amigurumi assembly is helpful.

How long does this project typically take to complete?

Most crocheters complete this project in 5-7 hours, though time may vary depending on experience, yarn type and assembly pace.

Where should I place the safety eyes?

Insert the safety eyes between rounds 6 and 7 of the head with 8 stitches between them (6 stitches visible), and place your round marker at the back of the head as shown.