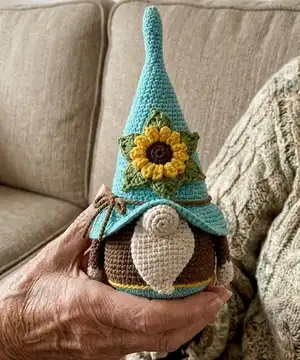
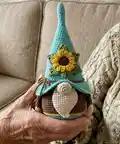
Make a charming sunflower gnome that stands about 26cm/10in tall using sport/fine weight yarn and a 2.5mm hook. This pattern includes step-by-step rounds for the hat, brim, body, arms, nose, beard, sunflower and assembly notes so you can crochet a complete, gift-ready gnome. Clear photos and helpful tips are included to guide you through shaping and finishing.
Progress Tracker
0% Complete
— HAT :
Info :
Use a contrast thread to mark the beginning of each round. Do not remove it until your work is completed
Round 1 :
Blue: 6SC in magic ring, tighten the ring (6)
Round 2 :
*(INC in next st, SC in next st)from*rep x3 (9)
Round 3-12 :
SC in each st around (9)
Round 13 :
*(SC in next sts, INC in next st, SC in next st)from*rep x3 (12)
Round 14 :
SC in each st around (12)
Round 15 :
*(SC in next 3sts, INC in next st)from*rep x3 (15)
Round 16 :
SC in each st around (15)
Round 17 :
*(SC in next 2sts, INC in next st, SC in next 2sts)from*rep x3 (18)
Round 18 :
SC in each st around (18)
Round 19 :
*(SC in next 5sts, INC in next st)from*rep x3 (21)
Round 20 :
SC in each st around (21)
Round 21 :
*(SC in next 3sts, INC in next st, SC in next 3sts)from*rep x3 (24)
Round 22 :
SC in each st around (24)
Round 23 :
*(SC in next 7sts, INC in next st)from*rep x3 (27)
Round 24 :
SC in each st around (27)
Round 25 :
*(SC in next 4sts, INC in next st, SC in next 4sts)from*rep x3 (30)
Round 26 :
SC in each st around (30)
Round 27 :
*(SC in next 9sts, INC in next st)from*rep x3 (33)
Round 28 :
SC in each st around (33)
Round 29 :
*(SC in next 5sts, INC in next st, SC in next 5sts)from*rep x3 (36)
Round 30 :
SC in each st around (36)
Round 31 :
*(SC in next 11sts, INC in next st)from*rep x3 (39)
Round 32 :
SC in each st around (39)
Round 33 :
*(SC in next 6sts, INC in next st, SC in next 6sts)from*rep x3 (42)
Round 34 :
SC in each st around (42)
Round 35 :
*(SC in next 13sts, INC in next st)from*rep x3 (45)
Round 36 :
SC in each st around (45)
Round 37 :
*(SC in next 7sts, INC in next st, SC in next 7sts)from*rep x3 (48)
Round 38 :
SC in each st around (48)
Round 39 :
*(SC in next 15sts, INC in next st)from*rep x3 (51)
Round 40 :
SC in each st around (51)
Round 41 :
*(SC in next 8sts, INC in next st, SC in next 8sts)from*rep x3 (54)
Round 42 :
*(SC in next 26sts, INC in next st)from*rep x2 (56)
Round 43-45 :
SC in each st around (56)
— HAT BRIM :
Round 46 :
Ch2, *(DC FLO in next 6sts, 2DC FLO in next st)from*rep x3, hdc FLO in next st, SC FLO in next 5sts, INC FLO in next st, SC FLO in next 5sts, hdc FLO in next st, *(2DC FLO in next st, DC FLO in next 6sts)from*rep x3, DC FLO in next st, sl st in 2nd Ch (64)
Round 47 :
Ch2, DC in next 25sts, hdc in next st, SC in next 12sts, hdc in next st, DC in next 24sts, sl st in 2nd Ch (64)
Round 48 :
Ch2, *(DC in next 7sts, 2DC in next st)from*rep x3, hdc in next st, SC in next 6sts, INC in next st, SC in next 6sts, hdc in next st, *(2DC in next st, DC in next 7sts)from*rep x3, DC in next st, sl st in 2nd Ch (72)
Round 49 :
SC in next 72sts around (72), sl st in 1st stitch of rd
— BODY :
Round 1 :
With Brown work BLO into stitches of Rd 46: SC BLO in each st around (56)
Round 2 :
SC in next 11sts, SC BLO in next 5sts (we will attach the arm here), SC in next 8sts, SC BLO in next 8sts (we will attach a beard here), SC in next 8sts, SC BLO in next 5sts (we will attach the arm here), SC in next 11sts (56)
Round 3-7 :
SC in each st around (56)
Round 8 :
*(SC in next 13sts, INC in next st)from*rep x4 (60)
Round 9-12 :
SC in each st around (60)
Round 13 :
*(SC in next 7sts, INC in next st, SC in next 7sts)from*rep x4 (64)
Round 14-15 :
SC in each st around. Change to Blue in last stitch. Cut off Brown (64)
Round 16 :
Blue: *(SC BLO in next 3sts, SC2tog BLO, SC BLO in next 3sts)from*rep x8 (56)
Round 17-18 :
SC in each st around (56)
Info :
Drop a loop from your hook
Round 18 (Yellow) :
Yellow: work surface slip stitch into stitches of Rd 16
Round 19 :
Grab a dropped blue loop back on your hook and continue: *(SC in next 5sts, SC2tog)from*rep x8 (48). Stuff
Round 20-21 :
SC in each st around (48)
Round 22 :
SC BLO in each st around (48)
Round 23 :
*(SC in next 2sts, SC2tog, SC in next 2sts)from*rep x8 (40)
Round 24 :
*(SC in next 3sts, SC2tog)from*rep x8 (32)
Round 25 :
*(SC in next st, SC2tog, SC in next st)from*rep x8 (24)
Round 26 :
*(SC in next st, SC2tog)from*rep x8 (16)
Round 27 :
SC2tog x8. Cut off thread and sew the opening (8)
— STAND :
Round 1 :
With Yellow work into stitches of Rd 21 of the Body: SC FLO in each st around. Cut off thread (48)
— ARMS :
Info :
Work in continuous rounds
Step 1 - Palms - Round 1 :
Wheat: 5SC in magic ring, tighten the ring (5)
Round 2 :
INC in each st around (10)
Round 3-5 :
SC in each st around (10)
Info :
Change to Brown in last st. Cut off Wheat
Round 6-7 :
Brown: SC in each st around (10)
Round 8 :
SC BLO in each st around (10)
Round 9-17 :
SC in each st around (10)
Info :
Cut off thread leaving a long tail for sewing.
— NOSE :
Round 1 :
Wheat: 6SC in magic ring, tighten the ring (6)
Round 2 :
INC in each st around (12)
Round 3 :
*(SC in next st, INC in next st)from*rep x6 (18)
Round 4-5 :
SC in each st around (18)
Round 6 :
*(SC in next st, SC2tog)from*rep x6 (12)
Info :
Cut off thread leaving a long tail for sewing. Stuff the nose a bit
— BEARD :
Info :
Work in continuous rounds. Off-white color unless otherwise stated.
Round 1 :
Off-white: Chain 2
Round 1 :
3SC in 2nd st from hook (work in continuous rounds) (3)
Round 2 :
INC in each of 3SC (6)
Round 3 :
INC in each of next 2sts, SC in next 2sts, INC in next st (9)
Round 4 :
SC in next st, INC in each of next 2sts, SC in next 5sts, INC in next st (12)
Round 5 :
*(SC in next 2sts, INC in next st)from*rep x3 (15)
Round 6 :
SC in next 3sts, INC in each of next 2sts, SC in next 9sts, INC in next st (18)
Round 7 :
SC in next 4sts, INC in each of next 2sts, SC in next 8sts, INC in next st, SC in next 3sts (21)
Round 8 :
SC in next 5sts, INC in each of next 2sts, SC in next 14sts (23)
Round 9 :
SC in next 6sts, INC in each of next 2sts, SC in next 14sts, INC in next st (26)
Round 10-12 :
SC in each st around (26)
Round 13 :
SC in next 8sts, SC2tog, SC in next 11sts, SC2tog, SC in next 3sts (24)
Round 14 :
SC in next 7sts, SC2tog, SC in next 10sts, SC2tog, SC in next 3sts (22)
Round 15 :
SC in next 6sts, SC2tog, SC in next 9sts, SC2tog, SC in next 3sts (20)
Round 16 :
SC in each st around (20)
Info :
Cut off thread leaving a long tail for sewing
— SUNFLOWER :
Round 1 :
Brown: in magic ring: Ch2, 11DC, sl st in Ch 2nd st of rd. Cut off thread (center)
Round 2 :
Join Bright Yellow: Petal: 1) Chain 3 (count as 1 DC) 2) 4DC in next st 3) Drop a loop from your hook 4) Insert a hook into 3rd Chain. When you will work other petals insert your hook in 1st DC 5) And insert the hook back into the dropped loop 6) Yarn over and pull through both loops on your hook. Petal is done. Now work to end (Ch2, Petal) around, and sl st at the end (total is 12 petals). Cut off thread
Round 3 :
Join Green grass and make leaves: Ch1, *(all in next 2Ch-space: [hdc, 2DC, TR, Ch4, sl st in previous TR, TR, 2DC, hdc]); SC in next 2Ch-space)from*rep x6. Total is 6 leaves
— ASSEMBLING :
Info :
Attach (sew on/glue) the nose on the beard and then sew on the stitches FLO made in front of the body under the hat brim especially for the beard. Sew on the arms to body under the hat brim to the stitches you've made on Rd 2 of the body.
— TWISTED CORD :
Info :
The initial thread length should be three times as long as the length of the final cord. For example, if your final cord should be approx. 50cm, you need to grab 150cm threads
Step 1 :
Take a double Brown thread about 150 cm length, make a knot on one end
Step 2 :
Hook on for something (I use a door handle) and start to twist
Step 3 :
Fold in half and remove the end from the door handle
Step 4 :
Straighten the cord and make a knot on the other end
This delightful sunflower gnome is full of handmade charm and personality, perfect for holiday displays or cozy shelf decor. The tall hat, shaped brim and sunflower applique give it a cheerful, unique look that stands out. Make one as a gift or keep it as a whimsical companion at home. 🌻🧶