🧢 Beautiful ✨ Detailed πŸ’ Adorable

Crochet Flexagon Amigurumi Pattern

Crochet Flexagon Amigurumi Pattern
4.5β˜… Rating
5-7 Hours Time Needed
4.1K Made This
βœ‚οΈ

Intermediate Level

Ideal for those with basic crochet experience, featuring slightly more advanced stitches and techniques to expand your skills.

⏱️

Weekend Treat

Takes 5-7 hours, making it an enjoyable project to finish over a couple of days.

🧸

Cute Companion

An adorable friend to cherish, handcrafted with love to bring comfort and joy for years to come.

About This Crochet Flexagon Amigurumi Pattern

This pattern creates a crochet flexagon β€” a soft interactive toy made from crocheted triangles joined into pyramids and assembled into a twistable flexagon. The design uses simple single crochet shaping and finishing to create crisp triangle faces and neat seams. You will make multiple triangles in four colors, edge them, form pyramids, and sew everything together into the final functional toy.
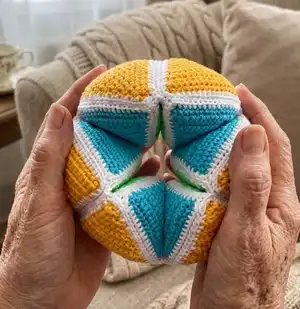
Crochet Flexagon Amigurumi Pattern crochet pattern - detailed view of completed project

Clear step-by-step rounds and photos make it easy to follow, and the pattern includes instructions for edging, assembly and final joining. The finished flexagon measures approximately 15 cm using the indicated yarn and hook.

Why You'll Love This Crochet Flexagon Amigurumi Pattern

I absolutely love this pattern because it turns simple crochet triangles into a clever, twistable toy that feels magical in your hands. I enjoy the repetitive rhythm of making many identical triangles β€” it is satisfying and meditative. The assembly step is cleverly visual and rewarding, transforming flat pieces into 3D pyramids and then into a moving flexagon. I love gifting these because they are colorful, tactile, and delight people of all ages.

Crochet Flexagon Amigurumi Pattern step 1 - construction progress Crochet Flexagon Amigurumi Pattern step 2 - assembly progress Crochet Flexagon Amigurumi Pattern step 3 - details and accessories Crochet Flexagon Amigurumi Pattern step 4 - final assembly and finishing

Switch Things Up

I love customizing this pattern by changing color palettes β€” try monochrome shades for a minimalist flexagon or a rainbow gradient for a playful version.

I sometimes swap YarnArt Jeans for a slightly thicker cotton to make a chunkier, more tactile flexagon; adjust hook size to match the yarn.

I also experiment with tiny embroidered motifs on each triangle before edging to personalize each face.

If you want a keychain version, I make smaller triangles with finer yarn and a smaller hook, then add a sturdy ring when assembling.

For a quieter, softer toy, choose muted pastel colors and use a softer stuffing to make the folds gentler.

I recommend trying contrast edging colors to create a crisp outline that highlights the fold lines and seams.

To make assembly easier I mark matching triangle seams with numbered pins so the pyramids align perfectly when sewn together.

I sometimes add a small bell or tactile insert into the center of the flexagon for sensory play β€” just be sure it is securely enclosed.

For gifts, I make sets with matching color schemes and include a small care tag explaining materials and washing instructions.

I enjoy transforming the pattern into classroom projects β€” split the steps across sessions so learners practice shaping, edging, and basic sewing one stage at a time.

Common Mistakes & How to Fix Them

βœ— Skipping the stitch counts in each row can cause the triangle edges to be uneven; follow and count stitches every round to maintain the intended shape. βœ— Not using a blunt or appropriate needle for assembly can distort seams and make joining awkward; use a blunt-end needle and sew using the half-cross stitch on back loops as recommended. βœ— Forgetting to write down color substitutions when changing yarns leads to inconsistent sets; note which color you used and which color it replaces before you begin to keep sets consistent. βœ— Understuffing or overstuffing the pyramids causes them to lose shape or become lumpy; fill gradually and use just enough holofiber to create a stable but flexible pyramid.
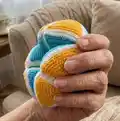
Crochet Flexagon Amigurumi Pattern

Make a playful crochet flexagon β€” an interactive, twistable toy that folds and unfolds in satisfying ways. This pattern guides you step-by-step through crocheting equilateral triangles, edging them, assembling pyramids and joining parts into a working flexagon. Perfect as a thoughtful handmade gift or a calming fidget toy to practice fine motor skills.

Intermediate 5-7 Hours

Materials Needed for Crochet Flexagon Amigurumi Pattern

β€” Main Fabric

  • 01
    YarnArt Jeans 33 (blue) - small amount for triangles
  • 02
    YarnArt Jeans 77 (orange) - small amount for triangles
  • 03
    YarnArt Jeans 60 (light green) - small amount for triangles
  • 04
    YarnArt Jeans 35 (yellow) - small amount for triangles
  • 05
    Alize Cotton Gold 55 (white) - for edging and seams

β€” Tools Required

  • 01
    Crochet hook No 2
  • 02
    Holofiber filler
  • 03
    Sewing needle (blunt end recommended for assembly)
  • 04
    Scissors

Progress Tracker

0% Complete

β€” Notes :

Info :

You can use any yarn and a suitable hook. If you work with other colors than indicated in the pattern, I would recommend you to write down which color you use and which color you are replacing with. The size of the finished toy from the indicated materials is ~15 cm

β€” Abbreviations :

Infos :

ch - chain. sc - single crochet. dec - decrease. inc3 - increase (3 sc in one stitch). sl st - slip stitch. (...) - the number in parentheses indicates the number of stitches in the row.

β€” Materials and tools :

Infos :

Yarn: YarnArt Jeans 33 (blue), YarnArt Jeans 77 (orange), YarnArt Jeans 60 (light green), YarnArt Jeans 35 (yellow), Alize Cotton Gold 55 (white). Tools: Crochet hook β„– 2. Holofiber filler. Sewing needle. Scissors.

β€” Equilateral triangle :

Info :

Note! How to make a single crochet decrease: - Insert hook into the indicated stitch. Yarn over and pull up a loop. (2 loops on the hook.) - Insert hook into the next stitch. Yarn over and pull up a loop. (3 loops on the hook.) - Yarn over, pull through all 3 loops on the hook.

Info :

Make 6 triangles of yellow, orange, light green and blue.You should have 24 triangles in total.

Round 1 :

17 ch, from the second stitch from the hook - 16 sc, ch, turn (16)

Round 2 :

dec, 12 sc, dec, ch, turn (14)

Round 3 :

14 sc, ch, turn (14)

Round 4 :

dec, 10 sc, dec, ch, turn (12)

Round 5 :

12 sc, ch, turn (12)

Round 6 :

dec, 8 sc, dec, ch, turn (10)

Round 7 :

10 sc, ch, turn (10)

Round 8 :

dec, 6 sc, dec, ch, turn (8)

Round 9 :

8 sc, ch, turn (8)

Round 10 :

dec, 4 sc, dec, ch, turn (6)

Round 11 :

6 sc, ch, turn (6)

Round 12 :

dec, 2 sc, dec, ch, turn (4)

Round 13 :

4 sc, ch, turn (4)

Round 14 :

2 dec, ch, turn (2)

Round 15 :

dec (1)

Info :

Fasten off, cut the thread.

Info :

Attach the white thread to any of the sides of the triangle and work with sc along the edge, in the tops of the triangle - 3 sc in one stitch. Finish with a needle (see photo) and fasten the thread from the inside.You should have - (14 sc - on the side, 3 sc - at the top) *3 (51)

β€” Assembly :

Info :

Now you need to assemble the pyramids from the triangles. To do this, take a needle with a blunt end (or another one that is convenient for you), and sew 3 (!!!!) pyramids with white (or the color that you worked with) yarn according to the following schemes.

Info :

Sew with an Half Cross stitch seam for the back half-loops.

Info :

Fill with filler.

Info :

You should get 3 of pyramids A and 3 of pyramids B.

Info :

Now you can start assembling the flexagon. Connect pyramid A and pyramid B (see photo) - sew in the place indicated by a stroke. Use the seam formed when sewing the pyramids.

Info :

Make 3 parts, each part consists of 2 pyramids.

Info :

Assembly the parts in the way as shown in the next photo and sew along the line that is indicated by a stroke:

Info :

If you look from above, the seams are located where the arrows indicate:

Info :

Done! Let's twist and turn!! And also to develop imagination, fine motor skills and simply distract yourself from the outside world and calm down☺ I hope you enjoyed the process!

Info :

Happy crocheting!

Assembly Instructions

  • Attach the white thread to any side of each triangle and sc around the edge, placing 14 sc along each side and 3 sc in each corner; after finishing, fasten and hide the thread inside (resulting in 51 sc per triangle).
  • Sew three edged triangles together along their sides (back half-loops) using a blunt needle and a Half Cross stitch seam to form a filled pyramid; fill with holofiber before closing.
  • Make three assembled pyramids of type A and three of type B (colors as shown), then connect each Pyramid A to a Pyramid B by sewing along the seam formed during pyramid construction at the place indicated in the photos.
  • Create three parts by pairing pyramids (each part consists of two pyramids), then assemble the three parts together and sew along the indicated lines to form the completed flexagon, aligning seams as shown by the arrows in photos.
  • Use the seam formed when sewing the pyramids as the joining guide when connecting pyramids A and B to ensure neat alignment and functioning folds.
  • Pin or hold pieces in place while sewing to ensure symmetrical seams and consistent tension, then weave in and secure all ends inside the flexagon.

Important Notes

  • πŸ’‘Use yarn and a hook that you are comfortable with; the pattern was made with YarnArt Jeans and a 2 mm hook but other yarns will change the final size.
  • πŸ’‘Write down any color substitutions so you make consistent sets of triangles and pyramids across the project.
  • πŸ’‘When sewing pyramids together, use a blunt needle and a half-cross stitch into the back loops to keep seams neat and functional.
  • πŸ’‘Stuff the pyramids firmly but not overfilled to keep good shape and allow the flexagon to fold and twist properly.

This colorful crochet flexagon is a playful twist on classic amigurumi β€” perfect for fidgeting, learning, or gifting. It folds, flips and delights with each turn, bringing handmade charm and tactile joy to anyone who plays with it. Make it in bright colors for a cheerful look or soft pastels for a gentle, calming toy. 🧢✨

You ask,

we answer.

FAQs

What size will the finished piece be?

The finished flexagon measures approximately 15 cm across when made with the suggested yarns and crochet hook size.

Can I use different yarn weights for this pattern?

Yes, you can use different yarn weights, but the final size and stitch counts will change; choose an appropriate hook and expect a larger or smaller flexagon accordingly.

Do I need prior crochet experience for this pattern?

This pattern is rated intermediate because it requires shaping with decreases, working in rows, edging, and sewing pieces together; basic knowledge of single crochet and decreases is helpful.

How long does this project typically take to complete?

Most crocheters complete this project in 5-7 hours, depending on speed, experience, and how much time you spend on sewing and assembly.