About This Crochet Bunny Pumpkin Amigurumi Pattern
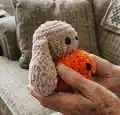
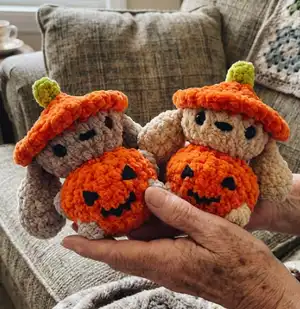
This pattern creates a tiny bunny whose body is crocheted in the shape of a pumpkin, complete with a floppy hat and a little pumpkin accessory. It uses chenille yarn for a soft, plush texture and bobble stitches for pumpkin detail. You will work in continuous rounds with color changes and simple shaping to build the head, body, ears, hat and stem. The pattern includes guidance for eyes, nose embroidery, and finishing touches to make your bunny expressive and adorable.
Includes full materials, abbreviations, and step-by-step rounds for every piece so you can follow along easily. Ideal for making seasonal gifts, decor, or a sweet amigurumi companion to brighten your autumn projects.
Why You'll Love This Crochet Bunny Pumpkin Amigurumi Pattern
I absolutely love this pattern because it blends classic amigurumi shaping with a playful seasonal twist, turning a bunny into a little pumpkin hug. I enjoyed using chenille yarn for its plush softness — it makes the finished toy irresistibly squishy and tactile. The hat and pumpkin details add so much personality with only a few simple stitches, which was really satisfying to design and make. I also love that you can personalize the face with felt or embroidery, making each bunny uniquely expressive and perfect for gifting.
Switch Things Up
I love how easy it is to customize this bunny pumpkin with different color choices — try pastel oranges and mint greens for a softer look.
You can change the yarn weight and hook size to make minis or larger versions; a bulky yarn will produce a chunkier plush while a DK yarn creates a smaller, more detailed toy.
I often experiment with different hat styles — add a floppy brim or a pointed witch hat for a playful variation.
For the pumpkin face, I sometimes use embroidered eyes and mouth instead of felt so everything is fully washable and child-safe.
I like adding a little wire inside the ears for posability, which lets me pose the bunny holding the pumpkin at different angles.
Try mixing textures by crocheting the hat in a different yarn to create contrast with the chenille body.
Make a trio of bunnies in varying sizes and colors to create a charming autumn display on a mantle or shelf.
To create a gift-ready piece, stitch a small loop at the top of the hat and add a ribbon for hanging as seasonal decor.
If you want a cuddly baby-safe toy, skip the safety eyes and embroider the face completely instead; I recommend this for very young children.
I also enjoy personalizing each bunny with tiny accessories like a felt leaf, tiny scarf, or a removable mini pumpkin to give each creation a unique personality.
Common Mistakes & How to Fix Them
✗ Skipping the magic ring or starting with chains instead of MR can create a loose center; always begin with a tight magic ring to close the hole neatly.
✗ Forgetting to change colors exactly where instructed will make pumpkin sections misaligned; follow the color-change notes and count stitches carefully at each transition.
✗ Not stretching your work during bobble or BO rounds can flatten the pumpkin texture; gently stretch to widen the rounds so the pumpkin looks round and plump.
✗ Stuffing too early or too much will make shaping difficult and lumpy; stuff gradually, shaping as you go and add fiber in small amounts to achieve a smooth, even finish.