About This Colourful Mini Dino Amigurumi Pattern
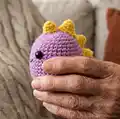
This pattern creates a small, colourful amigurumi dinosaur made from DK (8 ply) cotton. The head and body are crocheted as one piece, with a sewn-on tail and charming spikes along the back. You will embroider a friendly face and attach safety eyes to bring your dino to life. The finished dino measures approximately 7.5cm tall when using the suggested yarn and hook.

The pattern uses UK terminology and works in continuous rounds, with clear stitch counts after each round. Perfect for making multiple colours and customising spike placement for unique results.
Why You'll Love This Colourful Mini Dino Amigurumi Pattern
I absolutely love this pattern because it is endlessly customisable — you can change colours and spike arrangements to create a whole family of dinos. I adore how quick it is to make: in an afternoon you have a finished, gift-ready toy. The construction is clever but forgiving, teaching useful techniques like re-joining with a standing stitch and crocheting a tail into skipped stitches. Seeing the simple components come together into a cute character always makes me smile and I hope it will for you too.
Switch Things Up
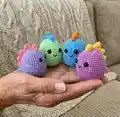
I love how easy it is to change the character by switching colours—try pastel shades for a soft look or neon tones for a playful collection.
You can make a keyring-sized dino by using thinner yarn and a smaller hook, or a huggable version with bulky yarn and a larger hook.
I often mix and match spike colours for a rainbow effect; try alternating colours for each spike to make a unique pattern.
Swap the safety eyes for embroidered eyes for a fully baby-safe toy suitable for little ones.
Add tiny accessories like a crocheted scarf, felt bow, or embroidered spots to give each dino its own personality.
Try changing the spike shapes by adjusting spike rounds—make them taller or flatter by adding or removing rounds.
I sometimes add a small button or bell inside the body for a gentle jingling toy—just make sure it�s securely enclosed for safety.
Experiment with facial expressions by moving the mouth higher or lower, or using different eyebrow stitches to change the mood.
Make a matching set in a gradient of colours to display on a shelf or give as a colourful themed gift set.
If you want posable limbs, consider adding thin wire wrapped in yarn into the tail before finishing so you can bend it into poses.
Common Mistakes & How to Fix Them
✗ Placing safety eyes too high or too low will affect facial balance; place them between rounds 9 and 10 (st 12 and st 18) as instructed to ensure the face sits correctly.
✗ Forgetting to mark the start of each round can lead to miscounted stitches and lost shaping; use a stitch marker or scrap yarn to clearly mark the beginning of every round.
✗ Not stuffing gradually causes lumpiness or distorted shaping; begin stuffing early and add small amounts as you progress to maintain an even form.
✗ Leaving tails too short makes sewing pieces together difficult later on; leave long threads when fastening off so you can easily stitch spikes and the tail in place.