🧢 Beautiful ✨ Detailed πŸ’ Adorable

Claude the Cloud Amigurumi Pattern

Claude the Cloud Amigurumi Pattern
4.7β˜… Rating
2-3 Hours Time Needed
2.4K Made This
βœ‚οΈ

Beginner Friendly Level

Perfect for those just starting their crochet journey, with clear instructions and simple techniques

⏱️

Bite-Sized Project

Finishes in 2-4 hoursβ€”perfect for an afternoon of creative relaxation.

🧸

Cute Companion

An adorable friend to cherish, handcrafted with love to bring comfort and joy for years to come.

About This Claude the Cloud Amigurumi Pattern

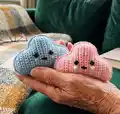
This pattern creates Claude the Cloud, a small plush amigurumi crocheted in rows and finished without sewing. Youll make two identical cloud halves, join them with single crochet, and stuff as you go for a rounded shape. The design includes placement notes for safety eyes and simple embroidery for the mouth and cheeks.

Claude the Cloud Amigurumi Pattern crochet pattern - detailed view of completed project

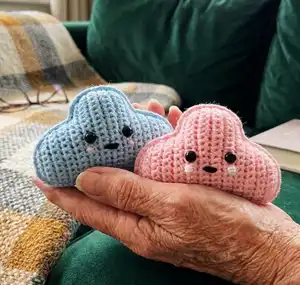
Designed for DK / light worsted yarn and a 3 mm hook, Claude measures approximately 7 cm x 13 cm when finished. This easy, no-sew project is a quick, satisfying make and a lovely handmade gift.

Why You'll Love This Claude the Cloud Amigurumi Pattern

I absolutely love this pattern because it takes a simple shape and turns it into a charming little companion with minimal effort. I enjoy that there is no complicated sewing β€” everything is assembled by crocheting the pieces together which saves time and gives a neat finish. The design is small, quick to make and perfect for practicing consistent rows and shaping. Making Claude feels relaxing and rewarding, and I always enjoy seeing the bright, smiling faces people embroider onto their clouds.

Claude the Cloud Amigurumi Pattern step 1 - construction progress Claude the Cloud Amigurumi Pattern step 2 - assembly progress Claude the Cloud Amigurumi Pattern step 3 - details and accessories Claude the Cloud Amigurumi Pattern step 4 - final assembly and finishing

Switch Things Up

I like to experiment with color to make Claude unique; try soft pastels like mint or lavender or go bold with rainbow shades to suit your style.

To make Claude larger or smaller, change your yarn weight and hook size β€” bulky yarn with a larger hook creates a squishier, bigger cloud while thinner yarn makes a tiny keychain-friendly version.

I sometimes replace safety eyes with embroidered eyes for a completely soft toy suitable for babies; use contrasting yarn for a cute look.

Add a small loop at the top before closing to turn Claude into an ornament or hanging decoration for a mobile.

Try using textured yarn or a boucle for an ultra-fluffy cloud effect β€” adjust stuffing amounts to compensate for bulkier yarn.

Make a whole set of clouds in graduated sizes and colors to create a whimsical display or a nursery mobile.

I often stitch tiny stars or a smiley face onto the back for a hidden detail that makes each cloud feel special.

For more personality, embroider freckles, lashes, or different mouth shapes β€” these small changes give each cloud its own expression.

If you want a weighted base so the cloud sits upright, add a small sachet of rice or plastic pellets inside the bottom before fully closing.

I also enjoy combining fabrics by sewing a felt star or moon to the cloud for an accessory; it adds a handcrafted charm and makes the project more giftable.

Common Mistakes & How to Fix Them

βœ— Forgetting to place the safety eyes at the correct rows can make the face lopsided; place the eyes between rows 11-12 and 17-18 and double-check their vertical alignment before fastening. βœ— Skipping stitch markers during the long straight section can cause you to lose track of the row start; place a marker in the last stitch of each row and move it up as you work to stay oriented. βœ— Not stuffing while joining the pieces will lead to a flat or uneven cloud; continue to add stuffing gradually as you single crochet the layers together to maintain the rounded shape. βœ— Pulling the yarn too tightly when embroidering the mouth or cheeks can distort the fabric; use gentle even tension and small stitches to achieve a neat expression.

Claude the Cloud Amigurumi Pattern

Make an adorable Claude the Cloud amigurumi with this friendly, no-sew crochet pattern. Youll create two identical cloud pieces and crochet them together while stuffing for a soft, rounded toy. Clear row-by-row instructions make it easy to follow and perfect for gifting or decorating a nursery.

Beginner Friendly 2-3 Hours

Materials Needed for Claude the Cloud Amigurumi Pattern

β€” Main Fabric

  • 01
    Yarn in the colors: blue/white/rose or any other color you want your cloud to be
  • 02
    Yarn strength: DK, light worsted, number 3 yarn

β€” Tools Required

  • 01
    Crochet hook: 3 mm
  • 02
    Stitch markers (use a stitch marker in the last stitch of each round, moving it up as you go)
  • 03
    Safety eyes: 9 mm
  • 04
    Black and rose yarn or embroidery floss for mouth and cheeks
  • 05
    Embroidery needle
  • 06
    Yarn needle
  • 07
    Scissors
  • 08
    Stuffing (polyester filling)

Progress Tracker

0% Complete

β€” Cloud Front-Piece :

R1 :

Ch 9, turn (9)

R2 :

Inc, 7 sc, turn (9)

R3 :

Ch 1, 8 sc, inc, turn (10)

R4 :

Ch 1, inc, 9, turn (11)

R5 :

Ch 1, 10 sc, inc, turn (12)

R6 :

Ch 1, 12 sc, turn (12)

R7 :

Ch 1, 12 sc, turn (12)

R8 :

Ch 1, inc, 11 sc, turn (13)

R9 :

Ch 1, 13 sc, ch 6, turn (19)

R10 :

1 sc, in second ch from hook, and next 17 sc (18)

R11 :

Ch 1, 17 sc, inc, turn (19)

R12-18 :

(7 rows) Ch 1, 19 sc, turn (19)

R19 :

Ch 1, 17 sc, dec turn (18)

R20 :

Ch 1, dec, 16 sc (17)

R21 :

Ch 1, 13 sc, keeping the last 4 stitches unstitched (13)

R22 :

Ch 1, dec, 11 sc, turn (12)

R23 :

Ch 1, 12 sc, turn (12)

R24 :

Ch 1, dec, 10 sc, turn (11)

R25 :

Ch 1, 9 sc, dec, turn (10)

R26 :

Ch 1, dec, 8 sc, turn (9)

R27 :

no chain, 7 sc, dec, turn (8)

R28 :

no chain, dec, 6 sc (7)

Info :

Cut yarn. Hide yarn ends.

β€” Cloud Back-Piece :

Info :

Make the back-piece the same way as the front-piece, but don't cut the yarn.

Info :

Once the second piece is finished, hide the other yarn end.

Info :

Add the safety eyes in one of the pieces, between row 11 and 12 and 17 and 18. Check that the eyes are on the same height and vertically in the middle of the piece.

Info :

Lay the pieces flat onto each other. Now crochet them together with a sc. We begin where we made the last stitch. Continue to stuff the cloud while crocheting along.

Info :

Make sure, the cloud is very firmly stuffed, especially add stuffing at the three corners. This way the cloud gets the cute round three-dimensional shape that we want.

Info :

Cut a piece of black yarn or embroidery-floss and embroider on the mouth. Then embroider on the cheeks with a few stitches.

Assembly Instructions

  • Add safety eyes to one piece before joining: place them between rows 11 and 12 and between rows 17 and 18, ensuring they are the same height and centered vertically on the piece.
  • Lay the front and back pieces flat together and crochet them together around the edges using single crochet, beginning where you made the last stitch of the second piece.
  • Stuff the cloud gradually while you crochet the edges together, continuing to add stuffing before closing each area so the cloud retains a soft, rounded 3D shape.
  • Make sure the cloud is firmly stuffed, paying special attention to the three corner bumps to ensure they keep their rounded form.
  • Embroider the mouth with black yarn or embroidery floss and add the cheeks with rose yarn or floss using a few small stitches for a neat facial expression.

Important Notes

  • πŸ’‘Use stitch markers in the last stitch of each row and move them up as you go to keep track of your rows and keep edges aligned.
  • πŸ’‘Stuff firmly but in small amounts as you crochet the pieces together to maintain an even, rounded shape without overfilling.
  • πŸ’‘Place and check safety eyes before joining the pieces to avoid repositioning after the toy is closed.

Create your own Claude the Cloud and bring a little happiness to any shelf or nursery. This charming, no-sew amigurumi is quick to make and perfect for gifting or decorating with friends and family. Share your finished clouds and spread the handmade joy! 🧢☁️

You ask,

we answer.

FAQs

What size will the finished piece be?

The finished amigurumi measures approximately 7 cm x 13 cm when using DK / light worsted yarn and a 3 mm hook.

Can I use a different yarn weight or hook?

Yes, you can change yarn weight and hook size but the finished size will change; use a larger hook and bulky yarn for a bigger plush or thinner yarn for a mini version.

Is this pattern suitable for beginners?

Yes, this pattern is rated Beginner Friendly with simple rows and basic shaping, though some experience with single crochet and increases/decreases is helpful.

How do I join the two pieces together?

Lay the two pieces together and single crochet around the edges, stuffing the cloud gradually as you join to create a smooth, rounded finish.