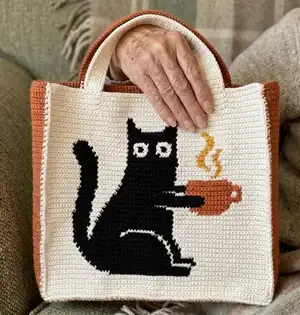
Make a stylish crochet tote bag featuring a bold cat holding a steaming cup — a charming intarsia design perfect for gifting or everyday use. This pattern walks you through the color-charted front panel, a solid back panel, handles and neat assembly. With clear row-by-row instructions and photo guidance, you will create a professional-looking bag you can be proud of.
Progress Tracker
0% Complete
— Required materials and tools :
Info :
Yarn: Gazzal Baby Bamboo (50% acrylic/50% bamboo) 50g/115m - light terracotta (95242), yellow (95205), white (95227). Yarn: Gazzal Baby Love (45% acrylic/55% modal) 50g/115m - black (1629). Crochet hook: 2.5 mm. Scissors. Tapestry needle.
— Abbreviations :
Infos :
Ch - chain. Sc - single crochet. R - Right Side. W - Wrong Side. RS - right side. WS - wrong side.
— Tips before starting :
Infos :
The front part of the bag is crocheted in the Intarsia crochet technique. If you did not crochet in this technique before, watch the YouTube video. You can find different videos on YouTube if needed. The front and back parts of the bag are crocheted in single crochet. Each square in the pattern indicates one single crochet. The front part of the bag is crocheted according to the pattern from bottom to top (see the chart). The first row is crocheted from right to left. Crochet the front and back parts of the bag in back and forth rows (turn as you complete each row). Begin each new row with a turning chain. You can use bobbins (or a piece of cardboard to wrap the yarn around) for crocheting the colored blocks. Add more yarn once the yarn on the bobbin is finished. You can use as many bobbins as you like. Before starting work, you should have ready bobbins in pearl and rose colors. Try not to pull the yarn too tight when changing colors, but also do not let it be too loose so that there are no gaps.
— Chart and legend :
Info :
Chart excerpt shows Right Side (R) and Wrong Side (W) markers. R = Right Side - NO tails on this side. W = Wrong Side - Keep ALL tails on this side while crocheting. Read graph from right to left on RS rows and left to right on WS rows.
— Front Side :
Info :
Start crocheting the front side of the bag. Chain 85 with white yarn. Start working in the second chain from the hook as follows in the chart below. After the end of each row turn and ch 1. The ch 1 does not count as a stitch.
Row 10 [WS] :
(white) x 24, (black) x 30, (white) x 30
Row 11 [RS] :
(white) x 29, (black) x 34, (white) x 21
Row 12 [WS] :
(white) x 19, (black) x 36, (white) x 29
Row 13 [RS] :
(white) x 30, (black) x 36, (white) x 18
Row 14 [WS] :
(white) x 17, (black) x 30, (white) x 8, (black) x 2, (white) x 27
Row 15 [RS] :
(white) x 27, (black) x 9, (white) x 1, (black) x 31, (white) x 16
Row 16 [WS] :
(white) x 15, (black) x 32, (white) x 1, (black) x 8, (white) x 28
Row 17 [RS] :
(white) x 33, (black) x 3, (white) x 1, (black) x 33, (white) x 14
Row 18 [WS] :
(white) x 14, (black) x 33, (white) x 1, (black) x 3, (white) x 33
Row 19 [RS] :
(white) x 33, (black) x 3, (white) x 2, (black) x 33, (white) x 13
Row 20 [WS] :
(white) x 13, (black) x 33, (white) x 1, (black) x 4, (white) x 33
Row 21 [RS] :
(white) x 34, (black) x 3, (white) x 1, (black) x 34, (white) x 12
Row 22 [WS] :
(white) x 12, (black) x 33, (white) x 2, (black) x 3, (white) x 34
Row 23 [RS] :
(white) x 35, (black) x 3, (white) x 1, (black) x 34, (white) x 11
Row 24 [WS] :
(white) x 11, (black) x 5, (white) x 1, (black) x 27, (white) x 2, (black) x 3, (white) x 35
Row 25 [RS] :
(white) x 36, (black) x 3, (white) x 2, (black) x 26, (white) x 1, (black) x 5, (white) x 11
Row 26 [WS] :
(white) x 11, (black) x 5, (white) x 2, (black) x 10, (white) x 2, (black) x 12, (white) x 2, (black) x 4, (white) x 36
Row 27 [RS] :
(white) x 36, (black) x 5, (white) x 3, (black) x 8, (white) x 3, (black) x 11, (white) x 2, (black) x 5, (white) x 11
Row 28 [WS] :
(white) x 11, (black) x 5, (white) x 2, (black) x 13, (white) x 10, (black) x 7, (white) x 36
Row 29 [RS] :
(white) x 36, (black) x 29, (white) x 3, (black) x 5, (white) x 11
Row 30 [WS] :
(white) x 11, (black) x 6, (white) x 2, (black) x 29, (white) x 36
Row 31 [RS] :
(white) x 36, (black) x 29, (white) x 2, (black) x 6, (white) x 11
Row 32 [WS] :
(white) x 11, (black) x 6, (white) x 3, (black) x 28, (white) x 36
Row 33 [RS] :
(white) x 36, (black) x 28, (white) x 3, (black) x 6, (white) x 11
Row 34 [WS] :
(white) x 11, (black) x 6, (white) x 4, (black) x 27, (white) x 36
Row 35 [RS] :
(white) x 36, (black) x 27, (white) x 4, (black) x 6, (white) x 11
Row 36 [WS] :
(white) x 12, (black) x 6, (white) x 4, (black) x 26, (white) x 9, (light terracotta) x 9, (white) x 18
Row 37 [RS] :
(white) x 16, (light terracotta) x 13, (white) x 7, (black) x 26, (white) x 4, (black) x 6, (white) x 12
Row 38 [WS] :
(white) x 12, (black) x 6, (white) x 5, (black) x 22, (white) x 9, (light terracotta) x 15, (white) x 15
Row 39 [RS] :
(white) x 14, (light terracotta) x 11, (black) x 13, (white) x 5, (black) x 18, (white) x 5, (black) x 6, (white) x 12
Row 40 [WS] :
(white) x 12, (black) x 6, (white) x 6, (black) x 36, (light terracotta) x 10, (white) x 14
Row 41 [RS] :
(white) x 11, (light terracotta) x 13, (black) x 35, (white) x 6, (black) x 6, (white) x 13
Row 42 [WS] :
(white) x 13, (black) x 6, (white) x 6, (black) x 35, (light terracotta) x 14, (white) x 10
Row 43 [RS] :
(white) x 10, (light terracotta) x 2, (white) x 2, (light terracotta) x 11, (black) x 33, (white) x 7, (black) x 6, (white) x 13
Row 44 [WS] :
(white) x 13, (black) x 6, (white) x 8, (black) x 21, (white) x 5, (light terracotta) x 17, (white) x 2, (light terracotta) x 2, (white) x 10
Row 45 [RS] :
(white) x 10, (light terracotta) x 2, (white) x 2, (light terracotta) x 17, (black) x 4, (white) x 5, (black) x 17, (white) x 8, (black) x 6, (white) x 13
Row 46 [WS] :
(white) x 14, (black) x 6, (white) x 8, (black) x 25, (light terracotta) x 21, (white) x 10
Row 47 [RS] :
(white) x 11, (light terracotta) x 20, (black) x 25, (white) x 8, (black) x 6, (white) x 14
Row 48 [WS] :
(white) x 14, (black) x 6, (white) x 9, (black) x 19, (white) x 5, (light terracotta) x 17, (white) x 14
Row 49 [RS] :
(white) x 15, (light terracotta) x 15, (white) x 6, (black) x 19, (white) x 9, (black) x 6, (white) x 14
Row 50 [WS] :
(white) x 14, (black) x 6, (white) x 9, (black) x 20, (white) x 35
Row 51 [RS] :
(white) x 19, (yellow) x 2, (white) x 14, (black) x 19, (white) x 10, (black) x 6, (white) x 14
Row 52 [WS] :
(white) x 14, (black) x 6, (white) x 10, (black) x 19, (white) x 15, (yellow) x 2, (white) x 18
Row 53 [RS] :
(white) x 17, (yellow) x 2, (white) x 16, (black) x 19, (white) x 10, (black) x 6, (white) x 14
Row 54 [WS] :
(white) x 14, (black) x 6, (white) x 10, (black) x 19, (white) x 11, (yellow) x 2, (white) x 3, (yellow) x 2, (white) x 17
Row 55 [RS] :
(white) x 17, (yellow) x 2, (white) x 4, (yellow) x 3, (white) x 9, (black) x 18, (white) x 11, (black) x 6, (white) x 14
Row 56 [WS] :
(white) x 13, (black) x 7, (white) x 11, (black) x 19, (white) x 7, (yellow) x 3, (white) x 4, (yellow) x 2, (white) x 18
Row 57 [RS] :
(white) x 19, (yellow) x 2, (white) x 3, (yellow) x 3, (white) x 7, (black) x 19, (white) x 11, (black) x 7, (white) x 13
Row 58 [WS] :
(white) x 12, (black) x 8, (white) x 11, (black) x 19, (white) x 7, (yellow) x 3, (white) x 3, (yellow) x 2, (white) x 19
Row 59 [RS] :
(white) x 18, (yellow) x 3, (white) x 3, (yellow) x 3, (white) x 7, (black) x 19, (white) x 12, (black) x 7, (white) x 12
Row 60 [WS] :
(white) x 11, (black) x 8, (white) x 12, (black) x 3, (white) x 4, (black) x 5, (white) x 4, (black) x 3, (white) x 8, (yellow) x 3, (white) x 3, (yellow) x 2, (white) x 18
Row 61 [RS] :
(white) x 17, (yellow) x 2, (white) x 3, (yellow) x 3, (white) x 9, (black) x 2, (white) x 6, (black) x 3, (white) x 6, (black) x 2, (white) x 13, (black) x 7, (white) x 11
Row 62 [WS] :
(white) x 11, (black) x 7, (white) x 13, (black) x 2, (white) x 2, (black) x 2, (white) x 2, (black) x 3, (white) x 2, (black) x 2, (white) x 2, (black) x 2, (white) x 10, (yellow) x 3, (white) x 21
Row 63 [RS] :
(white) x 20, (yellow) x 3, (white) x 11, (black) x 2, (white) x 2, (black) x 2, (white) x 2, (black) x 3, (white) x 2, (black) x 2, (white) x 2, (black) x 2, (white) x 14, (black) x 6, (white) x 11
Row 64 [WS] :
(white) x 12, (black) x 4, (white) x 15, (black) x 2, (white) x 6, (black) x 3, (white) x 6, (black) x 2, (white) x 11, (yellow) x 3, (white) x 20
Row 65 [RS] :
(white) x 20, (yellow) x 3, (white) x 11, (black) x 3, (white) x 4, (black) x 5, (white) x 4, (black) x 3, (white) x 31
Row 66 [WS] :
(white) x 31, (black) x 19, (white) x 11, (yellow) x 3, (white) x 20
Row 67 [RS] :
(white) x 21, (yellow) x 3, (white) x 10, (black) x 19, (white) x 31
Row 68 [WS] :
(white) x 31, (black) x 19, (white) x 9, (yellow) x 3, (white) x 22
Row 69 [RS] :
(white) x 34, (black) x 19, (white) x 31
Row 70 [WS] :
(white) x 31, (black) x 5, (white) x 9, (black) x 5, (white) x 34
Row 71 [RS] :
(white) x 34, (black) x 4, (white) x 11, (black) x 4, (white) x 31
Row 72 [WS] :
(white) x 31, (black) x 3, (white) x 13, (black) x 3, (white) x 34
Row 73 [RS] :
(white) x 34, (black) x 3, (white) x 13, (black) x 3, (white) x 31
Row 74 [WS] :
(white) x 31, (black) x 2, (white) x 15, (black) x 2, (white) x 34
Row 75 [RS] :
(white) x 84
Row 76 [WS] :
(white) x 84
Row 77 [RS] :
(white) x 84
Row 78 [WS] :
(white) x 84
Row 79 [RS] :
(white) x 84
Row 80 [WS] :
(white) x 84
Row 81 [RS] :
(white) x 84
Row 82 [WS] :
(white) x 84
Row 83 [RS] :
(white) x 84
Row 84 [WS] :
(white) x 84
Info :
Once the last row is finished, fasten off, and hide the yarn tail.
— Back part of the bag :
Info :
Light terracotta color yarn. Chain 85, and start working in the second chain from the hook.
Rows 2-83 :
ch, 84 sc, turn
Info :
Cut yarn, and hide the tail.
— Handle of the bag (make 2) :
Info :
Leave a long tail for sewing at the beginning and end of the row. Chain 6 with light terracotta (white) yarn. Start working in the second chain from the hook.
2-159 rows :
ch, 5 sc, turn
Info :
Do not cut yarn and Crochet one circle round of sc around all handle. The handle using the materials stated in this pattern is ~24 inches / 61 cm in length. Make the length of the handle as desired.
— Bottom of the bag :
Info :
Light terracotta color yarn. Chain 10, and start working in the second chain from the hook.
Rows 2-251 :
ch, 9 sc, turn
— Assembly :
Info :
Place the bottom and the back site part of the bag with wrong sides to each other and crochet them together using sc. Use light terracotta yarn. You will crochet on the right side, you will make 252 sc, then end the work. Hide the yarn tail.
Info :
Then crochet together bottom of the bag and front side. Use white yarn. Crochet on right side and make 252 sc, end the work. Hide the yarn tail.
This cat tote is a delightful mix of playful design and practical function 🎒. The intarsia chart creates a bold, graphic front panel that stands out in any crowd. Finished with contrasting handles and neat edges, this bag is perfect for gifts or everyday use 🧶✨