🧢 Beautiful ✨ Detailed πŸ’ Adorable

Capybara Amigurumi Pattern

Capybara Amigurumi Pattern
4.1β˜… Rating
1.5-2 Hours Time Needed
3.1K Made This
βœ‚οΈ

Beginner Friendly Level

Perfect for those just starting their crochet journey, with clear instructions and simple techniques

⏱️

Quick Make

Complete in under 2 hoursβ€”lightning fast fun for instant gratification and quick gifts.

🧸

Cute Companion

An adorable friend to cherish, handcrafted with love to bring comfort and joy for years to come.

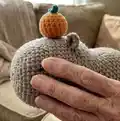
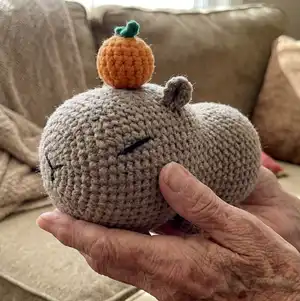
About This Capybara Amigurumi Pattern

This pattern creates a soft capybara amigurumi crocheted in super-bulky plush yarn with embroidered face details and a small tangerine accessory. The pattern uses simple single crochet rounds and easy increases and decreases to shape the head and body. You will make separate legs and ears which are sewn on after crocheting the body.

Capybara Amigurumi Pattern crochet pattern - detailed view of completed project

Clear step-by-step rounds, placement photos and finishing instructions make assembly straightforward. Ideal for a quick handmade gift or a cozy pocket-sized companion.

Why You'll Love This Capybara Amigurumi Pattern

I absolutely love this pattern because it turns simple stitches into a charming, huggable capybara with minimal fuss. The plush yarn gives a wonderfully soft texture that makes the finished toy irresistible. I enjoy the small details like the tiny tangerine and embroidered face which add personality without complicated steps. It is so satisfying to finish quickly and see all the parts come together into a cute little companion.

Capybara Amigurumi Pattern step 1 - construction progress Capybara Amigurumi Pattern step 2 - assembly progress Capybara Amigurumi Pattern step 3 - details and accessories Capybara Amigurumi Pattern step 4 - final assembly and finishing

Switch Things Up

I love that you can easily change the yarn color to make different capybara characters; try soft pastels for a baby version or warm browns for a realistic tone.

You can change the yarn weight and hook size to make mini or giant versions; using thinner yarn will create a small keychain friend while bulky yarn makes a large cuddly toy.

I often add little accessories like tiny crocheted hats, scarves, or a mini bow to give each capybara a unique personality.

Try embroidering different eye shapes or mouth expressions to change the mood β€” a simple curve gives a sleepy look while a slight smile makes it cheerful.

I sometimes stuff the tangerine more or less to vary its firmness and shape; you can also add a tiny bead inside for weight if you like a firmer top ornament.

For a textured finish, experiment with faux fur or plush yarn in contrasting pile lengths to create varied tactile effects on the body.

I like to combine yarns β€” a variegated or speckled yarn for the body can make each toy look distinct and hand-dyed without extra steps.

If you want posable legs, try inserting craft wire into the leg tails before sewing and wrapping it with yarn to keep it safe and comfortable to handle.

Change the color of the tiny tangerine and leaves or make a cluster of tiny fruits on the head to create a playful scene with multiple accessories.

I recommend trying embroidered freckles or small surface details to add character; use a contrasting thread for subtle but effective facial features.

Want to make a set? Crochet multiple capybaras in different sizes and arrange them as a family β€” mix colors and accessories for a delightful handmade collection.

Common Mistakes & How to Fix Them

βœ— Skipping stitch markers when marking ear positions can cause uneven placement; place markers and double check symmetry before sewing to ensure balanced ears. βœ— Not stuffing gradually will create lumps and uneven shaping; add small amounts of stuffing while you shape the head and body to maintain smooth curves. βœ— Forgetting to count stitches after increases or decreases can throw off shaping; count at the end of each round, especially after shaping rounds like R18 and R25. βœ— Pulling yarn too tight on decreases will distort the shape and make seams obvious; keep an even, relaxed tension when crocheting and when tightening the final hole.

Capybara Amigurumi Pattern

Make a cuddly capybara amigurumi with this easy, beginner-friendly crochet pattern. You will work with plush super-bulky yarn to create a soft, squishy toy with a tiny tangerine accessory. Clear round-by-round instructions and photos guide you through assembly so you can finish a charming capybara in just a couple of hours.

Beginner Friendly 1.5-2 Hours

Materials Needed for Capybara Amigurumi Pattern

β€” Main Fabric

  • 01
    Super bulky plush yarn (Himalaya Dolphin Baby 120m/100g - 131 yds/100g) approximately 1 skein beige color for body
  • 02
    Small amount of orange super bulky yarn for the tangerine (a few grams)
  • 03
    Small amount of green yarn for the tangerine leaves
  • 04
    Black fine yarn for embroidering eyes and nose (example: YarnArt Begonia black color 0999)

β€” Tools Required

  • 01
    Crochet hook 4.5 mm (H-7 US)
  • 02
    Polyester stuffing (filler)
  • 03
    Stitch markers
  • 04
    Big and small yarn needles (tapestry needles) for sewing and embroidery
  • 05
    Scissors

Progress Tracker

0% Complete

β€” Notes :

Infos :

Measurements approx.: 8.7x4.7x4.7" (22x12x12 cm). Crochet level: Easy. Time: 1.5-2 hours.

Infos :

Stitches/Terms Used (US Terminology): MR = magic ring. St = stitch. Sl St = slip stitch. Sc = single crochet. Inc = increase (crochet 2 stitches in 1 stitch). Dec = decrease (crochet 2 stitches together). Rnd(s) = round(s). () = number of stitches you should have at the end of row. ()xN = repeat whatever is between the brackets N times stated.

β€” Leg (x 4) :

Round 1 :

crochet a MR with 6 Sc (6)

Round 2 :

Inc around (12)

Round 3 :

Sc around, Sl St (12)

Info :

Fasten off. Leave a sewing tail.

β€” Ear (x 2) :

Round 1 :

crochet a MR with 6 Sc (6)

Info :

Don`t close the ring, turn, Ch

Round 2 :

(Inc, Sc) x 3 (9)

Info :

Fasten off.

Info :

Sew the corners together. Leave sewing tail.

β€” Head-body :

Round 1 :

crochet a MR with 8 Sc (8)

Round 2 :

Inc around (16)

Round 3 :

(Sc 1, inc) x 8 (24)

Round 4 :

(Sc 2, inc) x 8 (32)

Round 5 :

(Sc 3, inc) x 8 (40)

Round 6 :

(Sc 4, inc) x 8 (48)

Round 7 :

Sc around (48)

Round 8 :

Sc 19, Inc, Sc 8, Inc, Sc 19 (50)

Round 9 :

Sc around (50)

Round 10 :

Sc 21, Inc, Sc 6, Inc, Sc 21 (52)

Round 11-13 :

Sc around (52) 3 Rnds

Round 14 :

Sc 23, Inc, Sc 4, Inc, Sc 23 (54)

Round 15-17 :

Sc around (54) 3 Rnds

Info :

In the next round we will mark the approximate position of the ears.

Round 18 :

Sc 6, Dec, Sc 4, Dec, Sc 9, Sc 1 (mark this St), Sc 9, Sc 1 (mark this St), Sc 10, Dec, Sc 4, Dec, Sc 2 (50)

Round 19 :

Sc 4, Dec, Sc 2, Dec, Sc 34, Dec, Sc 2, Dec (46)

Round 20-22 :

Sc around (46) 3 Rnds

Round 23 :

Sc 20, Dec, Sc 4, Dec, Sc 18 (44)

Round 24 :

Sc 20, Dec, Sc 2, Dec, Sc 18 (42)

Round 25 :

Sc 10, Inc, Sc 8, Dec, Sc 4, Dec, Sc 8, Inc, Sc 6 (42)

Round 26 :

Sc around (42)

Round 27 :

(Sc 6, Inc) x 6 (48)

Round 28-34 :

Sc around (48) 7 Rnds

Info :

Stuff with filler.

Round 35 :

(Sc 4, Dec) x 8 (40)

Round 36 :

(Sc 3, Dec) x 8 (32)

Round 37 :

(Sc 2, Dec) x 8 (24)

Round 38 :

(Sc, Dec) x 8 (16)

Info :

Stuff firmly.

Round 39 :

Dec 8 (8)

Info :

Tighten the hole, hide the thread inside.

β€” Tangerine :

Round 1 :

crochet a MR with 6 Sc (6)

Round 2 :

Inc around (12)

Round 3 :

(Sc 1, Inc) x 6 (18)

Round 4-6 :

Sc around (18) 3 Rnds

Round 7 :

(Sc 1, Dec) x 6 (12)

Info :

Stuff

Round 8 :

Dec around (6)

Info :

Fasten off, tighten the hole, leave the thread for sewing.

β€” Leaves :

Item Name (P1) :

Ch 4, Sl St in 1st Ch, Ch 4, Sl St in 1st Ch. Fasten off, wrap the center with thread and tie a knot.

Assembly Instructions

  • Determine the position of the legs on the underside of the body using markers, then sew the four legs in place securely using a yarn needle and the sewing tails.
  • Sew the ear corners together as instructed, leave sewing tails, then position and sew the ears to the marked stitches on the head at a distance of approximately 9-10 stitches apart.
  • Embroider the eyes: for the left eye, from the left ear go down 3 rounds then left 5 stitches to mark dot 1; from dot 1 go down 5 stitches and left 1 stitch to mark dot 2; connect the two dots with thin black thread. Repeat mirrored for the right eye.
  • Embroider the nose with the same black thread as the eyes; tie a knot to secure embroidery and hide the thread ends inside the head.
  • Sew the leaves to the tangerine and hide the threads inside, then sew the tangerine to the top of the head and hide the threads inside.
  • Before final sewing, pin parts with markers and check symmetry; adjust placement if necessary so ears and legs sit evenly.

Important Notes

  • πŸ’‘Use stitch markers to mark rounds and especially the two stitches in R18 where the ears will be attached to ensure correct placement.
  • πŸ’‘Stuff the body gradually and a little firmly for best shape, but avoid overstuffing which can distort the stitches.
  • πŸ’‘Pin and align parts before sewing them permanently to check symmetry and spacing across the body.
  • πŸ’‘Weave and hide thread ends inside the toy after finishing embroidery and sewing to keep the outside neat.

This adorable capybara amigurumi is soft, quick to make, and full of charm β€” perfect as a gift or a handmade companion. Sew on the tiny tangerine and embroider the face for the cutest finishing touches. Enjoy creating a plush friend that brings smiles and cozy hugs! 🧢🧑

You ask,

we answer.

FAQs

What size will the finished piece be?

The finished amigurumi measures approximately 8.7 x 4.7 x 4.7 inches (22 x 12 x 12 cm) when using the recommended super-bulky plush yarn and 4.5 mm hook.

Can I use different yarn weights for this pattern?

Yes, you can use different yarn weights, but the final size and texture will change; use an appropriate hook size for your chosen yarn and expect a smaller or larger toy.

Do I need prior crochet experience for this pattern?

This pattern is rated beginner-friendly and uses basic stitches (single crochet, increases and decreases), so basic crochet experience is recommended for best results.

How long does this project typically take to complete?

Most crocheters complete this project in about 1.5-2 hours, though time may vary depending on experience and speed.

Are safety eyes required or can I embroider the face?

This pattern uses embroidered eyes and nose with black yarn; you can use safety eyes if preferred, but embroidery gives a softer look for plush yarn.