🧢 Beautiful ✨ Detailed πŸ’ Adorable

Race Track Mat Pattern

Race Track Mat Pattern
4.0β˜… Rating
5-7 Hours Time Needed
2.5K Made This
βœ‚οΈ

Intermediate Level

Ideal for those with basic crochet experience, featuring slightly more advanced stitches and techniques to expand your skills.

⏱️

Weekend Treat

Takes 5-7 hours, making it an enjoyable project to finish over a couple of days.

🏑

Cozy Accent

A warm touch for your space that transforms ordinary corners into inviting nooks filled with handmade charm.

About This Race Track Mat Pattern

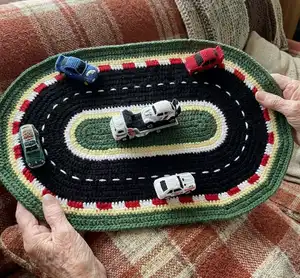
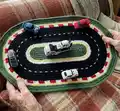
This pattern creates a charming oval race track mat perfect for playrooms or as a travel mat for toy cars. It uses simple rounds of double crochet to shape an oval, with colour-change rounds to create the lane, curb stripes, and finished edge. Photographs and step-by-step round instructions are included to guide your progress.

Race Track Mat Pattern crochet pattern - detailed view of completed project

The mat finishes at approximately 56cm x 35cm (22" x 14") using worsted weight yarn and recommended hook sizes. Optional tips for scaling up to a larger version are provided at the end of the pattern.

Why You'll Love This Race Track Mat Pattern

I absolutely love this pattern because it turns basic crochet stitches into something playful and practical. The oval shaping technique is satisfying to work and teaches increases at each end of an oval in a clear, repeatable way. I enjoy the colour-change rounds β€” they add so much personality and let you customize the look easily. The finished mat is durable and perfect for hours of imaginative play or a bright nursery accent.

Race Track Mat Pattern step 1 - construction progress Race Track Mat Pattern step 2 - assembly progress Race Track Mat Pattern step 3 - details and accessories Race Track Mat Pattern step 4 - final assembly and finishing

Switch Things Up

I love how easy it is to customize the colour palette for this mat; try pastels for a nursery-friendly look or bold primaries for a classic race track feel.

You can make the mat larger by switching to bulky weight yarn and increasing the hook size β€” that creates a chunkier, more durable mat perfect for floor play.

To make a small travel version, use lighter weight yarn and a smaller hook, then reduce the starting chain proportionally to create a mini track for pocket cars.

I often add embroidered numbers or tiny felt flags to the curb for extra detail and character β€” these small accessories really personalize the piece.

Experiment with different lane styles for variety; you could embroider a double-dash or a zig-zag line instead of the straight dashes if you prefer.

If you want a reversible look, choose contrasting colours that harmonize on both sides and carry the unused colour neatly at the base of stitches.

Try adding a non-slip backing or a slip-resistant rug pad underneath if the mat will be used on smooth floors for extra safety during playtime.

I sometimes make a matching set of coasters using the same striped curb idea scaled down to smaller ovals for a fun coordinated gift set.

For a grown-up version, select neutrals like stone, cream and charcoal and add a metallic thread highlight to one border round for a chic accent.

Dont be afraid to play with stitch height: substituting half double crochet or single crochet for some rounds will change texture and density, giving you a different finished drape and feel.

Common Mistakes & How to Fix Them

βœ— Missing a stitch in the initial chain can throw off later colour patterns and border repeats; recount your starting chain and mark every tenth chain to avoid mistakes. βœ— Not placing stitch markers at the start of each increase section makes it hard to track increases; place a stitch marker in the first stitch of each increase to see where the next rounds will expand. βœ— Changing colour in the wrong place can produce a jagged edge or loose joins; always pick up the new colour on the last yarn over of the last dc in the sequence as instructed. βœ— Carrying the unused color incorrectly causes bulky floats or visible strands; carry the unused colour along the base of the stitches and catch it neatly to avoid loose loops on the right side.

Race Track Mat Pattern

Make a playful race track mat perfect for playtime, nursery decor, or as a display mat for toy cars. This pattern guides you through an oval, multi-colour mat with clear round-by-round instructions and photos to help you succeed. Youll create a sturdy, fun mat with a dashed center lane and a contrasting border to make it pop. Ideal for gifting or keeping on the floor for hours of imaginative play.

Intermediate 5-7 Hours

Materials Needed for Race Track Mat Pattern

β€” Main Fabric

  • 01
    Worsted/Medium weight yarn (#4) in Green (main inner and final rounds)
  • 02
    Worsted/Medium weight yarn (#4) in Black (main track rounds)
  • 03
    Worsted/Medium weight yarn (#4) in White (inner border and stripe)
  • 04
    Worsted/Medium weight yarn (#4) in Red (alternating curb details)
  • 05
    For larger version: bulky weight yarn (5) recommended

β€” Tools Required

  • 01
    Crochet hook size 3.5 mm for main rounds
  • 02
    Crochet hook size 4.0 mm for final edge single crochet round
  • 03
    Stitch markers
  • 04
    Darning needle / yarn needle
  • 05
    Scissors
  • 06
    Approximately 3 feet of white yarn for lane dashes

Progress Tracker

0% Complete

β€” Body :

Info :

Starting with GREEN yarn, Chain 43.

Round 1 :

dc in second chain from hook, dc in each stitch along the chain until the last chain. In the last chain place 4 dc, then place a dc in each stitch along the other side of the chain, on the end turning chain (shown below) place 4 dc, join with a slip stitch to the first dc

Round 2 :

Chain 2, dc in the same stitch as the chain and in each stitch until you reach the 4 end dc. Place 2 dc in each of the four end stitches., dc in each stitch until you reach the other end with 4 dc, place 2 dc in each of the four end stitches, slip stitch to the first dc of the round.

Info :

When adding additional rounds, increases will be added at each end of the oval (dcINC = 2 dc in the same stitch to make an increase) The same pattern repeats along the sides, but the bolded sections increase on the ends. ***Placing a stitch marker in the first stitch of each increase helps in seeing where the next round of increases will be.

Round 3 :

Chain 2, dc in the same stitch as the chain. dc in each stitch across straight stretch, (dcINC, dc) x4, dc in each stitch across, (dcINC, dc) x4, ***on the last yo, of the last dc of the round, change your yarn to YELLOW*** (see photos below), sl st to the first dc of the round

Round 4 :

Chain 2, dc in the same stitch as the chain. dc in each stitch across straight stretch, (dcINC, 2dc) x4, dcINC, dc across straight stretch, (dcINC, 2dc) x4, dcINC, ***on the last yo, of the last dc of the round, change your yarn to WHITE***, sl st to the first dc of the round

Info :

From Round 4 onwards, 5 increases are added to each end of the oval to ensure the mat lays flat.

Round 5 :

Chain 2, dc in the same stitch as the chain. dc in each stitch across straight stretch, (dcINC, 3dc) x4, dcINC, dc across straight stretch, (dcINC, 3dc) x4, dcINC, dc in each st until end of round, ***on the last yo, of the last dc of the round, change your yarn to BLACK***sl st to the first dc of the round

Round 6 :

Chain 2, dc in the same stitch as the chain. dc in each stitch across straight stretch, (dcINC, 4dc) x4, dcINC, dc across straight stretch, (dcINC, 4dc) x4, dcINC, dc in each st until end of round, sl st to the first dc of the round

Round 7 :

Chain 2, dc in the same stitch as the chain. dc in each stitch across straight stretch, (dcINC, 5dc) x4, dcINC, dc across straight stretch, (dcINC,5dc) x4, dcINC, dc in each st until end of round, sl st to the first dc of the round

Round 8 :

Chain 2, dc in the same stitch as the chain. dc in each stitch across straight stretch, (dcINC, 6dc) x4, dcINC, dc across straight stretch, (dcINC, 6dc) x4, dcINC, dc in each st until end of round, sl st to the first dc of the round

Round 9 :

Chain 2, dc in the same stitch as the chain and in each stitch across straight stretch, (dcINC, 7dc) x4, dcINC, dc across straight stretch, (dcINC, 7dc) x4, dcINC, dc in each st until end of round, sl st to the first dc of the round

Round 10 :

Chain 2, dc in the same stitch as the chain and in each stitch across straight stretch, (dcINC, 8dc) x4, dcINC, dc across straight stretch, (dcINC, 8dc) x4, dcINC, dc in each st until end of round, sl st to the first dc of the round

Round 11 :

Chain 2, dc in the same stitch as the chain and in each stitch across straight stretch, (dcINC, 9dc) x4, dcINC, dc across straight stretch, (dcINC, 9dc) x4, dcINC, dc in each st until end of round, sl st to the first dc of the round

Round 12 :

Chain 2, dc in the same stitch as the chain and in each stitch across straight stretch, (dcINC, 10dc) x4, dcINC, dc across straight stretch, (dcINC, 10dc) x4, dcINC, dc in each st until end of round, sl st to the first dc of the round

Round 13 :

Chain 2, dc in the same stitch as the chain and in each stitch across straight stretch, (dcINC, 11dc) x4, dcINC, dc across straight stretch, (dcINC, 11dc) x4, dcINC, dc in each st until end of round, ***on the last yo, of the last dc of the round, change your yarn to RED or WHITE***, sl st to the first dc of the round

Round 14 :

Use alternating red and white yarn every four stitches, carrying the unused colour along the round at the base of the stitches. Same as all the other colour changes, youu2019ll want to bring in the new colour on the last yo of the last dc of the sequence. Chain 2, dc in the same stitch as the chain and in each stitch across straight stretch, (dcINC, 12dc) x4, dcINC, dc across straight stretch, (dcINC, 12dc) x4, dcINC, dc in each st until end of round, ***on the last yo, of the last dc of the round, change your yarn to YELLOW***, sl st to the first dc of the round

Info :

***In sample shown above a stitch was missed in the beginning chain, leaving me two stitches short for the alternating colour round. Double checking stitch counts and using stitch markers will avoid this issue ;)

Round 15 :

Chain 2, dc in the same stitch as the chain and in each stitch across straight stretch, (dcINC, 13dc) x4, dcINC, dc across straight stretch, (dcINC, 13dc) x4, dcINC, dc in each st until end of round, ***on the last yo, of the last dc of the round, change your yarn to GREEN***sl st to the first dc of the round

Round 16 :

Chain 2, dc in the same stitch as the chain and in each stitch across straight stretch, (dcINC, 14dc) x4, dcINC, dc across straight stretch, (dcINC, 14dc) x4, dcINC, dc in each st until end of round, sl st to the first dc of the round

Round 17 :

Chain 2, dc in the same stitch as the chain and in each stitch across straight stretch, (dcINC, 15dc) x4, dcINC, dc across straight stretch, (dcINC, 15dc) x4, dcINC, dc in each st until end of round, sl st to the first dc of the round

Round 18 :

with a 4mm hook, Chain 1, sc in each st, slip stitch to the first stitch in the round.

β€” Finishing :

Info :

Using a darning needle weave in all ends.

Info :

Using a darning needle and approx. 3 feet of white yarn, create the lane dividing dash using the line between the four and fifth rounds of black as a guide. Dashes on the sample shown are woven through the space every two stitches from the front to the back, repeating this process until you meet the start and tie off. Weave in ends.

Info :

Photo above shows the backside of the Red and White round and the strand of unused colour being carried at the base of the stitches.

Info :

For a larger version, switch the yarn to a bulky weight(5) and use a 5mm hook for the main mat and 5.5mm or 6mm for the final edge single crochet round.

Assembly Instructions

  • Weave in all loose yarn ends using a darning needle, securing ends neatly on the wrong side of the mat.
  • Create the lane dividing dash using approx. 3 feet of white yarn and a darning needle, working dashes through the space every two stitches from front to back until you meet the start, then tie off and weave in ends.
  • When changing colours, bring in the new colour on the last yarn over (yo) of the last dc of the sequence to secure neat colour joins.
  • Use stitch markers to mark the first stitch of each increase section so you can easily track where the next round of increases will be worked.
  • If resizing, follow the recommendation to use bulky weight yarn and larger hooks (5mm for main, 5.5-6mm for final edge) and adjust starting chain count proportionally.

Important Notes

  • πŸ’‘Use stitch markers to mark the first stitch of each increase to track the ends of the oval and keep increases aligned.
  • πŸ’‘Bring in new colours on the last yarn over of the last dc in the sequence to create a neat colour change and reduce loose ends.
  • πŸ’‘Carry unused colours along the base of the stitches when working alternating colours to avoid long floats on the right side.
  • πŸ’‘Double check your starting chain count before joining rounds to ensure the alternating colour round will align correctly.

This race track mat is a fun and functional piece that brings playtime to life with handmade charm. The bold lane, curb stripes, and contrasting edge make it an instant favorite for kids and collectors alike. Customize the colours to match any room or toy car collection β€” then watch the imagination roll! πŸ§ΆπŸš—

You ask,

we answer.

FAQs

What size will the finished piece be?

The completed mat measures approximately 56 cm x 35 cm (22" x 14") when worked in worsted weight yarn with the recommended hook sizes.

Can I make the mat larger or smaller?

Yes β€” for a larger version switch to bulky weight (5) yarn and use a 5 mm hook for the main mat and 5.5 mm or 6 mm for the final single crochet round; adjust starting chain and rounds proportionally.

How do I create the dashed lane in the centre?

Using a darning needle and approx. 3 feet of white yarn, stitch short dashes through the space between the fourth and fifth black rounds, working every two stitches from front to back until you complete the lane.

Do I need special skills to follow this pattern?

This pattern is rated intermediate; you should be comfortable with double crochet, increases, colour changes, and working in rounds.

How long does this project typically take to complete?

Most crocheters complete this project in 5-7 hours depending on experience and working speed.