🧢 Beautiful ✨ Detailed πŸ’ Adorable

Bunny Amigurumi Pattern

Bunny Amigurumi Pattern
4.7β˜… Rating
5-7 Hours Time Needed
2.2K Made This
βœ‚οΈ

Intermediate Level

Ideal for those with basic crochet experience, featuring slightly more advanced stitches and techniques to expand your skills.

⏱️

Weekend Treat

Takes 5-7 hours, making it an enjoyable project to finish over a couple of days.

🧸

Cute Companion

An adorable friend to cherish, handcrafted with love to bring comfort and joy for years to come.

About This Bunny Amigurumi Pattern

This pattern teaches you how to crochet a charming bunny amigurumi with long wired ears and a neat teardrop body. Youll work most pieces in continuous rounds and finish with simple embroidery and assembly steps. The instructions are photo-supported and written round-by-round for clarity.

Bunny Amigurumi Pattern crochet pattern - detailed view of completed project

Includes materials, abbreviations, and exact stitch counts for every round. Ideal for making small gifts or a colorful collection of handmade bunnies.

Why You'll Love This Bunny Amigurumi Pattern

I absolutely love this pattern because it turns simple single crochet rounds into a sweet, characterful bunny. I enjoy how a small change in yarn weight or hook size can make three very different sizes from the same instructions. The wired ears let me pose each bunny so they feel unique and playful. I also love that the pattern is photo-illustrated and written in full, which gives me confidence to share it with others.

Bunny Amigurumi Pattern step 1 - construction progress Bunny Amigurumi Pattern step 2 - assembly progress Bunny Amigurumi Pattern step 3 - details and accessories Bunny Amigurumi Pattern step 4 - final assembly and finishing

Switch Things Up

I love customizing these bunnies by changing yarn weight and hook size to make an entire family of different-sized friends.

I often use thinner yarn and a smaller hook to create tiny keychain bunnies, perfect as gift toppers or party favors.

For a chunky, cozy version I crochet with bulky yarn and a larger hook so the bunny becomes a soft pillow-like companion.

Try using variegated yarn or self-striping yarn for playful color transitions across the body and ears.

I like to embroider different mouth shapes or add tiny felt cheeks to give each bunny a unique expression.

You can swap safety eyes for embroidered eyes for a fully baby-safe toy or to achieve a softer look.

Embedding a small bell or a lavender sachet inside the stuffing makes a lovely scented keepsake or baby comforter.

Dress your bunny with a crocheted scarf, tiny bow, or a miniature hat to personalize it for a recipient.

I sometimes wrap the wire inside a thin yarn tube before inserting it into the ear to prevent any sharp edges from poking through.

Combine textures: pair a fluffy boucle yarn for the body with smooth yarn for the ears to create contrast and tactile interest.

Make a matching set by changing only the eyes or mouth embroidery style so the bunnies read as a family with subtle differences.

Consider stuffing density: a firmer stuffing gives stability for standing bunnies, while softer stuffing makes them squishier and cuddlier.

Common Mistakes & How to Fix Them

βœ— Skipping the instruction to work in continuous rounds causes visible seams and misaligned stitches; always work without joining or turning and mark your first stitch. βœ— Forgetting to leave the second ear unfastened prevents starting the body from the ear yarn; do not fasten off the second ear so you can continue into the body. βœ— Stuffing the ears will make them too bulky and ruin the wired shaping; do not stuff ears and insert wire instead as instructed. βœ— Not inserting safety eyes before stuffing can make placement difficult; place eyes between rounds 27 and 28 while the body is still open and only then stuff firmly. βœ— Pulling yarn too tightly when embroidering the mouth will pucker the fabric; embroider gently with a small amount of tension and check placement before securing. βœ— Ignoring stitch counts during increases/decreases leads to uneven shaping; count stitches after each increase or decrease round to maintain the correct shape.

Bunny Amigurumi Pattern

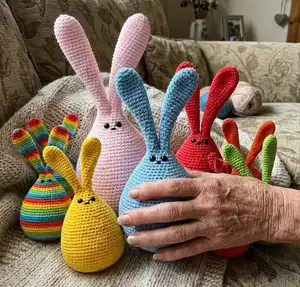
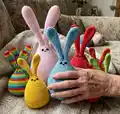
Make an adorable crocheted bunny with this clear, photo-illustrated pattern. Youll create a soft, teardrop-shaped body with long wired ears for an expressive pose. The pattern includes full round-by-round instructions, materials and finishing tips so you can complete a beautiful handmade gift. Perfect for gifting or decorating nurseries and cozy corners.

Intermediate 5-7 Hours

Materials Needed for Bunny Amigurumi Pattern

β€” Main Fabric

  • 01
    Chunky / Bulky yarn (Stylecraft Special Chunky) - Color: Cloud Blue 1019 = 65 g (for medium bunny)
  • 02
    DMC Petra No.3 (fine yarn) for the smallest size (use 3 mm hook)
  • 03
    4 strands of DK yarn held together (for biggest size with 6 mm hook)
  • 04
    A little bit of Black DK yarn to embroider the mouth (optional)
  • 05
    Polyester fiberfill stuffing = 60 g

β€” Tools Required

  • 01
    Crochet hook size 4.00 mm (US: G/6, UK: 8)
  • 02
    Crochet hook size 3.00 mm (for smallest size)
  • 03
    Crochet hook size 6.00 mm (for largest size when using 4 strands DK)
  • 04
    Tapestry needle
  • 05
    One pair of 9 mm safety eyes
  • 06
    Scissors
  • 07
    Stitch markers (to mark first stitch of each round)
  • 08
    Polyester stuffing (fiberfill)
  • 09
    Iron wire: 12 inches long (30 cm), 18 gauge (1.25 mm thick) for ear support
  • 10
    Black DK yarn for embroidery (optional)

Progress Tracker

0% Complete

β€” Abbreviations :

Infos :

US Crochet Abbreviations. ch = chain. sc = single crochet. st = stitch. sl = slip. rnd = round. tog = together.

Info :

For this project you work in continuous rounds, do not join or turn unless otherwise stated. Mark first stitch of each round.

β€” Ear :

Info :

Make 2.

Round 1 :

With Cloud Blue 1019 and 4 mm hook, 6 sc in a magic ring. (6)

Round 2 :

(Sc in next st, 2 sc in next st) around. (9)

Round 3 :

(2 sc in next st, sc in next 2 sts) around. (12)

Round 4-10 :

Sc in each st around. (12)

Round 11 :

Sc next 2 sts tog, sc in next 10 sts. (11)

Round 12 :

Sc in each st around. (11)

Round 13 :

Sc in next 5 sts, sc next 2 sts tog, sc in next 4 sts. (10)

Round 14 :

Sc in each st around. (10)

Round 15 :

Sc next 2 sts tog, sc in next 8 sts. (9)

Round 16 :

Sc in each st around. (9)

Round 17 :

Sc in next 4 sts, sc next 2 sts tog, sc in next 3 sts. (8)

Round 18 :

Sc in each st around. (8)

Round 19 :

Sc next 2 sts tog, sc in next 6 sts. (7)

Round 20 :

Sc in each st around. (7)

Round 21 :

Sc in next 3 sts, sc next 2 sts tog, sc in next 2 sts. (6)

Round 22-23 :

Sc in each st around. (6)

Round 24 :

Sc in each st around. (6)

Info :

For the first ear, join with sl st in first st. Fasten off. For the second ear, do not sl st in first st. Do not fasten off.

β€” Body :

Info :

The yarn of the second ear is used to start the body.

Round 1 :

Sc in the stitch on rnd 24 of the first ear (mark first st), sc in next 5 sts on first ear, sc in next 6 sts on second ear. (12)

Round 2 :

(Sc in next st, 2 sc in next st) around. (18)

Round 3 :

Sc in each st around. (18)

Round 4 :

(2 sc in next st, sc in next 2 sts) around. (24)

Round 5 :

Sc in each st around. (24)

Round 6 :

(Sc in next 3 sts, 2 sc in next st) around. (30)

Round 7 :

Sc in each st around. (30)

Round 8 :

Sc in next 2 sts, 2 sc in next st, (sc in next 4 sts, 2 sc in next st) 5 times, sc in next 2 sts. (36)

Round 9 :

Sc in each st around. (36)

Round 10 :

(Sc in next 5 sts, 2 sc in next st) around. (42)

Round 11 :

Sc in each st around. (42)

Round 12 :

Sc in next 3 sts, 2 sc in next st, (sc in next 6 sts, 2 sc in next st) 5 times, sc in next 3 sts. (48)

Round 13 :

Sc in each st around. (48)

Round 14 :

(Sc in next 7 sts, 2 sc in next st) around. (54)

Round 15 :

Sc in each st around. (54)

Round 16 :

Sc in next 4 sts, 2 sc in next st, (sc in next 8 sts, 2 sc in next st) 5 times, sc in next 4 sts. (60)

Round 17-22 :

Sc in each st around. (60)

Round 23 :

Sc in next 4 sts, sc next 2 sts tog, (sc in next 8 sts, sc next 2 sts tog) 5 times, sc in next 4 sts. (54)

Round 24 :

(Sc in next 7 sts, sc next 2 sts tog) around. (48)

Round 25 :

Sc in next 3 sts, sc next 2 sts tog, (sc in next 6 sts, sc next 2 sts tog) 5 times, sc in next 3 sts. (42)

Round 26 :

(Sc in next 5 sts, sc next 2 sts tog) around. (36)

Round 27 :

Sc in next 2 sts, sc next 2 sts tog, (sc in next 4 sts, sc next 2 sts tog) 5 times, sc in next 2 sts, sl st in first st, fasten off. (30)

β€” Bottom :

Info :

With Chunky yarn and 4 mm hook.

Round 1 :

With Cloud Blue 1019, 6 sc in a magic ring. (6)

Round 2 :

2 sc in each st around. (12)

Round 3 :

(Sc in next st, 2 sc in next st) around. (18)

Round 4 :

(2 sc in next st, sc in next 2 sts) around. (24)

Round 5 :

(Sc in next 3 sts, 2 sc in next st) around, join with sl st in first st, leave long end for sewing, fasten off. (30)

Info :

Insert safety eyes 3 sts apart between rnds 27-28.

Info :

Do not stuff ears. Stuff body tightly then sew the bottom piece to the last round of the body.

β€” Finishing :

Info :

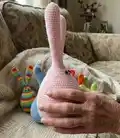
Fold the wire in half and make it as long as the ear by folding the ends of wire, see picture below. Insert the wire inside ears.

Info :

With Black DK yarn embroider a little x-cross between the eyes on rnd 28.

Assembly Instructions

  • Attach the bottom piece to the last round of the body by aligning the bottom's edge with the body opening and sew with the long tail left from round 5 of the bottom.
  • Insert safety eyes 3 stitches apart between rounds 27 and 28 before stuffing the body to ensure correct placement and symmetry.
  • Do not stuff the ears; fold the iron wire in half, shape as long as each ear, and insert the wire inside each ear for support and poseability.
  • Stuff the body tightly with polyester fiberfill before sewing the bottom piece on to maintain the teardrop shape and stability.
  • Use the yarn tail from the second ear to join and begin the body, and fasten off and weave in ends after the final slip stitch on round 27.

Important Notes

  • πŸ’‘Work in continuous rounds; do not join or turn unless a round specifically tells you to do so.
  • πŸ’‘Mark the first stitch of each round with a stitch marker to keep track of your rounds and prevent mistakes.
  • πŸ’‘Do not stuff the ears; insert the folded wire into the ears for shape and poseability as instructed.
  • πŸ’‘Insert safety eyes before stuffing and closing the body so placement is accurate and easy to complete.

This sweet Bunny amigurumi pattern is a delightful, simple project that makes a perfect handmade gift. Whether you make a tiny keychain friend or a larger cuddly companion, each bunny has personality and charm. Try a rainbow of colors and display them on a shelf or give them as joyful presents. 🧢✨😊

You ask,

we answer.

FAQs

What size will the finished piece be?

The blue, medium sized bunny measures approximately 10.3 inches tall (26 cm) when using the recommended Chunky yarn and 4 mm hook.

Can I use different yarn weights for this pattern?

Yes, the pattern can be adjusted: use DMC Petra No.3 with a 3 mm hook for the smallest bunny, Chunky yarn with a 4 mm hook for the medium bunny, or 4 strands of DK together with a 6 mm hook for the biggest bunny.

Do I need experience to make this Bunny?

This pattern is rated intermediate; you should be comfortable working in continuous rounds, making increases and decreases, and following round-by-round stitch counts.

How long does this project typically take to complete?

Most crocheters complete the medium-sized bunny in about 5-7 hours, though time may vary based on pace and experience.

Are the ears stuffed or wired?

Do not stuff the ears; the pattern uses a folded iron wire inserted into the ears for shaping and poseability.