🧢 Beautiful ✨ Detailed πŸ’ Adorable

Bulbasaur Amigurumi Pattern

Bulbasaur Amigurumi Pattern
4.4β˜… Rating
2-3 Hours Time Needed
2.9K Made This
βœ‚οΈ

Intermediate Level

Ideal for those with basic crochet experience, featuring slightly more advanced stitches and techniques to expand your skills.

⏱️

Bite-Sized Project

Finishes in 2-4 hoursβ€”perfect for an afternoon of creative relaxation.

🧸

Cute Companion

An adorable friend to cherish, handcrafted with love to bring comfort and joy for years to come.

About This Bulbasaur Amigurumi Pattern

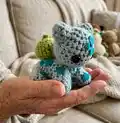
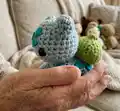
This pattern creates a small Bulbasaur amigurumi featuring a rounded head, plump body, tiny legs and arms, felt markings and a crocheted pod. You will use basic amigurumi techniques: single crochet in the round, increases, decreases and simple seaming. The pattern uses worsted weight yarn and a 3.5mm hook for a firm, cuddly finish. Photographs are provided to guide placement and assembly.

Bulbasaur Amigurumi Pattern crochet pattern - detailed view of completed project

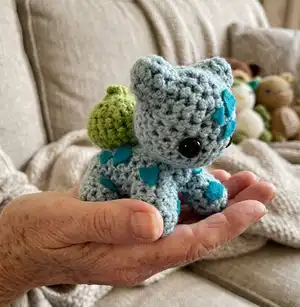
Perfect for gift-making or collecting, the finished Bulbasaur is compact and adorable. The pattern includes materials, abbreviations, and full row-by-row instructions so you can follow along easily.

Why You'll Love This Bulbasaur Amigurumi Pattern

I absolutely love this pattern because it captures Bulbasaur's charm in a very small, approachable amigurumi. I enjoy how quickly the pieces come together β€” you can crochet the whole toy in just a couple of afternoons. The shaping is simple but effective, relying on basic increases and decreases to create the rounded head and pod. I also love that the felt markings let you add personality without complicated embroidery. Sharing a handmade Bulbasaur always brings a huge smile to the recipient, and that joy is the reason I keep making more.

Bulbasaur Amigurumi Pattern step 1 - construction progress Bulbasaur Amigurumi Pattern step 2 - assembly progress Bulbasaur Amigurumi Pattern step 3 - details and accessories Bulbasaur Amigurumi Pattern step 4 - final assembly and finishing

Switch Things Up

I love changing up colors to make different characters from the same pattern; try soft pastels or bolder greens for a unique look.

You can scale the pattern by changing yarn weight and hook size: use thinner yarn for a tiny keychain or bulky yarn for a larger, cuddlier version.

Swap safety eyes for embroidered eyes for a fully child-safe toy β€” I often embroider faces when the toy is for young children.

Use embroidery floss to add small mouth details or extra facial expressions to give each Bulbasaur its own personality.

Try adding wire inside the legs or neck for poseable limbs if you want a display piece that can stand or be positioned.

Mix and match yarn textures like a slight boucle for a fuzzy effect or cotton for a smoother finish β€” each gives the toy a different character.

Instead of felt markings glued on, try small crocheted appliques sewn on for a more durable finish and handmade charm.

Make a matching set: create Ivysaur and Venusaur by increasing stitch counts and pod size, experimenting with shaping as you go.

I sometimes add tiny crocheted accessories like a tiny flower or scarf to personalize the amigurumi for gifts.

For gifting, stitch a loop into the top of the head to turn this into a hanging ornament or keyring β€” a cute and practical twist!

Common Mistakes & How to Fix Them

βœ— Skipping the magic ring/alternative chain start can leave a hole in your piece; use a tight magic ring or properly join the starting chain to avoid gaps. βœ— Forgetting to stuff gradually leads to lumps and uneven shaping; stuff little by little and shape as you go for a smooth finish. βœ— Not placing eyes in the right round causes a disproportionate face; mark eye placement before fastening and place them between the indicated stitches. βœ— Overtight tension will make the toy stiff and harder to sew; maintain an even, moderate tension to keep the fabric flexible and sewable. βœ— Ignoring stitch counts during increases and decreases causes mismatched rounds; count after each round and correct mistakes immediately to avoid bigger problems.

Bulbasaur Amigurumi Pattern

Make a tiny, adorable Bulbasaur amigurumi you can cherish or gift. This pattern guides you through crocheting the head, body, ears, legs and the little pod with clear step-by-step instructions. You will learn simple shaping using single crochet increases and decreases and how to assemble the pieces for a charming finished toy. Perfect for a creative afternoon and a lovely handmade keepsake.

Intermediate 2-3 Hours

Materials Needed for Bulbasaur Amigurumi Pattern

β€” Main Fabric

  • 01
    Worsted weight yarn (#4) - Light Teal/aqua - approximately 25-50g (head/body/limbs)
  • 02
    Worsted weight yarn (#4) - Green - approximately 10-20g (pod)
  • 03
    Dark teal felt - small scraps for markings
  • 04
    Polyfil or another soft stuffing - small amount for head, body and pod

β€” Tools Required

  • 01
    Crochet hook size 3.5mm
  • 02
    Scissors
  • 03
    Tapestry needle
  • 04
    Glue gun or fabric glue
  • 05
    1 pair 10mm safety eyes
  • 06
    Stitch markers (optional)
  • 07
    Pins for placement (optional)

Progress Tracker

0% Complete

β€” Materials :

Info :

3.5mm crochet hook. Scissors. Tapestry Needle. Glue gun/fabric glue. Dark teal Felt. 1 pair 10mm safety eyes. Polyfil (or another soft stuffing). Worsted weight yarn in: Green. Light Teal/aqua.

β€” Abbreviations :

Info :

SC = single crochet. DEC = single crochet decrease one. INC = single crochet increase one. SlSt = slip stitch. CH = chain. FO = fasten off.

β€” Head :

Round 1 :

CH 2, SC 8 in first stitch. (8 stitches) Alternatively, SC 8 into a magic circle

Round 2 :

INC x 8 (16 stitches)

Round 3 :

*SC, INC* x 8 (24 stitches)

Round 4-6 :

SC x 24 (24 stitches)

Round 7 :

*SC x 9*, INC, *SC x 4*, INC, *SC x 9* (26 stitches)

Info :

Place eyes 5 stitches apart (in between each of the increases)

Round 8 :

SC x 26 (26 stitches)

Round 9 :

*SC x 2*, DEC x 11*, *SC x 2* (15 stitches)

Info :

Stuff as much of the head as you can

Round 10 :

*SC x 4*, *DEC x 3*, *SC x 5*

Info :

Finish stuffing head, FO with SlSt.

β€” Body :

Round 1 :

CH 2, SC 6 in first stitch. (6 stitches) Alternatively, SC 6 into a magic circle

Round 2 :

INC x 6 (12 stitches)

Round 3 :

*SC, INC* x 6 (18 stitches)

Round 4-6 :

SC x 18 (18 stitches)

Round 7 :

*SC x 5*, INC, *SC x 6*, INC, *SC x 5* (20 stitches)

Round 8-10 :

SC x 20 (20 stitches)

Round 11 :

DEC to close, stuffing the body as you go. FO with a SlSt.

Info :

Sew head onto body (row 1 is the front of the body, and the increases done face the upwards.)

β€” Ears :

Round 1 :

CH 2, SC 6 in first stitch. (6 stitches) Alternatively, SC 6 into a magic circle

Round 2 :

*SC, INC* x 3

Round 3 :

*SC 2, INC* x 3

Info :

FO with SlSt

Info :

Sew ears onto head (I've provided a picture to use as a placement guide.)

β€” Pod :

Round 1 :

CH 12, join the ends into a loop with a SlSt. (You're just making a crochet ring with 12 stitches around.) (12 stitches)

Round 2 :

INC x 12 (24 stitches)

Round 3-4 :

SC x 24 (24 stitches)

Round 5 :

*SC 4, DEC* x 4 (20 stitches)

Round 6 :

DEC x 10 (10 stitches)

Round 7 :

DEC x 5 (5 stitches)

Round 8 :

SC 4, SlSt, FO.

Info :

Stuff pod (from the bottom)

Info :

Sew pod to the back of your Bulbasaur

β€” Arms and Legs :

Round 1 :

CH 2, SC 10 in first stitch. (10 stitches) Alternatively, SC 10 into a magic circle

Round 2-5 :

SC x 10 (10 stitches)

Info :

FO with SlSt.

Info :

Stuff legs lightly, and sew them onto body. (see pictures to the right and below for placement.)

Info :

Next comes the markings! This part is super simple, just cut out a bunch of triangles /other angled shapes of varying sizes and using the fabric glue/your hot glue gun, fasten them to your Bulbasaur.

Assembly Instructions

  • Sew head to body: position the finished head on row 1 of the body (row 1 is the front) with the increases facing upwards, then sew securely with a yarn needle.
  • Position and sew ears onto the head using the photograph as a placement guide, securing firmly with a yarn needle and weaving in ends.
  • Stuff the pod from the bottom and sew it to the back of the Bulbasaur, centering it on the highest rear section and securing with tight stitches.
  • Attach legs (and arms) by stuffing them lightly, positioning them evenly on the underside/side of the body as shown in pictures, then sew with a whipstitch.
  • Cut felt triangles/angled shapes and use fabric glue or a hot glue gun to fasten the dark teal markings to the head, legs and body as desired.

Important Notes

  • πŸ’‘Place safety eyes between the rounds specified and ensure they are spaced correctly before securing the washers.
  • πŸ’‘Stuff pieces gradually while closing to maintain smooth shaping and avoid overstuffing which can distort the amigurumi.
  • πŸ’‘Use pins or stitch markers to align pieces and check placement before sewing for symmetrical results.
  • πŸ’‘Weave in yarn ends and secure sewn joins with several passes to prevent pieces from loosening over time.

This little Bulbasaur is quick to make and full of personality β€” perfect for gifting or keeping as a cute desk companion. The small size makes it ideal for practicing shaping and assembly while producing a delightful finished piece. Happy crocheting and enjoy bringing this tiny Pokemon to life! 🧢🧸

You ask,

we answer.

FAQs

What size will the finished piece be?

The finished amigurumi measures approximately 8-10 cm tall when using worsted weight yarn and a 3.5mm hook; exact size depends on your tension.

Can I use different yarn weights for this pattern?

Yes, you can use different yarn weights, but this will change the finished size; adjust hook size accordingly and note that stuffing and eye sizes may need changing.

Do I need prior crochet experience for this pattern?

This pattern is rated intermediate, so basic knowledge of single crochet, increases, decreases and working in the round is recommended for best results.

How long does this project typically take to complete?

Most crocheters complete this project in 2-3 hours, though time may vary based on experience level and how much time you spend on assembly and detailing.