🧢 Beautiful ✨ Detailed πŸ’ Adorable

Bobby The Pencil Amigurumi Pattern

Bobby The Pencil Amigurumi Pattern
4.3β˜… Rating
5-7 Hours Time Needed
1.6K Made This
βœ‚οΈ

Intermediate Level

Ideal for those with basic crochet experience, featuring slightly more advanced stitches and techniques to expand your skills.

⏱️

Weekend Treat

Takes 5-7 hours, making it an enjoyable project to finish over a couple of days.

🧸

Cute Companion

An adorable friend to cherish, handcrafted with love to bring comfort and joy for years to come.

About This Bobby The Pencil Amigurumi Pattern
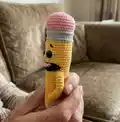
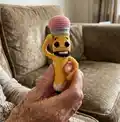
This pattern creates Bobby β€” a tiny, characterful pencil amigurumi with a removable-looking eraser, expressive mouth and posable arms. You will crochet small detailed parts like the inner mouth, tongue, eraser and sewn-on eyes for a finished character with personality. The design uses fine hookwork and an internal wire to make the arms poseable and sturdy.

Bobby The Pencil Amigurumi Pattern crochet pattern - detailed view of completed project

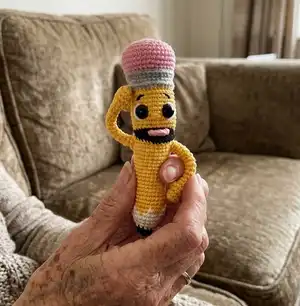
Clear step-by-step rounds, color-change notes and assembly photos help you follow along easily. The finished toy measures about 15 cm (5.9") using the recommended yarn and hook.

Why You'll Love This Bobby The Pencil Amigurumi Pattern

I absolutely love this pattern because it turns a simple pencil into a charming little character with so much personality. I enjoy the small, detailed rounds that give the face and eraser their distinctive look and the trick of sewing the mouth inner part that creates depth. The wired arms make Bobby poseable and fun to display, which always delights people who see the finished toy. Every step is rewarding β€” from crocheting tiny parts like the tongue to finishing the eraser β€” and I find the whole process incredibly satisfying.

Bobby The Pencil Amigurumi Pattern step 1 - construction progress Bobby The Pencil Amigurumi Pattern step 2 - assembly progress Bobby The Pencil Amigurumi Pattern step 3 - details and accessories Bobby The Pencil Amigurumi Pattern step 4 - final assembly and finishing

Switch Things Up

I love how easy it is to customize Bobby β€” you can change the yarn colors to create different personalities, like a rainbow eraser or a charcoal pencil look.

For a softer, chunkier Bobby try bulky yarn and a larger hook; the shape will be cuddlier and the project will work up faster.

If you want a tiny keychain version, use thinner crochet thread and a smaller hook and swap the wire for a short keychain ring inside the eraser.

I often add little accessories like a tiny scarf or a crocheted notebook β€” small props make the character more story-driven and gift-ready.

You can change the eyes to embroidered eyes for a baby-safe version, or use smaller safety eyes for a subtler look.

I sometimes make Bobby with a smile instead of a full open mouth by embroidering an arc for a simpler, easier face.

Try altering the arm length and angle to create different poses β€” longer arms make a more playful character while short arms look tidy and reserved.

Embroider different eyebrow shapes to change the expression quickly; a slight slant gives a cheeky look, while high arches make Bobby look surprised.

If you want sturdier posability, use thicker gauge wire and wrap the ends well with fabric tape or felt before covering with a band-aid as instructed.

I recommend testing one change at a time β€” color, yarn weight or eyes β€” so you can see how each tweak affects the final personality of your amigurumi.

Common Mistakes & How to Fix Them

βœ— Skipping color-change instructions at the tip will create uneven transitions; change colors exactly as written and carry threads neatly to maintain the pattern look. βœ— Forgetting to leave long sewing tails on small parts makes attachment difficult; always leave a long thread end when fastening off for easy sewing and secure finishing. βœ— Not inserting the mouth inner part properly can make the mouth bulge outwards; follow the photo instructions and secure the middle of the mouth from the other side to flatten it correctly. βœ— Not matching your crochet density to the recommended hook size causes size differences; check your tension and swap hook sizes to match the sample before you start. βœ— Overstuffing the body makes the pencil rigid and distorts shaping; stuff gradually and stop when the shape looks right, especially before closing the top rounds.

Bobby The Pencil Amigurumi Pattern

Make your own playful Bobby the Pencil amigurumi with clear, photo-supported instructions and full round-by-round details. This pattern walks you through small details like the mouth insert, eraser, and posable wired arms so your finished pencil has personality. Perfect for gift-making, keychains, or a fun desk companion.

Intermediate 5-7 Hours

Materials Needed for Bobby The Pencil Amigurumi Pattern

β€” Main Fabric

  • 01
    Cotton / semi-cotton yarn YarnArt Jeans or Alize Cotton Gold (~160 m / 50 g) - less than a ball of each color
  • 02
    Color: Yellow - less than a ball
  • 03
    Color: Black - less than a ball
  • 04
    Color: Ivory - less than a ball
  • 05
    Color: Gray - less than a ball
  • 06
    Color: Pink - less than a ball
  • 07
    Color: White - less than a ball

β€” Tools Required

  • 01
    Crochet hook size 1.75 mm (recommended)
  • 02
    Alternative hook size 2.0 mm (if needed for tension)
  • 03
    A pair of plastic eyes ~10 mm (2 pieces)
  • 04
    Aluminum or copper wire 1-1.5 mm for the arms
  • 05
    Band-aid (to wrap wire ends)
  • 06
    Yarn sewing needles
  • 07
    Stitch markers
  • 08
    Pins with large head
  • 09
    Scissors
  • 10
    Fiber filling (polyester stuffing)
  • 11
    Small pliers or wire cutters for trimming wire

Progress Tracker

0% Complete

β€” Inner Part of the Mouth :

Info :

*black yarn, 1,75 mm hook

Round 1 :

6 SC in MR;

Round 2 :

6 INC (12);

Round 3 :

(SC, INC)*6 (18);

Round 4 :

(2 SC, INC)*6 (24);

Round 5 :

(3 SC, INC)*6 (30);

Info :

fix the thread and leave a long ending for sewing.

β€” Tongue :

Info :

*pink yarn, 1,75 mm hook

Round 1 :

6 SC in MR;

Round 2 :

6 INC (12);

Round 3 :

3 SC, CH, turn the detail (3);

Round 4 :

3 SC in the other direction;

Info :

fix the thread and leave a long ending for sewing, withdraw the initial thread from the MR to the last row.

β€” Body :

Info :

*start with black yarn, 1,75 mm hook. *stuff in process

Round 1 :

3 SC IN MR;

Round 2 :

3 INC (6);

Round 3 :

(SC, INC)*3 (9);

Round 4 :

(2 SC, INC)*3 (12);

Info :

*change the color to ivory

Round 5 :

(3 SC, INC)*3 (15);

Round 6 :

(4 SC, INC)*3 (18);

Round 7 :

(5 SC, INC)*3 (21);

Round 8 :

(6 SC, INC)*3 (24);

Info :

*in Round 9 begin to change the thread color in turn

Round 9 :

(3 SC, change the color to yellow, SC, change the color to ivory)*6 (24);

Round 10 :

2 SC, (change the color to yellow, 3 SC, change the color to ivory, SC)*5, change the color to yellow, 2 SC (24);

Info :

* further, there are repeated rounds; if you want a longer pencil, just work extra repeated rounds

Round 11-24 :

14 rounds 24 SC;

Round 25 :

5 SC, INC, 12 SC, INC, 5 SC (26);

Round 26 :

6 SC, INC, 12 SC, INC, 6 SC (28);

Round 27 :

7 SC, INC, 12 SC, INC, 7 SC (30);

Round 28 :

7 SC, 16 SS back loops only, 7 SC (30);

Round 29 :

6 SC, chain 18, skip18 St, 6 SC (12);

Round 30 :

6 SC, 18 SC on the chain, 6 SC (30);

β€” Mouth Assembly :

Info :

*after you would crochet 3 rounds, fix the mouth inner part - sew it, as shown in the photo: on the top – hooking up black front loops and yellow loops of the chain, from below hooking up black and yellow front loops; fix with a stitch the middle part of the mouth and the body from the other side, so that the fiber filling does not push the black part out;

Round 31-38 :

7 rounds 30 SC;

Round 39 :

(4 SC, INC)*6 (36);

Info :

*insert plastic eyes 4 rounds higher than mouth upper line at the distance of 6 SC;

β€” Eraser (top) :

Info :

*change the color to gray

Round 40 :

36 SC front loops only;

Round 41 :

36 BPSC;

Round 42-43 :

2 rounds 36 SC;

Round 44 :

36 BPSC;

Info :

*change the color to pink

Round 45 :

(5 SC, INC)*6 (42);

Round 46 :

(6 SC, INC)*6 (48);

Round 47-49 :

3 rounds 48 SC;

Round 50 :

(6 SC, DEC)*6 back loops only (42);

Round 51 :

(5 SC, DEC)*6 (36);

Round 52 :

(4 SC, DEC)*6 (30);

Round 53 :

(3 SC, DEC)*6 (24);

Round 54 :

12 DEC (12);

Round 55 :

6 DEC (6);

Info :

- tighten the hole, fix the thread and hide the ending inside; - embroider the white of the eye on the sides, eyebrows and nose; - sew the tongue.

β€” Arms :

Info :

(2 details): *yellow yarn, 1,75 mm hook. *don't stuff

Round 1 :

3 SC IN MR;

Round 2 :

3 INC (6);

Round 3 :

(SC, INC)*3 (9);

Round 4 :

9 SC;

Round 5 :

chain 3, (start in the 2nd chain from the hook) 2 SC on the chain, 9 SC (9+2 on thumb);

Round 6 :

9 SC;

Round 7 :

(SC, DEC)*3 (6);

Round 8-17 :

10 rounds 6 SC;

Info :

- fix the thread and leave a long ending for sewing;

β€” Final Assembly :

Info :

- insert wire into the body, trim the ends, bend and isolate the tips with a band-aid, so that the length of the wire on each side is equal to the length of the arms;

Info :

- put the arms on the wire and sew them.

Assembly Instructions

  • Fix the inner black mouth disc into the body opening by sewing through the top loops (black front loops) and yellow loops of the chain, then from below hook up the black and yellow front loops and secure the middle part with a stitch so the filling will not push the black part out.
  • Insert the plastic eyes 4 rounds above the mouth upper line, spaced 6 SC apart; secure eyes and embroider the white highlights on the sides if desired.
  • Sew the tongue into the center of the mouth, using the long tail left when fastening off; position it flat on the inner mouth piece.
  • Insert the prepared wire through the body, trim and bend wire ends, insulate each tip with a band-aid so the exposed wire does not poke through the crochet; slide the two arm tubes onto each side of the wire and sew arms to the body securely.
  • Tighten the top hole of the eraser, fix the thread and hide the ending inside for a neat finish; embroider eyebrows and small nose details as pictured.

Important Notes

  • πŸ’‘Use stitch markers to keep track of the beginning of each round, especially during color changes and shaping sections.
  • πŸ’‘Work with consistent tension and check gauge; the designer uses medium density crocheting and a 1.75 mm hookβ€”adjust if your tension differs.
  • πŸ’‘Do not stuff the arms; the pattern instructs the arms to remain unstuffed and to be placed on wire for posability.
  • πŸ’‘When changing colors at the tip and body, carry and secure threads neatly to avoid lumps and visible floats.
  • πŸ’‘Leave long yarn tails when fastening off small pieces (tongue, mouth inner part) to make sewing them in place easier.

This playful Bobby the Pencil pattern brings a tiny pencil to life with personality and poseable arms. Follow the full round-by-round guide to crochet the eraser, body, mouth and tiny tongue with confidence. Perfect for gifts, desk decor, or a cute keychain-sized friend. πŸ§Άβœ‚οΈπŸ˜Š

You ask,

we answer.

FAQs

What size will the finished piece be?

The finished amigurumi measures approximately 15 cm (5.9") tall when using the recommended yarn and 1.75 mm hook.

Can I use different yarn weights for this pattern?

Yes, you can use different yarn weights, but the final size and stitch counts will change; choose an appropriate hook and expect the toy to be larger or smaller.

Do I need prior crochet experience for this pattern?

This pattern is rated intermediate; you should be comfortable working in the round, doing increases and decreases, and making small amigurumi parts.

How long does this project typically take to complete?

Most crocheters complete this project in 5-7 hours, though time may vary depending on experience and how many small details you embroider.