🧢 Beautiful ✨ Detailed πŸ’ Adorable

Bobble Sheep Amigurumi Pattern

Bobble Sheep Amigurumi Pattern
4.7β˜… Rating
5-7 Hours Time Needed
1.8K Made This
βœ‚οΈ

Intermediate Level

Ideal for those with basic crochet experience, featuring slightly more advanced stitches and techniques to expand your skills.

⏱️

Weekend Treat

Takes 5-7 hours, making it an enjoyable project to finish over a couple of days.

🧸

Cute Companion

An adorable friend to cherish, handcrafted with love to bring comfort and joy for years to come.

About This Bobble Sheep Amigurumi Pattern

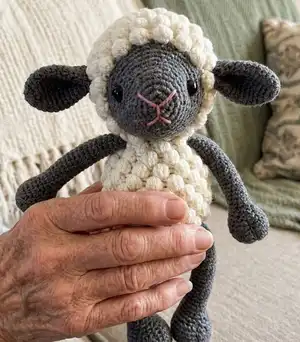
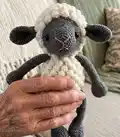
This pattern creates a soft, bobble-fleece sheep amigurumi with textured body and shaped gray limbs and face. It features the bobble stitch for a fluffy fleece, clear photo tutorials, and full round-by-round instructions. The design includes step-by-step finishing and assembly instructions so you can create a polished, gift-ready toy.

Bobble Sheep Amigurumi Pattern crochet pattern - detailed view of completed project

Includes techniques like magic ring, invisible decreases and bobble stitch, plus tips for placement of safety eyes and hiding yarn tails. Suitable for crafters comfortable with basic amigurumi shaping and following round-by-round instructions.

Why You'll Love This Bobble Sheep Amigurumi Pattern

I absolutely love this pattern because the bobble fleece gives the sheep an irresistible handmade texture that stands out. I enjoy how the pattern balances detailed shaping with approachable techniques so the result looks professional. I love including clear photos and step-by-step finishing tips because they make assembly relaxing and confident. I also enjoy how easy it is to personalize the sheep by changing yarn colors or eye styles to create completely unique companions.

Bobble Sheep Amigurumi Pattern step 1 - construction progress Bobble Sheep Amigurumi Pattern step 2 - assembly progress Bobble Sheep Amigurumi Pattern step 3 - details and accessories Bobble Sheep Amigurumi Pattern step 4 - final assembly and finishing

Switch Things Up

I love how easy it is to change the look of this sheep by swapping yarn colors; try pastel shades for a nursery-friendly buddy or bold contrasting colors for a modern twist.

If you want a chunkier, cuddlier sheep use a bulkier yarn and a larger hook; for a tiny keychain version use fingering weight yarn and a smaller hook.

I often experiment with different eye choices β€” safety eyes, embroidered eyes or tiny buttons all give the face a very different personality.

Try stitching eyelashes, eyebrows or freckles with embroidery floss to add character and expression to each sheep you make.

For a poseable version add thin wire inside the limbs before stuffing; this is a great option if you want the sheep to sit or hold small props.

You can make a whole flock by changing the bobble size: increase the number of bobble rounds for a fluffier body or reduce them for a sleeker look.

Add clothing or tiny accessories like a crocheted scarf, bow or little bell for seasonal or gift-ready designs that delight recipients.

Experiment with textured yarns for the fleece to get a very different surface β€” boucle or mohair blends can be gorgeous if you prefer a soft halo around the bobbles.

I sometimes embroider small motifs on the belly or add felt patches to personalize a sheep with initials or simple shapes.

Try combining two shades of white for an ombre fleece effect by changing color every few rounds; it adds visual interest without changing stitchwork.

Common Mistakes & How to Fix Them

βœ— Skipping the stitch marker while working in spiral leads to losing your start point; place a marker at the first stitch and move it each round to stay accurate. βœ— Neglecting to stuff gradually causes lumps and uneven shaping; add small amounts of fiberfill gradually and shape as you go. βœ— Using the wrong hook size changes gauge dramatically and will alter the finished size; use the recommended 2.5–3.0 mm hook and check your tension before starting. βœ— Forgetting to close holes securely will leave an opening in the finished toy; leave a long tail and weave or whip-stitch the opening closed securely. βœ— Pulling embroidery floss too tightly when stitching the nose distorts the face; use gentle, even tension and knot tails under the head for a neat finish.

Bobble Sheep Amigurumi Pattern

Make a charming bobble-textured sheep with this detailed intermediate amigurumi pattern. You will enjoy creating textured fleece, shaped limbs and a sweet embroidered face while following clear step-by-step instructions. The pattern includes photos, stitch tutorials and assembly tips so you can finish a unique handmade friend. Perfect for gifting or keeping as a cozy handmade companion.

Intermediate 5-7 Hours

Materials Needed for Bobble Sheep Amigurumi Pattern

β€” Main Fabric

  • 01
    DK weight alpaca wool (100 m = 50 g / 109 yd = 50 g), 8 ply / 11 wpi
  • 02
    White (fleece) - approximately 90 g
  • 03
    Gray (head, limbs, ears) - approximately 40 g
  • 04
    Cotton embroidery floss in black and pink for facial details
  • 05
    Polyester fiberfill for stuffing (quantity: small bag, about 50-100 g)

β€” Tools Required

  • 01
    Crochet hook 2.50 mm (US B-1) - recommended
  • 02
    Crochet hook 3.00 mm (US D-3) - optional for tension adjustments
  • 03
    12 mm (1/2") safety eyes (2 pieces) or buttons/beads
  • 04
    Polyester fiberfill or wadding for stuffing
  • 05
    Yarn needle for sewing and finishing
  • 06
    Scissors
  • 07
    Stitch markers
  • 08
    Pins for positioning pieces while sewing
  • 09
    Cotton embroidery floss in black and pink for facial details

Progress Tracker

0% Complete

β€” Head :

Info :

The fleece is crocheted in rounds, starting each round with a ch and joining each round with a sl st through the first stitch. Do not count them as stitches. Start each round in the first stitch, the same one you slip stitched into earlier.

With white yarn - Round 1 :

mr, sc 10, sl st in 1st sc (10)

Round 2 :

ch, (sc, bo+sc) x 5, sl st in 1st sc (15)

Round 3 :

ch, (sc 2, inc) x 5, sl st in 1st sc (20)

Round 4 :

ch, (sc, bo+sc) x 10, sl st in 1st sc (30)

Round 5 :

ch, sc in each stitch, sl st in 1st sc (30)

Round 6 :

ch, (bo+sc, sc) x 15, sl st in 1st bo (45)

Round 7 :

ch, sc in each stitch, sl st in 1st sc (45)

Round 8 :

ch, (sc 2, bo) x 18, sl st in 1st sc (54)

Round 9 :

ch, sc in each stitch, sl st in 1st sc (54)

Round 10 :

ch, sc, bo, (sc 2, bo) x 17, sc, sl st in 1st sc (54)

Round 11 :

ch, sc in each stitch, sl st in 1st sc (54)

Round 12 :

ch, (bo, sc 2) x 18, sl st in 1st bo (54)

Round 13 :

ch, sc in each stitch, sl st in 1st sc (54)

Round 14 :

ch, (sc 2, bo) x 18, sl st in 1st sc (54)

Round 15 :

ch, sc in each stitch, sl st in 1st sc (54)

Round 16 :

ch, sc, bo, (sc 2, bo) x 17, sc, sl st in 1st sc (54)

Round 17 :

ch, sc in each stitch, sl st in 1st sc (54)

Round 18 :

ch, (bo, sc 2) x 18, sl st in 1st bo (54)

Round 19 :

ch, (sc 4, sc2tog) x 9, sl st in 1st sc (45)

Round 20 :

ch, (sc 2, bo) x 15, sl st in 1st sc (45)

Info :

Fasten off. Attach the gray yarn with a slip stitch in the first stitch and continue crocheting in spiral.

With gray yarn - Round 21 :

sl st (counts as first stitch), sc 13, sc2tog, (sc 2, sc2tog) x 4, sc 13 (40)

Round 22 :

sc in each stitch (40)

Round 23 :

(sc 6, dec) x 5 (35)

Round 24-25 :

sc in each stitch (35)

Round 26 :

sc 2, dec, (sc 5, dec) x 4, sc 3 (30)

Round 27 :

sc in each stitch (30)

Info :

Attach safety eyes between rounds 24 and 25, leaving 14 stitches (count 13 holes) between them. Start stuffing the head. Keep adding a bit of fiberfill after every few rounds, stuffing the head firmly.

Round 28 :

(sc 4, dec) x 5 (25)

Round 29 :

sc in each stitch (25)

Round 30 :

sc, dec, (sc 3, dec) x 4, sc 2 (20)

Round 31 :

(dec, sc 8) x 2 (18)

Round 32 :

(sc, dec) x 6 (12)

Round 33 :

dec x 6 (6)

Info :

Finish stuffing. Cut the yarn, leaving a long yarn tail, fasten off and close the opening.

β€” EARS (make 2) :

With gray yarn - Round 1 :

mr, sc 6 (6)

Round 2 :

(inc, sc) x 3 (9)

Round 3 :

(sc 2, inc) x 3 (12)

Round 4 :

sc, inc, (sc 3, inc) x 2, sc 2 (15)

Round 5 :

(sc 4, inc) x 3 (18)

Round 6 :

sc 2, inc, (sc 5, inc) x 2, sc 3 (21)

Round 7-12 :

sc in each stitch (21)

Round 13 :

dec, sc 9, dec, sc 8 (19)

Round 14 :

sc in each stitch (19)

Round 15 :

sc 14, dec, sc 3 (18)

Round 16 :

dec, sc 6, dec, sc 8 (16)

Info :

Fold the ear in half and crochet over the top with single crochet stitches. Cut the yarn leaving a long yarn tail for sewing, and fasten off.

β€” Body :

Info :

The fleece is crocheted in rounds, starting each round with a ch and joining each round with a sl st through the first stitch. Do not count them as stitches. Start each round in the first stitch, the same one you slip stitched into earlier.

With white yarn - Round 1 :

mr, sc 10, sl st in 1st sc (10)

Round 2 :

ch, (sc, bo+sc) x 5, sl st in 1st sc (15)

Round 3 :

ch, (sc 2, inc) x 5, sl st in 1st sc (20)

Round 4 :

ch, (sc, bo+sc) x 10, sl st in 1st sc (30)

Round 5 :

ch, sc in each stitch, sl st in 1st sc (30)

Round 6 :

ch, (bo+sc, sc) x 15, sl st in 1st bo (45)

Round 7 :

ch, sc in each stitch, sl st in 1st sc (45)

Round 8 :

ch, (sc 2, bo) x 15, sl st in 1st sc (45)

Round 9 :

ch, sc in each stitch, sl st in 1st sc (45)

Round 10 :

ch, sc, bo, (sc 2, bo) x 14, sc, sl st in 1st sc (45)

Round 11 :

ch, sc in each stitch, sl st in 1st sc (45)

Round 12 :

ch, (bo, sc 2) x 15, sl st in 1st bo (45)

Round 13 :

ch, sc in each stitch, sl st in 1st sc (45)

Round 14 :

ch, (sc 2, bo) x 15, sl st in 1st sc (45)

Round 15 :

ch, sc in each stitch, sl st in 1st sc (45)

Round 16 :

ch, sc, bo, (sc 2, bo) x 14, sc, sl st in 1st sc (45)

Round 17 :

ch, sc in each stitch, sl st in 1st sc (45)

Round 18 :

ch, (bo, sc 2) x 15, sl st in 1st bo (45)

Round 19 :

ch, (sc 13, sc2tog) x 3, sl st in 1st sc (42)

Round 20 :

ch, (sc 2, bo) x 14, sl st in 1st sc (42)

Round 21 :

ch, sc 4, sc2tog, (sc 2, sc2tog) x 8, sc 4, sl st in 1st sc (33)

Round 22 :

ch, sc, bo, (sc 2, bo) x 10, sc, sl st in 1st sc (33)

Round 23 :

ch, (sc 3, sc2tog) x 6, sc 3, sl st in 1st sc (27)

Round 24 :

ch, (bo, sc 2) x 9, sl st in 1st bo (27)

Round 25 :

ch, sc in each stitch, sl st in 1st sc (27)

Info :

Cut the yarn, leaving a long yarn tail for sewing, and fasten off. Stuff the body firmly.

β€” Arms (make 2) :

With gray yarn - Round 1 :

mr, sc 6 (6)

Round 2 :

inc x 6 (12)

Round 3 :

(sc, inc) x 6 (18)

Round 4 :

(inc, sc 2) x 6 (24)

Round 5 :

sc 8, dec, (sc, dec) x 2, sc 8 (21)

Round 6 :

sc in each stitch (21)

Round 7 :

sc 10, dec, sc 9 (20)

Round 8 :

sc 7, dec, sc 3, dec, sc 6 (18)

Round 9 :

(dec, sc 7) x 2 (16)

Round 10 :

sc 7, dec, sc 7 (15)

Info :

Stuff the hands firmly. Make a long vertical stitch along the front of the hoof, draw it very tight and knot the yarn ends together. Keep adding a bit of fiberfill after every few rounds, stuffing the arms lightly about 2/3 way up.

Round 11 :

sc 4, dec, sc 3, dec, sc 4 (13)

Round 12-14 :

sc in each stitch (13)

Round 15 :

sc 6, dec, sc 5 (12)

Round 16-18 :

sc in each stitch (12)

Round 19 :

sc 6, dec, sc 4 (11)

Round 20-28 :

sc in each stitch (11)

Round 29 :

sc 9, dec (10)

Info :

Sl st in next stitch. Cut the yarn, leaving a long yarn tail for sewing, and fasten off.

β€” Legs (make 2) :

With gray yarn - Round 1 :

mr, sc 6 (6)

Round 2 :

inc x 6 (12)

Round 3 :

(sc, inc) x 6 (18)

Round 4 :

(inc, sc 2) x 6 (24)

Round 5 :

(sc 3, inc) x 6 (30)

Round 6 :

sc 10, dec, (sc 2, dec) x 2, sc 10 (27)

Round 7 :

sc 11, dec, sc, dec, sc 11 (25)

Round 8 :

(sc 7, dec) x 2, sc 7 (23)

Round 9 :

dec, sc 9, dec, sc 10 (21)

Round 10 :

sc 9, dec, sc 10 (20)

Round 11 :

(sc 5, dec) x 2, sc 6 (18)

Round 12 :

sc 8, dec, sc 8 (17)

Info :

Stuff the feet firmly. Make a long vertical stitch along the front of the hoof, draw it very tight and knot the yarn ends together. Keep adding a bit of fiberfill after every few rounds, stuffing the legs lightly.

Round 13 :

sc 7, dec, sc 8 (16)

Round 14-15 :

sc in each stitch (16)

Round 16 :

sc 7, dec, sc 7 (15)

Round 17-19 :

sc in each stitch (15)

Round 20 :

sc 7, dec, sc 6 (14)

Round 21-31 :

sc in each stitch (14)

Round 32 :

(sc, dec) x 4, sc 2 (10)

Info :

Sl st in next stitch. Cut the yarn, leaving a long yarn tail for sewing, and fasten off. Finish stuffing.

β€” Assembly :

Info :

Follow photo instructions for attaching safety eyes, closing the head, shaping eyes with yarn, embroidering the nose and mouth, finishing hooves and sewing pieces together. Use pins to position parts before sewing for symmetry.

Assembly Instructions

  • Sew the head to the body with whip stitch, placing it so the front edge of the body is just behind the last row of bobbles; add a bit more stuffing before closing the seam.
  • Place the arms to the sides of the body just below the last round of bobbles and sew them in place by pushing the top of the arm flat and inserting the needle through both layers.
  • Place the legs over the third round of bobbles, leaving 4-5 bobbles between them, and sew the legs to the body ensuring the openings align over a bobble for neat attachment.
  • Place the ears to the sides of the head just behind the second-to-last round of bobbles and sew the ears to the head using a yarn tail for secure attachment.

Important Notes

  • πŸ’‘Work in a continuous spiral; do not join rounds or turn your work unless instructed otherwise in the pattern.
  • πŸ’‘Use a stitch marker or a piece of yarn to mark the end or the beginning of a round to avoid losing track of rounds.
  • πŸ’‘Work all stitches in both loops unless instructed otherwise to maintain consistent texture and shaping.
  • πŸ’‘Attach safety eyes before closing the head and before heavy stuffing to ensure correct placement and secure attachment.

This sweet Bobble Sheep makes a thoughtful handmade gift and a lovely nursery companion. The bobble fleece adds delightful texture and charm to every stitch. Enjoy making one for yourself and another to give away β€” therapy for the hands and joy for the heart. πŸ§ΆπŸ‘

You ask,

we answer.

FAQs

What size will the finished piece be?

The finished amigurumi measures approximately 30 cm (12") from head to toe when crocheted with DK weight yarn and a 2.5 mm hook.

Can I use different yarn weights for this pattern?

Yes β€” you can use different yarn weights but the final size and texture will change; adjust your hook size accordingly and expect a different bobble appearance with other yarns.

Do I need prior crochet experience for this pattern?

This pattern is rated intermediate, so basic knowledge of magic ring, single crochet, increases, decreases and working in the round is recommended.

How long does this project typically take to complete?

Most crocheters complete this project in 5-7 hours, depending on experience and how much time you spend on finishing and assembly.