🧢 Beautiful ✨ Detailed πŸ’ Adorable

Blue the Butterfly Amigurumi Pattern

Blue the Butterfly Amigurumi Pattern
4.5β˜… Rating
5-7 Hours Time Needed
1.2K Made This
βœ‚οΈ

Intermediate Level

Ideal for those with basic crochet experience, featuring slightly more advanced stitches and techniques to expand your skills.

⏱️

Weekend Treat

Takes 5-7 hours, making it an enjoyable project to finish over a couple of days.

🧸

Cute Companion

An adorable friend to cherish, handcrafted with love to bring comfort and joy for years to come.

About This Blue the Butterfly Amigurumi Pattern

This pattern creates Blue the Butterfly, a sweet amigurumi toy with heart-tipped antennae, colorful wings, a cute bow, and soft legs and arms. You will work the pieces in continuous rounds and sew them together for a polished, finished look. Detailed stitch counts and placement tips make assembly straightforward.

Blue the Butterfly Amigurumi Pattern crochet pattern - detailed view of completed project

The pattern uses worsted weight yarn and a 3.25 mm hook to produce an approximately 11-inch finished toy. Clear photos and helpful tips for eye and nose placement are included to help you get professional results.

Why You'll Love This Blue the Butterfly Amigurumi Pattern

I absolutely love this pattern because it brings such a playful personality to life with simple shapes and whimsical details. I enjoy how the heart-shaped antenna tips give Blue an instant charm that appeals to both kids and adults. The wings are a fun place to add color and texture with variegated yarn, which always makes each finished butterfly unique. As the designer I crafted the assembly steps to be forgiving and encouraging, so you can get a beautiful result even if this is one of your first amigurumi projects.

Blue the Butterfly Amigurumi Pattern step 1 - construction progress Blue the Butterfly Amigurumi Pattern step 2 - assembly progress Blue the Butterfly Amigurumi Pattern step 3 - details and accessories Blue the Butterfly Amigurumi Pattern step 4 - final assembly and finishing

Switch Things Up

I love how versatile this pattern is for customization; you can swap Color D (variegated) for a solid color to change the wing look entirely.

I often use pastel shades for baby-friendly versions, or bold jewel tones to make a dramatic statement piece.

If you want a smaller or larger butterfly, change the yarn weight and hook size; try sport weight with a smaller hook for a tiny keychain version.

I sometimes add wire inside the antennae or wings for posability; this gives the toy an interactive quality for play or display.

Try embroidering different facial expressions by adjusting eye placement and the shape of the mouth to give each butterfly its own personality.

For texture on the wings, experiment with surface stitches or a toddler-safe embellishment like felt shapes sewn on.

Swap the bow for a tiny scarf or a flower applique to suit seasons or themes; you can create themed collections easily.

If you want a plusher feel, use a slightly thicker stuffing and larger hook for a chunkier, cuddlier result.

I like to mix yarn brands to create unique color effects; be mindful of gauge and adjust hook size as needed.

Personalize the finished toy with a small embroidered name tag or safety-stitched accessories to make it a special gift.

Common Mistakes & How to Fix Them

βœ— Skipping stitch markers at the start of each round can cause you to lose track of rounds and stitch counts; use a stitch marker and move it at the end of each round to stay organized. βœ— Forgetting to stuff as you go will make it difficult to shape limbs and body sections properly; stuff gradually while following the pattern so shaping is controlled and even. βœ— Placing eyes too high or low will change the expression of the face; follow the placement guidance between the specific rounds (eyes between rounds 12 and 13) and adjust slightly to match your yarn and hook size. βœ— Pulling your stitches too tight when closing will create puckered closures and difficulty sewing pieces together; maintain even, moderate tension and use pins to align pieces before sewing. βœ— Not counting stitches after increases or decreases results in incorrect shaping later in the pattern; count the stitch totals shown after each round to confirm accuracy.

Blue the Butterfly Amigurumi Pattern

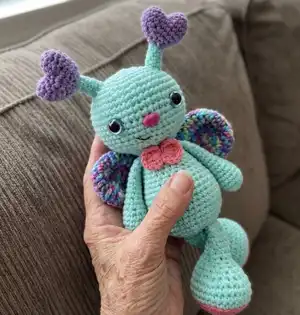
Make a sweet handmade Blue the Butterfly amigurumi with step-by-step instructions you can follow at home. This pattern includes detailed rounds for each piece, materials, abbreviations, and clear assembly photos to guide you. Perfect for creating a cuddly gift or a colorful nursery friend.

Intermediate 5-7 Hours

Materials Needed for Blue the Butterfly Amigurumi Pattern

β€” Main Fabric

  • 01
    Worsted weight yarn (#4), approximately 50g main color (Color A: Mint)
  • 02
    Accent color B: Purple - approximately 25-50g
  • 03
    Accent color C: Pink - approximately 25-50g
  • 04
    Color D: Variegated yarn - approximately 25-50g for wings
  • 05
    Additional small amounts of contrast yarn for nose and details

β€” Tools Required

  • 01
    Crochet hook size 3.25mm (D)
  • 02
    15 mm safety eyes (or 12-15 mm depending on preference)
  • 03
    14 mm oval nose (or alternative nose options)
  • 04
    Scissors
  • 05
    Yarn needle for sewing
  • 06
    Stitch markers
  • 07
    Polyester stuffing (fiberfill)
  • 08
    Black embroidery thread and white embroidery thread
  • 09
    Pipe cleaner (optional for antennae)
  • 10
    Pins for assembly

Progress Tracker

0% Complete

β€” Head :

Round 1 :

Make 6 sc into a magic ring= 6

Round 2 :

Increase in each st around= 12

Round 3 :

(sc, inc) x 6= 18

Round 4 :

sc, inc, (2 sc, inc) x 5, sc= 24

Round 5 :

(3 sc, inc) x 6= 30

Round 6 :

2 sc, inc, (4 sc, inc) x 5, 2 sc= 36

Round 7 :

(5 sc, inc) x 6= 42

Round 8 :

3 sc, inc, (6 sc, inc) x 5, 3 sc= 48

Round 9-14 :

sc in each st around

Info :

Place eyes between rounds 12 and 13, leaving 10 holes between them. Place nose in between eyes between rounds 13 and 14. (On page 17, there are different options for noses if wanted)

Info :

TIP! You may have to adjust the eye placement depending on yarn and hook size you use.

Round 15 :

3 sc, dec, (6 sc, dec) x 5, 3 sc= 42

Round 16 :

(5 sc, dec) x 6= 36

Info :

Start stuffing the head

Round 17 :

2 sc, dec, (4 sc, dec) x 5, 2 sc= 30

Round 18 :

(3 sc, dec) x 6= 24

Round 19 :

(2 sc, dec) x 6= 18

Info :

F/O and leave a tail. (the tail does not need to be long)

β€” Body :

Round 1 :

Make 6 sc into a magic ring= 6

Round 2 :

Increase in each st around= 12

Round 3 :

(sc, inc) x 6= 18

Round 4 :

(inc, 2 sc) x 6= 24

Round 5 :

(3 sc, inc) x 6= 30

Round 6 :

2 sc, inc, (4 sc, inc) x 5, 2 sc= 36

Round 7-13 :

sc in each st around

Round 14 :

(5 sc, dec) x 4, 8 sc= 32

Round 15 :

(4 sc, dec) x 3, 14 sc= 29

Round 16 :

(dec, 7 sc) x 2, dec, 9 sc= 26

Round 17 :

3 sc, dec, 16 sc, dec, 3 sc= 24

Info :

Start stuffing the body

Round 18 :

sc in each st around

Round 19 :

8 sc, dec, 4 sc, dec, 8 sc= 22

Round 20 :

sc in each st around

Round 21 :

dec, 8 sc, dec, 10 sc= 20

Round 22 :

sc in each st around

Round 23 :

(dec, 8 sc) x 2= 18

Info :

F/O and leave a long tail for sewing

β€” Arms (Make 2) :

Round 1 :

Make 6 sc into a magic ring= 6

Round 2 :

Increase in each st around= 12

Round 3-6 :

Sc in each st around

Info :

Stop stuffing the arms

Round 7 :

5 sc, dec, 5 sc= 11

Round 8 :

Sc in each st around

Round 9 :

4 sc, dec, 3 sc, dec= 9

Round 10 :

Sc in each st around

Round 11 :

7 sc, dec= 8

Round 12-16 :

Sc in each st around

Info :

F/O and leave a long tail for sewing. !Tip! If you fold the arms in half and sc closed, you will have an easier time when sewing them.

β€” Bow :

Info :

With Color C: Make a magic ring and ch 4. Into the magic ring: make 3 tr, ch 4, sl st, ch 4, 3 tr, ch 4, sl st. F/O and leave an extra long tail for sewing

β€” Legs (Make 2) :

Info :

Starting with Color C: Ch 6

Round 1 :

inc in 2nd chain from hook, 3 sc, 4 sc in the last chain, working on the opposite side of the chain; 3 sc, inc= 14

Info :

*For help with working on the opposite side of the chain refer to page 15*

Round 2 :

Inc3, 4 sc, inc3, 2 sc, inc3, 5 sc= 20

Round 3 :

inc x 3, 5 sc, inc3, 4 sc, inc3, 6 sc= 27

Round 4 :

sc, inc x 3, 8 sc, inc3, 6 sc, inc3, 7 sc= 34

Info :

Change to Color A

Round 5-7 :

sc in each st around

Round 8 :

17 sc, dec x 6, 5 sc= 28

Info :

Stuff the legs as you work

Round 9 :

16 sc, dec x 4, 4 sc= 24

Round 10 :

15 sc, dec x 4, sc= 20

Round 11 :

12 sc, dec x 4= 16

Info :

Stop stuffing the legs

Round 12 :

(dec, 6 sc) x 2= 14

Round 13 :

sc in each st around

Round 14 :

(dec, 5 sc) x 2= 12

Round 15 :

sc in each st around

Round 16 :

(dec, 4 sc) x 2= 10

Round 17 :

sc in each st around

Info :

F/O and leave a long tail for sewing

β€” Antennaes (Make 2) :

Info :

Starting with Color B: Heart Humps (Make 2)

Round 1 :

Make 6 sc into a magic ring= 6

Round 2 :

(sc, inc) x 3= 9

Round 3 :

sc in each st around

Info :

Do not F/O the 2nd hump!

Round 4 :

Work a single crochet in the 2nd hump to connect the 1st hump and 2nd hump together. Work 8 more sc around, work 9 sc in the next hump= 18

Round 5 :

sc in each st around

Round 6 :

(4 sc, dec) x 3= 15

Round 7 :

(3 sc, dec) x 3= 12

Round 8 :

(2 sc, dec) x 3= 9

Round 9 :

(sc, dec) x 3= 6

Info :

Stop stuffing

Info :

Change to Color A: 10-13. sc in each st around

Info :

F/O and leave a long tail for sewing

β€” Wings (Make 2) :

Round 1 :

Make 6 sc into a magic ring= 6

Round 2 :

Increase in each st around= 12

Round 3 :

(sc, inc) x 6= 18

Round 4 :

(2 sc, inc) x 6= 24

Round 5 :

(3 sc, inc) x 6= 30

Round 6-7 :

sc in each st around

Round 8 :

(3 sc, dec) x 6= 24

Round 9-10 :

sc in each st around

Info :

Do not stuff the wings

Round 11 :

(2 sc, dec) x 6= 18

Round 12-13 :

sc in each st around

Round 14 :

(sc, dec) x 6= 12

Round 15 :

sc in each st around

Info :

F/O and leave a long tail for sewing. !TIP! If you fold the wings in half and sc the opening closed, sewing will be much easier!

β€” Assembly :

Item Name (P1) :

Head and Body: 1. Cut a long strand of white embroidery thread. Insert the needle into the bottom of the head. Bring the needle up to a corner on the bottom of the eye. Insert the needle into a hole around to the top of the eye. Make sure you do not pull the thread too tightly. Repeat on the 2nd eye and weave in the tails. 2. Sew the head to the body. You may need to add stuffing when you get to the last few stitches to close.

Item Name (P1) :

Antennae: 1. Optional: Cut a piece of pipe cleaner in half. Fold the half in half again and twist. Insert the pipe cleaner into the lower half of the antenannae. Cut any excess off. You can choose to stuff them instead. 2. Pin the antennaes onto the head approximately between rounds 6 and 8. 3. Sew the antennaes onto the head.

Item Name (P1) :

Arms: Pin the arms to the side of the body approximately between rounds 21 and 22. Sew the arms onto the body in a forward facing angle.

Item Name (P1) :

Bow: 1. Pin the bow onto the front of the body. 2. Sew the bow onto the neck.

Item Name (P1) :

Legs: 1. Turn the body upside down with the front of the face facing away from you. Pin the legs onto the bottom of the body approximately between rounds 4 and 5. 2. Sew the legs onto the body.

Item Name (P1) :

Wings: 1. Pin the wings onto the back of the body. 2. Sew the wings onto the back of the body.

Item Name (P1) :

Mouth: 1. Thread your needle with a long strand of black thread. Insert the needle into a spot on the side of the head and bring the needle up to a hole on the side of the face. 2. Embroider a smile. 3. Weave in the ends.

Assembly Instructions

  • Attach head to body by sewing the head opening to the top of the body, adding stuffing as needed to close the gap securely.
  • Pin and sew the antennae between rounds 6 and 8 on the head; optionally insert pipe cleaner into antennae for structure before sewing.
  • Position arms on either side of the body between rounds 21 and 22 and sew in a forward-facing angle for a natural pose.
  • Pin legs to the bottom of the body between rounds 4 and 5, sew securely and reinforce stitching for durability.
  • Pin wings to the back of the body and sew them evenly to ensure symmetry and secure attachment.
  • Place and sew the bow at the neck area, then embroider the mouth with black thread and weave in ends.

Important Notes

  • πŸ’‘Do not join rounds unless stated; work in a continuous spiral for smooth amigurumi shaping.
  • πŸ’‘Use a stitch marker to mark the beginning of each round and move it as you progress.
  • πŸ’‘All stitches are worked in both loops unless otherwise stated in the pattern.
  • πŸ’‘Stuff firmly but not too tightly; gradual stuffing helps achieve natural shaping.
  • πŸ’‘Pin parts in place before sewing to ensure correct alignment and symmetry.

This adorable Blue the Butterfly pattern is designed to bring bright smiles and handmade charm to your home. It uses simple shapes and playful details to create a lovable companion you can personalize with your favorite colors. Whether you gift it or keep it, Blue will bring joy and color to any shelf or nursery. πŸ§ΆπŸ¦‹

You ask,

we answer.

FAQs

What size will the finished piece be?

The finished amigurumi measures approximately 11 inches from foot to top of head when made with worsted weight yarn and a 3.25 mm hook.

Can I use different yarn weights for this pattern?

Yes, you can use different yarn weights, but this will change the final size; if you use thicker yarn, use a larger hook and expect a larger butterfly.

Do I need prior crochet experience for this pattern?

This pattern is rated intermediate, so basic knowledge of single crochet, increases, decreases, and working in the round is recommended.

How long does this project typically take to complete?

Most crocheters complete this project in 5-7 hours depending on experience and how much time is spent on assembly and finishing.

Can I make the antennae posable?

Yes, you can insert a folded pipe cleaner inside the antennae for posability; trim any excess and secure before sewing to the head.