🧢 Beautiful ✨ Detailed πŸ’ Adorable

Potion Crochet Amigurumi Pattern

Potion Crochet Amigurumi Pattern
4.0β˜… Rating
5-7 Hours Time Needed
3.6K Made This
βœ‚οΈ

Intermediate Level

Ideal for those with basic crochet experience, featuring slightly more advanced stitches and techniques to expand your skills.

⏱️

Weekend Treat

Takes 5-7 hours, making it an enjoyable project to finish over a couple of days.

🧸

Cute Companion

An adorable friend to cherish, handcrafted with love to bring comfort and joy for years to come.

About This Potion Crochet Amigurumi Pattern

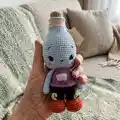
This pattern creates a sweet potion bottle amigurumi with a rounded bottle head, small body, arms and pumpkin-like boots. It uses Yarn Art Jeans yarn and small safety eyes to achieve a delicate, toy-sized finish. You will work in rounds and some rows for small pieces, with clear instructions for shaping and assembly.

Potion Crochet Amigurumi Pattern crochet pattern - detailed view of completed project

Designed for intermediate crocheters, the pattern includes needle sculpting for facial shaping and embroidered details. The finished toy measures about 19 cm with the recommended materials and tension.

Why You'll Love This Potion Crochet Amigurumi Pattern

I absolutely love this pattern because it turns a simple bottle shape into a lovable character with playful details. I enjoyed designing the tiny pocket and pumpkin-style boots that give the toy personality. The shaping is satisfying β€” you can see the piece take form round by round as you crochet. I also love the finishing touches like needle sculpting and embroidered eyebrows that make each toy feel unique and handmade.

Potion Crochet Amigurumi Pattern step 1 - construction progress Potion Crochet Amigurumi Pattern step 2 - assembly progress Potion Crochet Amigurumi Pattern step 3 - details and accessories Potion Crochet Amigurumi Pattern step 4 - final assembly and finishing

Switch Things Up

I love to change colors to give this potion character a new personality; try pastel blues and pinks for a sweet look or rich jewel tones for a mysterious vibe.

You can make a mini keychain version by using a finer yarn and a 1.5 mm hook, then attach a keyring before closing the top neck.

I often swap the safety eyes for embroidered eyes for a softer, child-safe toy that is perfect for babies and toddlers.

Try adding tiny crocheted accessories like a tiny tag, potion label, or miniature cork at the top of the neck for extra charm.

For a seasonal set, make several bottles in coordinating colors and sizes to display together as a themed collection.

I sometimes embroider different mouth shapes to change the expressionβ€”small curves, open smiles, or surprised O shapes work great.

You can change the boots to simple flat shoes by altering rounds and decreasing earlier if you prefer a seated or flat-bottom toy.

I recommend experimenting with different stuffing densities to achieve a softer or firmer look depending on how plush you want your amigurumi to be.

If you want posable limbs, consider adding thin wire inside the arms before finishing, ensuring the wire ends are fully covered and away from children.

I like to add a little blush using fabric-safe markers or powdered chalk around the cheeks to make the face look more lively.

Mixing yarn textures can create interesting effectsβ€”try a boucle or slightly fuzzy yarn for the body while keeping the face in smooth yarn for contrast.

Don't be afraid to redesign the pocket into a tiny pouch or add embroidery motifs to the belly to personalize each potion creation.

Common Mistakes & How to Fix Them

βœ— Skipping the stitch marker when working in continuous rounds leads to lost stitch counts; place a marker at the start of each round and move it as you work to avoid confusion. βœ— Not switching colors neatly can leave loose ends and messy joins; carry the yarn inside when possible or fasten off and weave ends neatly to hide transitions. βœ— Overstuffing the head or body can distort the shaping and make sewing difficult; stuff gradually and evenly, checking the shape as you go to maintain smooth curves. βœ— Forgetting to install safety eyes at the recommended rounds will misplace facial features; install the eyes between the specified rounds (30-31) and measure 13 SC apart before securing them.

Potion Crochet Amigurumi Pattern

Create a charming potion bottle amigurumi with this detailed crochet pattern. You will make a sweet character with a bottle-shaped head, tiny limbs, cute boots, and embroidered facial features. The pattern includes clear round-by-round instructions, tools list, abbreviations, and assembly notes so you can follow along easily. Perfect as a handmade gift or a seasonal decoration to display or give away.

Intermediate 5-7 Hours

Materials Needed for Potion Crochet Amigurumi Pattern

β€” Main Fabric

  • 01
    Yarn Art Jeans (light worsted/DK) color 75 - approximately 20-30g (head/neck accent)
  • 02
    Yarn Art Jeans (light worsted/DK) color 72 - approximately 30-40g (body/arms)
  • 03
    Yarn Art Jeans (light worsted/DK) color 85 - approximately 20-30g (boots/accents)
  • 04
    Yarn Art Jeans (light worsted/DK) color 19 - approximately 10-20g (pocket/detail)
  • 05
    Yarn Art Jeans (light worsted/DK) color 05 - approximately 10-20g (legs/trim)
  • 06
    Black fine yarn for eyelashes embroidery - small amount for facial embroidery

β€” Tools Required

  • 01
    Crochet hook size 1.75mm
  • 02
    Safety/plastic eyes 10-12mm (2 pieces)
  • 03
    Polyester toy stuffing
  • 04
    Chopstick (or stuffing tool) for stuffing
  • 05
    Needle for joining pieces and embroidering
  • 06
    Scissors
  • 07
    Pins for assembly
  • 08
    Stitch marker
  • 09
    Fine black yarn or embroidery thread for eyelashes and facial details

Progress Tracker

0% Complete

β€” Head :

Info :

BEGIN CROCHETING IN GREY

Round 1 :

6SC INTO MR (6)

Round 2 :

6INC (12)

Round 3 :

(1SC, INC)*6 (18)

Info :

WORK INTO BACK LOOPS ONLY

Round 4 :

18SC (18)

Round 5-7 :

18SC (18)

Info :

SWITCH TO BLUE YARN AND WORK INTO BACK LOOPS ONLY

Round 8 :

(2SC, INC)*6 (24)

Round 9-12 :

24SC (24)

Round 13 :

(3SC, INC)*6 (30)

Round 14-15 :

30SC (30)

Round 16 :

(4SC, INC)*6 (36)

Round 17 :

(5SC, INC)*6 (42)

Round 18 :

42SC (42)

Round 19 :

(6SC, INC)*6 (48)

Round 20-21 :

48SC (48)

Round 22 :

(7SC, INC)*6 (54)

Round 23-34 :

54SC (54)

Round 35 :

(7SC, DEC)*6 (48)

Round 36 :

BLO (6SC, DEC)*6 (42)

Round 37 :

(5SC, DEC)*6 (36)

Round 38 :

(4SC, DEC)*6 (30)

Round 39 :

(3SC, DEC)*6 (24)

Info :

RETURN TO ROUND 8, WORK ACROSS THE FRONT LOOPS

Info :

INSTALL EYES BETWEEN ROUNDS 30-31, 13SC APART

β€” Legs and Body :

Round 1 :

CHAIN 7, STARTING TO THE 2ND ST FROM HOOK WORK 5SC, 4SC TO 1 ST, 4SC, INC (13)

Round 2 :

INC, 4SC, 4INC, 4SC, 2INC (22)

Round 3 :

1SC, INC, 4SC, (1SC, INC)*4, 4SC, (1SC, INC)*2 (29)

Round 4 :

2SC, INC, 4SC, (2SC, INC)*4, 4SC, (2SC, INC)*2 (36)

Round 5-7 :

36SC (36)

Round 8 :

12SC, 6DEC HDC, 12SC (30)

Round 9 :

(3SC, DEC)*6 (24)

Round 10 :

3SC, DEC, (1SC, DEC)*5, 4SC (18)

Round 11 :

2SC, DEC, (4SC, DEC)*2, 2SC (15)

Info :

CHANGE YARN COLOR

Round 12 :

15SC (15)

Info :

WORK INTO BACK LOOPS ONLY

Round 13 :

15SC (15)

Round 14-17 :

15SC (15)

Info :

RETURN TO ROUND 13 AND WORK 15DC

Info :

WORK 5SC ADDITIONALLY ACROSS THE SECOND LEG

Info :

CUT YARN ON THE SECOND LEG, BUT DO NOT BREAK YARN ON THE SECOND ONE, GO ON WORKING ACROSS LEG #1: 15SC AND THEN ACROSS LEG #2: 15SC

Round 19 :

(4SC, INC)*6 (36)

Round 20 :

36SC (36)

Info :

CHANGE YARN COLOR

Round 21 :

36SC (36)

Info :

WORK INTO BACK LOOPS ONLY

Round 22 :

36SC (36)

Round 23-25 :

36SC (36)

Round 26 :

(4SC, DEC)*6 (30)

Round 27 :

30SC (30)

Round 28 :

(3SC, DEC)*6 (24)

Round 29-31 :

24SC (24)

Info :

RETURN TO ROUND 22, WORK 36DC

β€” Arms :

Round 1 :

6SC INTO MR (6)

Round 2 :

6INC (12)

Round 3 :

12SC (12)

Round 4 :

10SC, DEC (11)

Round 5 :

9SC, DEC (10)

Round 6-14 :

10SC (10)

Info :

A ROW THROUGH BOTH EDGES WORK

β€” Veins on the boots :

Item :

10CH, TURN AND STARTING TO THE 2ND ST FROM HOOK WORK 9 SL ST

β€” Pocket :

Row 1 :

5CH, TURN YOUR WORK

Row 2 :

INC, 2SC, INC (6SC) TURN YOUR WORK

Row 3 :

6SC (6)

Info :

SEW IT ON THE BELLY

β€” Face and Finishing :

Info :

MAKE FACE NEEDLE SCULPTING, SEND YOUR NEEDLE FROM BELOW THE NECK TO THE PLACE UNDER ONE OF THE EYES, AND GO BACK DOWN 1 ST AWAY, PULL. REPEAT THE STEPS ABOVE FOR THE SECOND EYE. PULL AND TIE KNOTS.

Info :

EMBROIDER BROWS AND A SMILE.

Assembly Instructions

  • Install the safety/plastic eyes between rounds 30-31 of the head measuring 13 single crochet stitches apart, then secure and fasten backs.
  • Sew the pocket onto the belly area after completing the pocket rows, ensuring it is centered on the front of the body.
  • Perform face needle sculpting by sending the needle from below the neck to the place under one eye, pull back down 1 stitch away, repeat for the second eye, then pull and tie knots; finish by embroidering brows and a smile.
  • Join the legs and body as instructed by working across leg #1 and leg #2 and cutting yarn on the second leg only when instructed to continue without breaking the flow.

Important Notes

  • πŸ’‘Use a stitch marker to mark the beginning of each round, especially where the pattern specifies changes and front/back loop work.
  • πŸ’‘Stuff pieces gradually and evenly; overstuffing can distort shaping while understuffing will make seams floppy.
  • πŸ’‘Pin parts in position before sewing to check placement and symmetry, especially the pocket and eyes.
  • πŸ’‘Weave in ends securely and hide tails inside the body to prevent unraveling and give a tidy finish.

This lovely Potion amigurumi is a sweet handmade gift and seasonal decor piece, crafted with care for a whimsical touch. It combines toy-sized charm with tiny details like a stitched face and pocket to make each piece unique. Share your finished creation and tag the designer to spread the handmade love! 🧢πŸ§ͺ

You ask,

we answer.

FAQs

What size will the finished piece be?

The finished amigurumi measures approximately 19 cm tall when using the recommended Yarn Art Jeans yarn and a 1.75 mm hook; size may vary with tension and yarn choice.

Can I use different yarn weights for this pattern?

Yes, you can use different yarn weights, but altering the weight will change the final size and the recommended hook; adjust hook size accordingly and be prepared for proportion differences.

Do I need prior crochet experience for this pattern?

This pattern is rated intermediate, so basic crochet skills like MR, SC, INC, DEC, working into BLO/FLO, and reading round-by-round instructions are recommended for best results.

How long does this project typically take to complete?

Most crocheters finish this project in about 5-7 hours, though time may vary by experience level, familiarity with amigurumi techniques, and the pace of sewing and finishing.