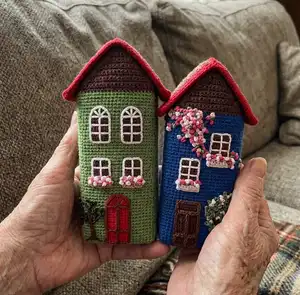
🧢 Beautiful ✨ Detailed πŸ’ Adorable

Big Houses Crochet Pattern

Big Houses Crochet Pattern
4.4β˜… Rating
12-15 Hours Time Needed
1.3K Made This
βœ‚οΈ

Intermediate Level

Ideal for those with basic crochet experience, featuring slightly more advanced stitches and techniques to expand your skills.

⏱️

Multi-Day Project

A rewarding 12+ hour journeyβ€”perfect for dedicated crafters who love detailed work.

🏑

Cozy Accent

A warm touch for your space that transforms ordinary corners into inviting nooks filled with handmade charm.

About This Big Houses Crochet Pattern

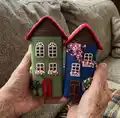
This pattern creates tall, structured crochet houses with an inner and outer shell and a removable cardboard template for support. Youll crochet round-by-round for the body and work back-and-forth rows for the roof, then join parts and add felt and embroidered details. Techniques include working through posts, creating neat corners, and inserting cardboard templates for stability.

Big Houses Crochet Pattern crochet pattern - detailed view of completed project

Clear step-by-step photos and exact stitch counts are included to help you follow along confidently. Colors and embellishments are fully customizable to suit your decor or gift ideas.

Why You'll Love This Big Houses Crochet Pattern

I absolutely love this pattern because it turns simple crochet into a charming architectural keepsake you can display proudly. I enjoy the satisfying precision of working the outer and inner shells and inserting a cardboard template for a clean, stable finish. The combination of rounds and back-and-forth roof shaping keeps each stage interesting and varied. I also love how easily you can make each house unique by changing yarn colors and felt detailsβ€”it feels like crafting a tiny home with personality.

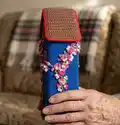
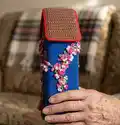
Big Houses Crochet Pattern step 1 - construction progress Big Houses Crochet Pattern step 2 - assembly progress Big Houses Crochet Pattern step 3 - details and accessories Big Houses Crochet Pattern step 4 - final assembly and finishing

Switch Things Up

I love customizing the colors of these houses; try pastel shades for a soft nursery set or bright primary colors for a playful look.

I often switch to a thicker DK or aran yarn and a larger hook to make chunky, cuddly versions for a different scale.

For a tiny keychain size, use fingering yarn and a very small hook and scale down the cardboard templates accordingly.

I add tiny beads and sequins to the flowerbeds for a sparkly, festive effect when making holiday houses.

Try embroidering different window shapes or adding curtains in contrasting felt to change the personality of each house.

I sometimes create matching sets with different roof textures by combining FLO or BLO rounds or by surface crochet for shingles.

Use painted or patterned paper instead of felt for modern, graphic doors and windows if you prefer crisp lines and less stitching.

Make a whole street by varying heights and widths: adjust the number of rounds in the body or add extra rows to make taller or shorter buildings.

I recommend experimenting with different cardboard thicknesses; a slightly thinner cardboard can make the house easier to insert but less rigid, so balance according to your display needs.

For posable scenes, add a small cotton stuffing inside and a magnet in the base to attach to a metal tray or board to create a customizable village display.

Common Mistakes & How to Fix Them

βœ— Skipping the stitch marker at the start of the corner rounds causes uneven corners; place a marker in the 2nd stitch (3 sc) to keep the corners accurate. βœ— Crocheting too loosely will show stuffing or cause floppy sides; maintain tight, consistent tension and use a smaller hook if needed. βœ— Failing to insert the cardboard template snugly will distort the house shape; cut and glue the cardboard as instructed and insert it before finishing the sides. βœ— Not drawing the yarn tails to the outer side when instructed can create visible tails; always pull tails through to the outer side and hide or weave them between parts. βœ— Rushing the roof shaping can produce mismatched heights; follow the exact back-and-forth row counts and adjust by unraveling or adding a row until both halves match.

Big Houses Crochet Pattern

Make charming, tall crocheted houses that double as decorative toys or cozy shelf accents. This pattern guides you step-by-step through crocheting the outer and inner house shells, adding rigid cardboard supports, and finishing roofs and felt details. Youll enjoy a mix of rounds, back-and-forth rows, and simple assembly techniques that create a polished handmade house. Perfect for gifting or seasonal display, each house is fully customizable with color and embellishments.

Intermediate 12-15 Hours

Materials Needed for Big Houses Crochet Pattern

β€” Main Fabric

  • 01
    DK weight yarn - Alize Cotton Gold (55% cotton/45% acrylic; 100 g/330 m)
  • 02
    Color No.485 Green - main body (approx. one skein depending on size)
  • 03
    Color No.493 Brown - roof and trim (small amount)
  • 04
    Color No.56 Red - door accents (small amount)
  • 05
    Color No.141 Blue - alternate house color option (small amount)
  • 06
    Embroidery thread 100% cotton - brown, light brown, white, multiple shades of pink, two to three shades of green for flowers and details
  • 07
    Thin firm felt - brown, light brown, red, white for windows, door and pots
  • 08
    Cardboard for the bottom, roofs, and inner template (from a tea box or similar)

β€” Tools Required

  • 01
    Crochet hook size 2.25 mm
  • 02
    Tapestry needle (yarn/sewing needle)
  • 03
    Scissors
  • 04
    Stitch markers (use a contrasting yarn strand or plastic markers)
  • 05
    Polyester stuffing (optional for decorative inserts)
  • 06
    Cardboard pieces for bottoms and roofs (e.g., tea box cardboard)
  • 07
    Glue for gluing cardboard
  • 08
    White permanent marker (for drawing details on felt)
  • 09
    Pencil (for tracing templates)
  • 10
    Pins for assembly (to hold parts while sewing)

Progress Tracker

0% Complete

β€” HOUSE No.1 (the outer part) :

Info :

YARN - Alize Cotton Gold No.485 (green) and a 2.25 mm crochet hook.

Round 1 :

8 into MR (8)

Info :

Place a stitch marker in the 2nd stitch (3 sc) in order not to lose the corner.

Round 2 :

1 sc, (3 sc in 1 stitch), 1 sc, (3 sc in 1 stitch), 1 sc, (3 sc in 1 stitch), 1 sc, (3 sc in 1 stitch) (16)

Round 3 :

2 sc, (3 sc in 1 stitch), 3 sc, (3 sc in 1 stitch), 3 sc, (3 sc in 1 stitch), 3 sc, (3 sc in 1 stitch) (24)

Round 4 :

4 sc, (3 sc in 1 stitch), 5 sc, (3 sc in 1 stitch), 5 sc, (3 sc in 1 stitch), 5 sc, (3 sc in 1 stitch) (32)

Round 5 :

6 sc, (3 sc in 1 stitch), 7 sc, (3 sc in 1 stitch), 7 sc, (3 sc in 1 stitch), 7 sc, (3 sc in 1 stitch) (40)

Round 6 :

8 sc, (3 sc in 1 stitch), 9 sc, (3 sc in 1 stitch), 9 sc, (3 sc in 1 stitch), 9 sc, (3 sc in 1 stitch) (48)

Round 7 :

10 sc, (3 sc in 1 stitch), 11 sc, (3 sc in 1 stitch), 11 sc, (3 sc in 1 stitch), 11 sc, (3 sc in 1 stitch) (56)

Round 8 :

12 sc, (3 sc in 1 stitch), 13 sc, (3 sc in 1 stitch), 13 sc, (3 sc in 1 stitch), 13 sc, (3 sc in 1 stitch) (64)

Round 9 :

14 sc, (3 sc in 1 stitch), 15 sc, (3 sc in 1 stitch), 15 sc, (3 sc in 1 stitch), 15 sc, (3 sc in 1 stitch) (72)

Round 10 :

16 sc, (3 sc in 1 stitch), 17 sc, (3 sc in 1 stitch), 17 sc, (3 sc in 1 stitch), 17 sc, (3 sc in 1 stitch) (80)

Round 11 :

18 sc, (3 sc in 1 stitch), 19 sc, (3 sc in 1 stitch), 19 sc, (3 sc in 1 stitch), 19 sc, (3 sc in 1 stitch) (88)

Info :

* Crochet the next round through the posts between stitches: insert the hook in the first stitch and draw it out in the second stitch, grabbing the working yarn and making sc.

Round 12 :

88 sc (between the posts)

Round 13-15 :

88 sc (3 rounds)

Info :

Trace the bottom of the square on cardboard and cut it out. If you use thin cardboard then cut two squares. Insert the cardboard template into the bottom of the house. Do not cut yarn.

Round 16-60 :

88 sc (45 rounds)

Info :

Prepare cardboard for the wools of the house (tea box cardboard recommended). Glue the cardboard and insert the template into the crocheted part. Mark the corners counting 22 stitches from four sides and place stitch markers.

Info :

Attach brown yarn (Alize cotton Gold No.493). Cut green yarn. Work in back and forth rows to make the roof top on the marked corner sections.

Item Name (roof rows P1) :

Row 1: 22 sc, turn

Round/Row 2 :

Row 2: 21 sc, turn

Round/Row 3 :

Row 3: 19 sc, turn

Round/Row 4 :

Row 4: 17 sc, turn

Round/Row 5 :

Row 5: 15 sc, turn

Round/Row 6 :

Row 6: 13 sc, turn

Round/Row 7 :

Row 7: 11 sc, turn

Round/Row 8 :

Row 8: 9 sc, turn

Round/Row 9 :

Row 9: 7 sc, turn

Round/Row 10 :

Row 10: 5 sc, turn

Round/Row 11 :

Row 11: 3 sc, turn

Round/Row 12 :

Row 12: 1 sc, turn. Break yarn.

Info :

Attach brown yarn to the marked point on the opposite side of the house and work in back and forth rows similarly to form the second roof triangle. Break yarn and hide tails.

β€” HOUSE No.1 (the inner part) :

Info :

The bottom of the inner part will be smaller than the outer part by one row. YARN - Alize Cotton Gold No.485 (green) and a 2.25 mm crochet hook.

Round 1 :

8 into MR (8)

Round 2 :

1 sc, (3 sc in 1 stitch), 1 sc, (3 sc in 1 stitch), 1 sc, (3 sc in 1 stitch), 1 sc, (3 sc in 1 stitch) (16)

Round 3 :

2 sc, (3 sc in 1 stitch), 3 sc, (3 sc in 1 stitch), 3 sc, (3 sc in 1 stitch), 3 sc, (3 sc in 1 stitch) (24)

Round 4 :

4 sc, (3 sc in 1 stitch), 5 sc, (3 sc in 1 stitch), 5 sc, (3 sc in 1 stitch), 5 sc, (3 sc in 1 stitch) (32)

Round 5 :

6 sc, (3 sc in 1 stitch), 7 sc, (3 sc in 1 stitch), 7 sc, (3 sc in 1 stitch), 7 sc, (3 sc in 1 stitch) (40)

Round 6 :

8 sc, (3 sc in 1 stitch), 9 sc, (3 sc in 1 stitch), 9 sc, (3 sc in 1 stitch), 9 sc, (3 sc in 1 stitch) (48)

Round 7 :

10 sc, (3 sc in 1 stitch), 11 sc, (3 sc in 1 stitch), 11 sc, (3 sc in 1 stitch), 11 sc, (3 sc in 1 stitch) (56)

Round 8 :

12 sc, (3 sc in 1 stitch), 13 sc, (3 sc in 1 stitch), 13 sc, (3 sc in 1 stitch), 13 sc, (3 sc in 1 stitch) (64)

Round 9 :

14 sc, (3 sc in 1 stitch), 15 sc, (3 sc in 1 stitch), 15 sc, (3 sc in 1 stitch), 15 sc, (3 sc in 1 stitch) (72)

Round 10 :

16 sc, (3 sc in 1 stitch), 17 sc, (3 sc in 1 stitch), 17 sc, (3 sc in 1 stitch), 17 sc, (3 sc in 1 stitch) (80)

Info :

* Crochet the next round through the posts between stitches making sc as described earlier.

Round 11 :

80 sc (between the posts)

Round 12-56 :

80 sc (45 rounds)

Info :

Draw the yarn tail to the right side. Insert the inner part into the outer part and check if heights match. Adjust by completing or unraveling a row if needed. Break yarn when finished and hide tails between parts.

β€” Join and Assembly :

Info :

Divide the top round into 22 and 18 stitches using pins. The 18 stitches are the left and right sides of the house, and 22 stitches are the front and back sides of the house. Mark corners with pins.

Instruction :

Insert the inner part of the house into the outer part. Hide all yarn tails between the parts.

Instruction :

Join both parts of the house by crocheting through both pieces: Crochet 15 sc (chain 1 on the top of the house) through both parts along the edge to the top. Move downward, crocheting 15 sc through both parts. Hide the yarn tail inside the part and cut the excess yarn.

Instruction :

Join both parts of the house on the opposite side: crochet 15 sc (chain 1 on the top of the house) through both parts to the top. Move downward, crocheting 15 sc through both parts. Hide and trim tails.

Instruction :

Join the left and right parts of the house: sew the left and right parts of the house with the yarn tail approx. 50 cm (20 inches) long. Sew the last stitches on the outer part into one stitch of the inner part (outer has 22 stitches, inner has 18). Hide the yarn tail inside the house and trim the excess.

Info :

Insert the cardboard roof templates: trace the perimeter of the roof with a pencil and cut the cardboard slightly smaller (about 0.5 cm) than crocheted piece. Insert templates and glue as needed for a neat finish.

Info :

Finish by adding felt windows, doors, and flowerpots: make templates from paper, cut felt pieces, glue and embroider as shown. Use white permanent marker for drawing details if required.

β€” HOUSE DESIGN :

Info :

Make templates from a sheet of paper for four windows, a front door, and two trapeziums for flowerpots. Trace templates on felt, cut and attach to the house. Embroider details with muline threads following the photos.

Assembly Instructions

  • Insert the cardboard bottom template into the crocheted square and glue if needed; if using thin cardboard cut two pieces and insert them together for strength.
  • Insert the inner (smaller) house part into the outer part and check heights; adjust by adding or unraveling rows so both parts match evenly before joining.
  • Use stitch markers to divide the top round into front/back (22 stitches) and left/right (18 stitches), then sew or crochet both parts together along the top edges as instructed.
  • Sew the left and right side seams, aligning outer and inner pieces carefully (outer side has 22 stitches, inner side 18); hide yarn tails inside the house when finished.
  • Glue or sew felt windows, doors and trapizium flowerpots onto the front; embroider door details and attach flower embellishments using muline threads for a polished look.

Important Notes

  • πŸ’‘Use stitch markers to keep track of corners and sides to ensure correct shaping and alignment.
  • πŸ’‘Crochet tightly enough that stuffing or inner cardboard does not show through the stitches; a smaller hook helps achieve a dense fabric.
  • πŸ’‘Trace and cut cardboard templates slightly smaller than crocheted pieces (about 0.5 cm) so they insert easily and hold shape.
  • πŸ’‘Pin and check placement before sewing parts together to avoid misalignment and ensure both parts sit flush.
  • πŸ’‘Weave in or hide yarn tails between inner and outer parts as you go to avoid visible ends after assembly.

Create a delightful row of handmade houses to brighten shelves, mantels, or gifts β€” each one is a tiny work of art full of personality. Customize colors, felt details, and embroidery to tell your own story with every house. These cozy homes make warm holiday decorations or thoughtful, handcrafted presents. 🧡🏑✨

You ask,

we answer.

FAQs

What size will the finished piece be?

The finished house measures approximately 17.5-19.5 cm (6.9-7.7 inches) in height when using the recommended yarn and hook size and following the pattern instructions.

Can I use different yarn weights for this pattern?

Yes, you can use different yarn weights, but this will change the final size and stitch counts. If switching yarn weight, adjust your hook size and make a gauge swatch to ensure the cardboard templates and overall proportions still work.

Do I need prior crochet experience for this pattern?

This pattern is rated intermediate and assumes you are comfortable with single crochet, increases, decreases, working in the round, and back-and-forth rows. Knowledge of working through post stitches is helpful.

How long does this project typically take to complete?

Most crafters complete one house in about 12-15 hours, depending on experience, customization, and time spent on felt and embroidered details.