๐Ÿงถ Beautiful โœจ Detailed ๐Ÿ’ Adorable

Bee-utiful Pimp Your Bag Pattern

Bee-utiful Pimp Your Bag Pattern
4.3โ˜… Rating
5-7 Hours Time Needed
3.0K Made This
โœ‚๏ธ

Intermediate Level

Ideal for those with basic crochet experience, featuring slightly more advanced stitches and techniques to expand your skills.

โฑ๏ธ

Weekend Treat

Takes 5-7 hours, making it an enjoyable project to finish over a couple of days.

โœจ

Stylish Touch

An elegant detail to elevate any look, combining traditional techniques with contemporary design sensibilities.

About This Bee-utiful Pimp Your Bag Pattern

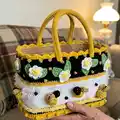
This pattern shows you how to crochet decorative panels and motifs to 'pimp' a regular straw bag into a summery, bee-themed accessory. Youll make flowers, leaves, bobbles and little bees and attach them to a strap-fitting crocheted cover. The design mixes several Scheepjes yarns to create textured stripes, sparkly gold highlights and fluffy effects.

Bee-utiful Pimp Your Bag Pattern crochet pattern - detailed view of completed project

Detailed step-by-step instructions are included for each motif: flower, leaf and bee, plus finishing notes for attaching everything to your straw bag. The finished piece is playful, sturdy and perfect for sunny days out.

Why You'll Love This Bee-utiful Pimp Your Bag Pattern

I absolutely love this pattern because it combines texture, color and playful motifs to make a truly unique bag cover. I enjoy how the bobble stitch adds a bouncy, tactile detail that brings the bees and flowers to life. The pattern encourages mixing yarn types โ€” soft, twinkle and panda โ€” which gives a lovely contrast and a luxurious finish. Making the small bees is such a satisfying mini-project inside the larger bag cover, and they make delightful embellishments or an optional keychain. Overall, it is a fun, creative project that rewards you with a wearable piece full of personality.

Bee-utiful Pimp Your Bag Pattern step 1 - construction progress Bee-utiful Pimp Your Bag Pattern step 2 - assembly progress Bee-utiful Pimp Your Bag Pattern step 3 - details and accessories Bee-utiful Pimp Your Bag Pattern step 4 - final assembly and finishing

Switch Things Up

I love the versatility of this bag cover and often change yarn colors to match seasons or outfits. Try soft pastels for a springtime look or deep jewel tones for autumn.

You can make a miniature version for a keychain by using thinner yarn and a smaller hook; the bees and flowers scale down beautifully.

I sometimes replace the gold twinkle yarn with a metallic thread for a subtler shimmer, or swap the Scheepjes Panda for a fluffy eyelash yarn for extra texture.

If you want a sturdier cover, crochet two identical panels and sew them together around the edges for added structure and warmth.

To personalize, embroider initials onto one side of the bag or add tiny crocheted letters among the flowers for a name or message.

For a beach-ready version, use cotton yarns to make the cover more washable and durable against sand and sun exposure.

I also enjoy making matching accessories โ€” a small coin purse or phone pouch decorated with the same motifs ties the look together nicely.

Experiment with motif placement: cluster flowers for a bouquet effect or stagger bees and bobbles for a playful scattered design.

Try attaching leather handles or repurposing vintage bag handles to elevate the finished look and add contrast to the crocheted texture.

Dont be afraid to swap stitch patterns in the striped sections โ€” a row of shell stitches or hdc ribs can change the bag's character dramatically.

If youre short on time, make fewer bees and larger flowers for bold impact without as many small pieces to sew on.

I often use different colored beads for the bee eyes to create little personalities; mix black and gold for variety.

Common Mistakes & How to Fix Them

โœ— Crocheting the panel too tightly will make it hard to slide over the straw bag; loosen your tension slightly and check fit before finishing; resew edges if adjustment is needed. โœ— Not measuring the starting chain to fit the bag circumference can cause mismatch and wrinkling; measure and adjust the number of chains to match the 84 cm circumference before working in the round. โœ— Forgetting to stuff the bee bodies properly makes them squashed and misshapen; stuff gradually and firmly so the heads and bodies keep their round shapes. โœ— Skipping the step to sew the crocheted top and bottom to the straw bag allows shifting; securely stitch the top and bottom edges to the bag to keep the cover stable. โœ— Misplacing flowers or leaves without pinning causes uneven placement; pin motifs in position and check spacing before permanently sewing them on. โœ— Not finishing and weaving in ends as you go results in many loose tails at the end; fasten off and weave ends as you complete each motif for a neat finish.

Bee-utiful Pimp Your Bag Pattern

Transform a simple straw bag into a bright, summery statement piece with cheerful flowers, leaves, bobbles and tiny bees. This pattern guides you through crocheting decorative panels to fit around a straw bag, adding texture and playful details. Youll love how the mix of yarns and bobble stitches brings fun and dimension to an everyday accessory. Perfect for gifting or making a unique bag that turns heads.

Intermediate 5-7 Hours

Materials Needed for Bee-utiful Pimp Your Bag Pattern

โ€” Main Fabric

  • 01
    Straw bag with a circumference of 84 cm, 21 cm tall (base item to decorate)
  • 02
    Scheepjes Colour Crafter yarn - Black (Ede 1002)
  • 03
    Scheepjes Colour Crafter yarn - White (Barneveld 1005)
  • 04
    Scheepjes Colour Crafter yarn - Yellow Ochre (Eindhoven 1114)
  • 05
    Scheepjes Softy yarn - Yellow (489)
  • 06
    Scheepjes Panda yarn - White (581)
  • 07
    Scheepjes Softfun yarn - Denim Green (506)
  • 08
    Scheepjes Twinkle yarn - Gold (941)
  • 09
    Yarn from Scheepjes.com (all listed yarns)

โ€” Tools Required

  • 01
    5 mm crochet hook
  • 02
    Fiberfill stuffing for the bees
  • 03
    Gold-colored beads (rocaille beads)
  • 04
    Keychain with ring (optional)

Progress Tracker

0% Complete

โ€” Individual bobbles :

Info :

For this bag, youll be using the bobble stitch in addition to the usual stitches. Crochet the bobble stitch as follows: Draw up the yarn through your work so that you have a loop on the hook. Yarn over the hook, insert the hook in the same spot and draw the yarn up, rep this 2 more times: you now have 7 loops on your hook. Yarn over the hook and draw the yarn through the 7 loops, crochet 1 ch. Insert the hook into the work, draw up the yarn and end with 1 sl st. Pull the thread tight and fasten off.

โ€” Bag :

Info :

Crochet the bag with sc around and from the top down. Crochet a starting chain that fits around the circumference of the bag. Dont crochet too loosely, but it shouldnt be too tight either.

Round 1-13 :

Crochet 6 cm sc with black, change to yellow ochre

Round 14-18 :

Crochet 2 cm sc, change to Barneveld white

Round 19-35 :

Crochet 7 cm sc, change to yellow

Round 36 :

Crochet sc with gold

Round 37-40 :

Crochet 1 cm sc with yellow, change to black

Round 41-42 :

Crochet 1 cm sc, change to yellow ochre

Round 43-47 :

Crochet 2 cm sc, change to black

Round 48-53 :

Crochet 2 cm sc

Info :

The total height of your work should now be 21 cm. Fasten off all threads and slide your crocheted work over the bag. Crochet another 2 rounds of sc on top of the beginning round. Skip a couple of sc where the straps are. Continue with yellow ochre.

Round 1 :

1 sc, *5 ch, skip 4 sc, 1 sc*, rep from * to *

Round 2 :

Crochet around the ch-loop from the previous round *1 sc, 1 hdc, 1 dc, 1 hdc, 1 sc*, rep from * to *

Info :

Finishing the bag: Crochet a gold chain onto Round 14. Crochet a Panda white chain onto Round 18. Crochet a gold chain onto Round 47. Crochet yellow bobbles around the bag spaced 3.5 cm apart onto Round 45.

โ€” Flower :

Round 1 :

With white, make a MR. 18 sc in the MR, join with 1 sl st.

Round 2 :

*3 ch, 1 dc in the next sc, 3 ch, 1 sl st in the next sc*. This is the first petal. Rep 5 more times from * to * (= 6 flower petals in total). Fasten off.

Info :

Continue with yellow. Crochet from the middle 1 sc around the sc from the previous round, skip 1 sc, 1 sc, rep until you have made 9 sc, fasten off.

โ€” Leaf :

Info :

With green, make a chain with 9 ch. Crochet 1 sc in to the 2nd ch from the hook, 1 hdc in the next ch, then 1 dc, 1 tr, 1 dc, 1 hdc, 1 sc, 2 ch and continue on the other side of the chain. Crochet into the 8 stitches: 1 sc, 1 hdc, 1 dc, 1 tr, 1 dc, 1 hdc and 1 sc. Fasten off, leaving a long tail. Make as many leaves as you want in the same way and sew them underneath the flowers.

โ€” Bee :

Head :

With black, make a MR. Round 1: 6 sc in the MR. Round 2: 2 sc in every sc (= 12). Round 3: 12 sc. Round 4: sc2tog (= 6). Fasten off, leaving a long tail. Stuff the head.

Body :

With yellow ochre, make a MR. Round 1: 6 sc in the MR. Round 2: 2 sc in every sc (= 12), change to gold. Round 3: 1 sc, 2 sc in next sc (= 18), change to yellow ochre. Round 4: 18 sc, change to gold. Round 5: 18 sc, change to yellow ochre. Round 6: 1 sc, sc2tog, rep (= 12). Round 7: sc2tog (= 6). Fasten off. Stuff the body. Sew the open sides of the head and the body together.

Wings (2 x) :

Make a MR with gold. Round 1: 6 sc in the MR, turn. Round 2: 2 hdc in every sc, fasten off. Sew the wings onto the body.

Finishing the bee :

Sew 2 gold-colored beads (rocaille beads) onto the bees head for the eyes.

Finishing :

Crochet 10 flowers and leaves and 8 bees (with an optional extra bee for the keychain). Attach the leaves underneath the flowers and attach them to the black part of the bag (= Round 1-13). Sew the bees onto the white part of the bag (= Round 19-35). Using the gold, crochet several bobbles among the flowers and with black and white several bobbles around the bees. Attach the extra bee to the keychain if you are using a keychain. To prevent the crocheted work from shifting, sew the top and bottom part of the crocheted bag to the straw bag. Fold the black bottom edge over as you do this.

Assembly Instructions

  • Attach leaves underneath each flower and sew the assembled flowers onto the black section of the bag (the portion made in Rounds 1-13) using a yarn tail and whipstitch for security.
  • Sew the bees onto the white middle section of the bag (the portion made in Rounds 19-35), spacing them evenly and using a long tail to firmly attach each bee through the crocheted fabric.
  • Stitch the top and bottom edges of the crocheted cover to the straw bag to prevent shifting; fold the black bottom edge over the bag edge and sew through both layers for a neat finish.
  • Attach an optional extra bee to a keychain ring and fasten the keychain to a handle or ring on the bag for a removable charm.
  • Add gold and colored bobbles as specified, spacing the yellow bobbles approximately 3.5 cm apart around Round 45, and sew on gold rocaille beads for bee eyes.
  • Pin motifs and handles into position before final sewing to ensure symmetry and even spacing, then tack and finish by weaving in all tails.

Important Notes

  • ๐Ÿ’กMeasure the starting chain to match the straw bag circumference (84 cm) before joining to avoid a mismatched fit.
  • ๐Ÿ’กDont crochet too tightly; the cover must slide over the straw bag but still sit snugly when sewn in place.
  • ๐Ÿ’กStuff the bees firmly but not overstuffed so they keep a round, stable shape without bursting seams.
  • ๐Ÿ’กSew the crocheted cover to the straw bag at the top and bottom edges to prevent the work from shifting during use.
  • ๐Ÿ’กPin parts in place before sewing to check placement of flowers, leaves and bees for consistent spacing.

This bright Bee-utiful bag cover turns a plain straw bag into a buzzing summer accessory full of texture and charm. The mix of soft yarns, sparkly gold and playful bobbles makes each detail pop. Make it for yourself or as a sunny gift that will bring smiles every time its used. ๐Ÿ๐Ÿงถ

You ask,

we answer.

FAQs

What size will the finished piece be?

The crocheted cover is designed to fit a straw bag with a circumference of 84 cm and a height of 21 cm; adjust your starting chain if your bag dimensions differ.

Can I use different yarn weights for this pattern?

You can substitute yarns but this will change the final size and texture; match yarn types and check gauge, and adjust hook size as needed for fit.

Do I need prior crochet experience for this pattern?

This pattern is rated intermediate, so familiarity with magic ring, bobble stitch, increases/decreases and sewing motifs is recommended.

How long does this project typically take to complete?

Most crafters complete this project in 5-7 hours, including crocheting motifs and sewing everything onto the straw bag.

How many motifs do I need to make?

Make 10 flowers (with leaves) and 8 bees for the bag, plus an optional extra bee if you want a keychain charm.