🧶 Beautiful ✨ Detailed 💝 Adorable

Bee No Sew Amigurumi Pattern

Bee No Sew Amigurumi Pattern
4.9★ Rating
2-3 Hours Time Needed
1.7K Made This
✂️

Intermediate Level

Ideal for those with basic crochet experience, featuring slightly more advanced stitches and techniques to expand your skills.

⏱️

Bite-Sized Project

Finishes in 2-4 hours—perfect for an afternoon of creative relaxation.

🧸

Cute Companion

An adorable friend to cherish, handcrafted with love to bring comfort and joy for years to come.

About This Bee No Sew Amigurumi Pattern

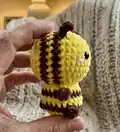
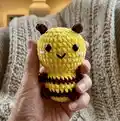
This pattern creates a small, no-sew bee amigurumi worked from the body up into the head using super bulky yarn. It features color changes for bee stripes, bobble stitches for legs, and a simple picked-up beard detail. The pattern is designed to be quick to make while yielding a charming finished toy.

Bee No Sew Amigurumi Pattern crochet pattern - detailed view of completed project

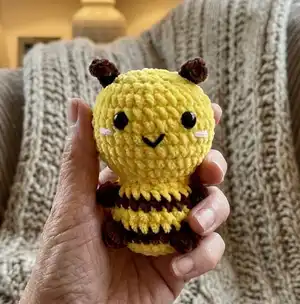
Detailed round-by-round instructions and assembly notes are included, plus placement guidance for eyes and embroidered features. No separate sewing of body parts required — everything is crocheted in place.

Why You'll Love This Bee No Sew Amigurumi Pattern

I absolutely love this pattern because it turns simple stitches into a delightfully characterful bee in just a few hours. I enjoy how the bobble stitch details add texture and personality without complicated assembly. The no-sew construction is one of my favorite parts — it keeps the project neat and beginner-friendly while still teaching increases, decreases, and front/back loop techniques. Making several in different colorways is addictive and makes perfect little gifts.

Bee No Sew Amigurumi Pattern step 1 - construction progress Bee No Sew Amigurumi Pattern step 2 - assembly progress Bee No Sew Amigurumi Pattern step 3 - details and accessories Bee No Sew Amigurumi Pattern step 4 - final assembly and finishing

Switch Things Up

I love customizing this bee by changing the stripe colors; try pastel colors for a soft nursery friend or bright contrasting yarn for a bold look.

You can make the bee smaller or larger by switching yarn weight and hook size — use a thinner yarn for tiny keychain bees or bulky yarn for a chunky plush.

I often add tiny crocheted wings or a loop for hanging to turn the bee into an ornament or keychain accessory.

Try embroidering different facial expressions: a small smile, a surprised 'o', or sleepy eyes to change personality instantly.

Swap the bobble stitch rows for simple clusters if you prefer a flatter look for the legs and accents.

To make a set, create multiple bees in a rainbow palette and attach them to a ribbon for a cute garland.

I sometimes add safety-stitched tiny felt antennae for durability if the toy will be handled often by children.

If you want poseable limbs, consider inserting thin craft wire into the bobble legs before finishing and covering with additional stuffing.

For gifting, stitch a tiny scarf or hat in a complementary color to make the bee extra special and personalized.

Experiment with eyelash yarn or sequin eyes for a different surface texture and sparkle; always secure any small parts if the toy will go to young children.

Common Mistakes & How to Fix Them

✗ Skipping stitch markers during rounds with increases and decreases can throw off your stitch count; place a marker at the start of each round and move it up to keep count accurate. ✗ Changing color without securing the ends can cause loose tails and unraveling; carry the yarn neatly or weave in ends right after color change rows to secure them. ✗ Not stuffing gradually causes lumps and uneven shaping; stuff a little at a time and shape as you go to keep an even finish. ✗ Crocheting too tightly makes the fabric stiff and hides stitch definition; relax your tension slightly when using super bulky yarn to keep the amigurumi soft and flexible.

Bee No Sew Amigurumi Pattern

Make a cute no-sew bee amigurumi using super bulky yarn and simple stitches. This pattern walks you through a seamless body-to-head construction with bobble details for legs and stripes for charm. Perfect for quick handmade gifts or a cheerful desk companion—complete with assembly tips and embroidery instructions to add personality.

Intermediate 2-3 Hours

Materials Needed for Bee No Sew Amigurumi Pattern

— Main Fabric

  • 01
    Super Bulky yarn / Category 6 - Yellow (main color) - approx 50-100g
  • 02
    Super Bulky yarn / Category 6 - Brown (accent/stripes/feet) - approx 25-50g
  • 03
    Short pieces of pink and black yarn for cheeks and mouth embroidery
  • 04
    Polyester fiberfill for stuffing
  • 05
    Plastic safety eyes 8mm (2 pieces)

— Tools Required

  • 01
    Crochet hook size 3.5mm (E)
  • 02
    Stitch marker
  • 03
    Sewing needle (yarn needle) for weaving ends and embroidery
  • 04
    Scissors
  • 05
    Hot glue gun (optional for securing safety eyes)
  • 06
    Polyester stuffing (fiberfill)

Progress Tracker

0% Complete

— Body :

Info :

Begin with Yellow yarn

Round 1 :

6 SC in an MR (6)

Round 2 :

6 INC (12)

Round 3 :

(SC, INC) 6 times (18)

Round 4 :

(2 SC, INC) 6 times (24)

Info :

Change to Brown yarn

Round 5 :

8 SC, BO, 6 SC, BO, 8 SC (24)

Info :

Change to Yellow yarn

Round 6 :

8 SC, SC into the stitch's BO, 6 SC, SC into the stitch's BO, 8 SC (24)

Round 7 :

24 SC (24)

Info :

Change to Brown yarn

Round 8 :

6 SC, BO, 10 SC, BO, 6 SC (24)

Info :

Change to Yellow yarn

Round 9 :

6 SC, SC into the stitch's BO, 10 SC, SC into the stitch's BO, 6 SC (24)

Round 10 :

(SC, DEC) 8 times (16)

Round 11 :

FLO, (SC, INC) 8 times (24)

Round 12 :

(SC, INC) 12 times (36)

Round 13-18 :

36 SC (36)

Round 19 :

(2 SC, DEC) 9 times (27)

Info :

*Stuffing*

Round 20 :

(SC, DEC) 9 times (18)

Round 21 :

(SC, DEC) 6 times (12)

Round 22 :

6 DEC (6)

Info :

Weave in the yarn end and cut

— Beard :

Info :

Begin with brown yarn

Beard (picked up at Row 19) :

Pick up the yarn from row 19: 4 CH, turn: 3 SC. Cut the yarn.

Info :

Attach the eyes between rows 16 and 17.

Info :

Use black yarn to embroider the mouth and pink yarn to embroider the cheeks.

— Finishing :

Info :

Make sure all ends are woven in and stuffing is even before closing.

Assembly Instructions

  • Attach the safety eyes between rows 16 and 17, spacing them evenly and ensuring they sit level on the face.
  • Pick up the yarn from row 19 to crochet the beard: chain 4, turn, then 3 SC; cut yarn and weave in ends.
  • Use black yarn to embroider the mouth centered between the eyes and pink yarn to add small cheek blushes beside each eye.
  • Weave in any remaining yarn tails and cut; check stuffing through the opening and adjust before final closure.
  • If desired, secure safety eyes with hot glue from the inside for extra hold (optional).

Important Notes

  • 💡Use a stitch marker at the start of each round to keep track of rounds and prevent accidental increases or decreases.
  • 💡Stuff gradually and evenly as you work up into the head to maintain a smooth, round shape and prevent lumps.
  • 💡Weave in ends and secure color changes as you go to avoid long tails and ensure a neat finish.
  • 💡Place safety eyes before the head is fully closed to make attachment easier and more secure.

This adorable bee amigurumi is quick to make and full of charm — perfect for gifts, keychains, or decor. The no-sew construction keeps the project tidy and beginner-friendly while teaching neat finishing techniques. Try different color combinations and add tiny accessories to make each bee unique. 🐝🧶

You ask,

we answer.

FAQs

What size will the finished piece be?

The finished bee measures approximately 9-12 cm tall when made with super bulky yarn and a 3.5mm hook; exact size will vary by yarn and tension.

Can I use different yarn weights for this pattern?

Yes, you can use different yarn weights but this will change the final size; switch hook size appropriately and expect faster or slower work depending on yarn thickness.

Do I need prior crochet experience for this pattern?

This pattern is rated intermediate because it uses bobble stitches, color changes, and front/back loop techniques; basic knowledge of single crochet, increases, and decreases is recommended.

How long does this project typically take to complete?

Most crocheters finish this small bee in about 2-3 hours, depending on experience and how quickly you work through color changes and finishing.