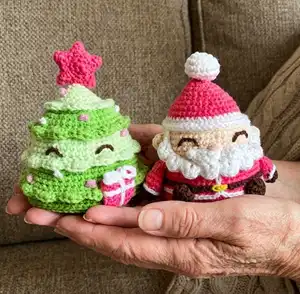
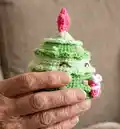
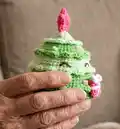
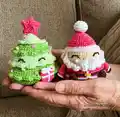
Create a delightful reversible amigurumi that transforms from a jolly Santa into a charming Christmas tree. This pattern guides you through crocheting both sides, assembling details, and adding surface slip-stitch decoration for a professional finish. Ideal for gift making or holiday decor, the finished toy measures about 8 cm tall when using the recommended yarn and hook. Follow the step-by-step instructions and photos to complete your reversible holiday friend with confidence.
Progress Tracker
0% Complete
— Special Stitches :
Info :
Invisible Finish: After completing the last st, cut the yarn and pull on the loop to draw the tail. Using the tapestry needle, skip the next st, and insert the needle from front to back, under both loops. Go back to the last st, and insert the needle through the back loop of this st. Pull on the tail.
Info :
Crochet Surface Slip Stitches: Insert hook into crocheted fabric from the front to the back. Keeping the yarn at the back, pull up a loop. Insert hook in the next spot specified, from front to back. And pull up a loop through the fabric and through the loop on the hook. Repeat as instructed to make the surface chain.
— Santa Claus :
Info :
HEAD AND BODY: Start with white yarn. Leave a long starting yarn tail, approximately 10 cm (4"). This tail will be used to join both Santa Claus and Christmas tree at the end of this pattern.
Round 3 :
[sc, inc]x6 (18)
Round 6 :
[sc, dec]x6 (12)
Info :
Stuffed with fiberfill.
Info :
Change to pink yarn.
Round 9 :
[3sc, inc]x3 (15)
Round 10 :
[sc, inc, sc]x5 (20)
Round 11 :
[3sc, inc]x5 (25)
Round 12 :
[2sc, inc, 2sc]x5 (30)
Round 13 :
[2sc, inc, 2sc]x6 (36)
Round 14 :
[5sc, inc]x6 (42)
Info :
Change to white yarn.
Round 16 :
[3sc, inc, 3sc]x6 (48)
Info :
Change to skin color yarn. Do not cut the white yarn. The remaining white tail should stay outside.
Info :
Stop for a while to make some sl st around the FLs of R17 (you worked R18 BLO) using white yarn. End with invisible finish.
Info :
Then continue working with skin color yarn again.
Round 21 :
[7sc, inc]x6 (54)
Info :
Change to white yarn.
Info :
Change to pink yarn. Do not cut the white yarn because it will be used to make some surface slip stitches.
Round 27 :
[4sc, inc, 4sc]x6 (60)
Info :
Fasten off and finish with invisible finish. Then weave in ends.
Info :
Surface decoration on Santa's body using surface slip stitch technique:
Info :
With white yarn: Make a loop between R23-24 (the color changing round between skin color and white), then make some surface slip stitches around until you reach the middle of Santa's front part.
Info :
Then, do 5 surface slip stitches vertically between R25-28.
Info :
Then continue to go to a st between R28-29 around, right under the FL left of R28 (you worked R29 BLO), and do some surface slip stitches around, until you meet the vertical slip stitch again.
Info :
Make a surface slip stitch to the last st of vertical slip stitch (at R28). Then cut the white yarn for about 50 cm long. Fasten off. With tapestry needle, pass the white thread to go inside through the last st of vertical surface slip stitch. Then, continue making some surface slip stitches around R23-24 again, until you meet the first st of surface slip stitch. End with invisible finish.
Info :
With dark brown yarn: Make a loop between R27-28, at the second st from the white line. Make some surface slip stitches around until you reach the second st before the white line.
Info :
Then change to yellow yarn: make 3 surface slip stitches to connect to the dark brown line. Fasten off and hide and secure the tails.
— Beard :
Info :
Start with white yarn, make 36ch. Start from the second ch from the hook, 2sl st, [skip 1st, 5hdc in the same st, skip 1st, sl st]x8, sl st. Fasten off, leave a long tail for sewing. With the ugly side facing forward, sew the beard to the face part of the body. Only sew the chains to the face and let the shells remain unsewn.
— Ears (make 2) :
Info :
Start with skin color yarn, make 5sc in MR. Fasten off and leave a long tail for sewing. Sew the ears between R20-22 of the body.
— Moustache :
Info :
Start with white yarn, make 13ch. Start from the second ch from the hook, sl st, inc, hdc, dc inc, skip 1 st, 2sl st, skip 1st, dc inc, hdc, inc, ss. Fasten off, leave a long tail for sewing. With the ugly side facing forward, sew the moustache to the face part of the body.
Info :
Then embroider the eyes with dark brown yarn at R20 of the body, 3 st wide and 6 st apart. Also embroider the nose with peach yarn between R21-22, right on the top of moustache, 2st wide.
— Arms (make 2) :
Info :
Start with dark brown yarn.
Info :
Change to pink yarn.
Info :
Make a round of surface slip stitch between R2-3 using white yarn.
Info :
Stuff 50% of the arm with fiberfill.
Info :
Last round: flatten and work through both stitches 4sc (4). FO, leave a long tail for sewing. Sew the arms to the body between R24-25.
— Feet (make 2) :
Info :
Start with dark brown yarn.
Round 2 :
[2sc, inc]x2 (8)
Info :
Last round: flatten and work through both stitches 4sc (4). Fasten off, leave a long tail for sewing.
Info :
Then, sew the legs at the bottom three rounds of the body, 8st apart.
Info :
Notes: - Do not use the BL of the last round when sewing the legs because they will be used to join the santa and the tree. - Sew the legs only on 60% of their height, and let the top parts remain not sewn.
— Christmas tree :
Info :
TREE: Start with pale green yarn. Leave a long starting yarn tail, approximately 10 cm (4").
Round 3 :
[3sc, inc]x3 (15)
Round 4 :
[sc, inc, sc]x5 (20)
Round 5 :
[3sc, inc]x5 (25)
Round 6 :
[2sc, inc, 2sc]x5 (30)
Info :
Change to apple green yarn.
Round 7 :
BLO [2sc, inc, 2sc]x6 (36)
Round 8 :
[5sc, inc]x6 (42)
Round 10 :
[3sc, inc, 3sc]x6 (48)
Info :
Change to pale green yarn.
Round 15 :
[7sc, inc]x6 (54)
Info :
Change to apple green yarn.
Round 20 :
[4sc, inc, 4sc]x6 (60)
Info :
Change to moss green yarn.
Info :
Fasten off, leave a long tail for sewing, about 50 cm long. Do an invisible finish.
Info :
Decoration ruffles (attach yarn at FL of previous BLO rounds): Hold your tree so the bottom side is facing you. At the back side, right at the first st of the round, attach the pale green yarn at the FL of R6 (you worked R7 BLO). Make: [sl st, sc, hdc inc, sc]x7, 2sl st. Sl st to the first st of this round. Fasten off, secure and hide the tails.
Info :
Attach the apple green yarn at the FL of R10 (you worked R11 BLO). Make: [sl st, sc, hdc inc, sc]x11, 4sl st. Sl st to the first st of this round. Fasten off, secure and hide the tails.
Info :
Attach the pale green yarn at the FL of R15 (you worked R16 BLO). Make: [sl st, sc, hdc inc, sc]x13, 2sl st. Sl st to the first st of this round. Fasten off, secure and hide the tails.
Info :
Attach the apple green yarn at the FL of R20 (you worked R21 BLO). Make: [sl st, sc, hdc inc, sc]x14, 4sl st. Sl st to the first st of this round. Fasten off, secure and hide the tails.
— Star :
Info :
Start with pink yarn. Make two:
Round 3 :
[3ch, start from the second ch from the hook: sl st, sc, skip 1st, sl st to the next st]x5
Info :
Fasten off, leave a long tail for sewing. With the ugly parts facing each other, sew them together with tapestry needle. And then, sew the star to the top of the tree.
— Balls :
Info :
Make some balls to decorate the christmas tree using light pink and white yarn. Attach the thread to the desired position to make a ball. Work 3ch, then sl st to the st where you started attaching the yarn. Fasten off, secure and hide the tails.
— Gift :
Info :
Start with pink yarn. Work in rows. Make 5ch.
Round 1 :
From the second ch from the hook, 4sc (4), 1ch.
Round 2 :
turn, 4sc (4), 1ch.
Info :
Fasten off, leave a short tail. Make another one, but do not fasten off. Join them together with some sc around (work inc3 for every corner). Then fasten off, leave a long tail for sewing.
Info :
Then, attach white yarn to the middle of the bottom edge of the gift. Make some ch until it reaches the top. Sl st to the middle of the upper part. Make 8ch and sl st to the same st. Then make 8ch again and sl st again near the previous st. Tidy up the bows by sewing them using tapestry needle. Then pass the tread to the middle of side part, and make a loop. Make some ch until it reaches the other side. Fasten off. You can fix the position of the white ch by sewing at the overlapping point of both ch.
Info :
Sew the gift to the bottom five rounds of the tree. Notes: Do not use the BL of the last round when sewing the gift because they will be used to join the santa and the tree.
— Beard, Moustache, Embroidery and Final Face Details :
Info :
Sew the beard and moustache with ugly sides facing out as instructed. Embroider the eyes with dark brown yarn at R20 (3 st wide and 6 st apart) and the nose with peach yarn between R21-22, 2 st wide.
— Joining the Santa and the Christmas Tree :
Info :
Flip the santa and the christmas tree so the ugly sides are facing you. Make a knot with the yarn left from the magic ring. Try to leave a small space between them.
Info :
Join the last rounds of the santa and the christmas tree. Sew them together with moss green yarn tail through the BL of each piece. To finish, make a knot and hide the tail.
Info :
Flip the christmas tree back so the good side is facing you, but keep the santa stay with the ugly side. No need to stuff with fiberfill. Push the santa inside the christmas tree. Since there is not any shared part between them, it is optional to make the position of both faces matched up.
— Base (optional, to make separated toys) :
Info :
To make the base, use pink yarn for santa side and moss green yarn for christmas tree side. R1 : 6sc in MR (6)
Round 3 :
[sc, inc]x6 (18)
Round 4 :
[sc, inc, sc]x6 (24)
Round 5 :
[3sc, inc]x6 (30)
Round 6 :
[2sc, inc, 2sc]x6 (36)
Round 7 :
[5sc, inc]x6 (42)
Round 8 :
[3sc, inc, 3sc]x6 (48)
Round 9 :
[7sc, inc]x6 (54)
Round 10 :
[4sc, inc, 4sc]x6 (60)
Info :
Fasten off. Leave a long tail for sewing. Stuff the body with fiberfill (you can continue stuffing while sewing the base). Prepare a circular piece of cardboard or rigid plastic to fit inside the bottom of the body. Place the cardboard/rigid plastic to the bottom, and sew the base to the BL of the last round of the body.
Info :
Congratulation! your christmas reversible amigurumi is ready.
This charming reversible amigurumi brings holiday magic in a tiny package — Santa one side, Christmas tree the other. Make it for decorations, gifts, or little seasonal keepsakes that fit perfectly on shelves and mantels. Enjoy stitching the small details like the beard, surface lines, star and gift to make your piece unique. 🎄🧶