🧢 Beautiful ✨ Detailed πŸ’ Adorable

Any-Size Square Container Crochet Pattern

Any-Size Square Container Crochet Pattern
4.4β˜… Rating
2-4 Hours Time Needed
2.5K Made This
βœ‚οΈ

Beginner Friendly Level

Perfect for those just starting their crochet journey, with clear instructions and simple techniques

⏱️

Bite-Sized Project

Finishes in 2-4 hoursβ€”perfect for an afternoon of creative relaxation.

🏑

Cozy Accent

A warm touch for your space that transforms ordinary corners into inviting nooks filled with handmade charm.

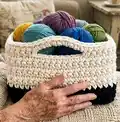
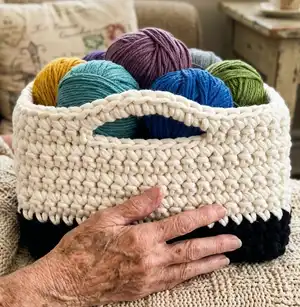
About This Any-Size Square Container Crochet Pattern

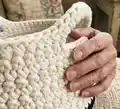
This pattern creates a sturdy square container worked from the base up in rounds that can be made in any width, height or number of colours. The design includes optional handles and uses basic single crochet/double crochet stitches for a dense, robust fabric. It is ideal for using up leftover bulky or cord yarns to make functional, attractive storage.

Any-Size Square Container Crochet Pattern crochet pattern - detailed view of completed project

Clear instructions include a base, sides, handle shaping and finishing suggestions to make your container look professional. The pattern shows both American and British terms and gives an example to match the cover photo dimensions.

Why You'll Love This Any-Size Square Container Crochet Pattern

I absolutely love this pattern because it's wonderfully flexible β€” you can make a tiny tray or a deep storage basket using the exact same instructions. I enjoy how quickly the base builds into a square and how repeating simple rounds creates a strong fabric that holds its shape. The optional handles are a small design detail that make the finished piece much more functional and gift-ready. Making these containers is a satisfying, practical project that uses up yarn scraps and yields beautiful results every time.

Any-Size Square Container Crochet Pattern step 1 - construction progress Any-Size Square Container Crochet Pattern step 2 - assembly progress Any-Size Square Container Crochet Pattern step 3 - details and accessories Any-Size Square Container Crochet Pattern step 4 - final assembly and finishing

Switch Things Up

I love changing the colours to create stripes; try alternating every two rounds for bold bands or every round for a finely striped look.

You can make the container deeper by repeating Round B more times; I often double the height to create a tall laundry-style basket.

For a softer look try using bulky wool instead of cord, remembering that the fabric will be less stiff and may need fabric stiffener.

If you want a very sturdy box, use a cord such as 5mm recycled cotton cord and a small hook for dense stitches that hold shape well.

I sometimes add a contrasting border around the top by working a round of dc (UK sc) in a bright colour to frame the handles.

To make smaller versions for desk organisers, use thinner yarn and a smaller hook; count fewer base rounds to reduce the width.

Try adding decorative labels by sewing on felt tags or crocheting small appliques to personalise each container.

Consider lining the inside with fabric glue or a fabric liner for extra durability and a polished finish.

I occasionally add a stiffener coat to the inside surface when the container feels too floppy; fabric stiffener or diluted PVA works well.

For gift-ready boxes, make a matching lid by crocheting a square base the same size and adding a small knob in the centre as a handle.

Common Mistakes & How to Fix Them

βœ— Skipping stitch markers at each corner will make counting sides difficult; place and move markers as instructed to identify where each side starts and ends. βœ— Using an extremely large hook with thin yarn produces loose fabric that won't be stiff enough; use a small hook for your chosen yarn or use a thicker, non-stretchy cord for structure. βœ— Changing colours mid-round instead of on the slip stitch join can create uneven joins; make colour changes on the ss join at the end of a round for neat transitions. βœ— Not checking the number of chains for handles can result in asymmetrical openings; count stitches on each side and ensure equal spacing left and right before chaining for the handle.

Any-Size Square Container Crochet Pattern

Make a sturdy, stylish square storage container that you can size to any width or height. This pattern uses basic stitches and works up from a square base, so you can customise colours, handles and height to suit your needs. It is perfect for using up leftover yarn or making a set of matching organisers for your home. Follow clear step-by-step instructions to create a robust container that holds its shape and looks beautiful on shelves.

Beginner Friendly 2-4 Hours

Materials Needed for Any-Size Square Container Crochet Pattern

β€” Main Fabric

  • 01
    Thick yarn (aran weight or thicker) in a non-stretchy fibre such as raffia, cotton or jute
  • 02
    Bobbiny 5mm recycled cotton cord in Black - approximate amount depends on container size (used in cover photo)
  • 03
    Bobbiny 5mm recycled cotton cord in Natural - approximate amount depends on container size (used in cover photo)
  • 04
    Leftover bulky yarns or bulky cotton cord as desired for colour blocking or stripes

β€” Tools Required

  • 01
    The smallest-sized crochet hook that you can comfortably use with your chosen yarn (recommended: 8mm (US L/11))
  • 02
    Stitch markers
  • 03
    A tapestry needle if using yarn, or glue if using thick cord

Progress Tracker

0% Complete

β€” General Info :

Info :

An easy-to-make container with a square base which can be made in any width, height or number of colours, making it a good project for beginners or for using up yarn left over from other projects.

Info :

The container is worked in rounds from the base up and can be made with or without the handles.

Info :

This pattern uses both American and British crochet terms. The American term is given first with the British term afterwards in brackets.

Colour changes :

Colour changes are optional. If you wish to change colours do so on the ss join at the end of a round.

The container in the cover photo :

The instructions below are to make any size of container, but at the end of some instructions there is an example given in brackets (e.g. 19 sts). Follow these (e.g....) if you want to replicate the container in the cover photo, which is 24cm wide and 15cm tall.

Alternative to magic loop :

The base begins with a magic loop. If you don't know this technique ch 4, join with a ss into the 1st ch, ch 1, then work round 1 into this loop instead of into a magic loop.

Joining :

At the end of every round join by working a ss into the 1st sc (dc) of the round.

β€” Base :

Round 1 :

[sc (dc), ch 2] 4 times into a magic loop. Join.

Round 2 :

ch 1 and turn, sc (dc) into every sc (dc) and CR into every ch-2 sp. Join.

Info :

Repeat round 2 until the base is the size you want (e.g. total of 9 rounds).

β€” Sides :

Round A :

ch 1 and turn, sc (dc) in every sc (dc) and 2 sc (dc) in every ch-2 sp, placing a st marker between the 2 sc (dc) at each corner. Join. Move the markers up on each round - they mark where each side starts/ends.

Round B :

ch 1 and turn, sc (dc) in every sc (dc). Join.

Info :

Repeat round B until the container is the height you want before the handles begin (e.g. repeat 9 times, changing colour after the 2nd repeat).

Info :

(If you are not making the handles, continue until the container is the full height you want then fasten off.)

Info :

The last round will be on the outside of the container, so if it's currently on the inside turn the container inside out now.

β€” Handles :

Info :

Count how many sts you have on each side. Each handle should be about half the width of one side, and you need to have the same number of sts to the left and right of it (e.g. the container in the photo has 19 sts on each side. The handle is 9 sts wide, with 5 sts to the left and 5 sts to the right).

Round :

Ch 1 and turn, sc (dc) in every sc (dc) until you reach the first marker. Handle side: sc (dc) the number of sts to the right of the handle, ch the number of sts for the handle and skip the same number of sc (dc), then sc (dc) the number of sts to the left of the handle (e.g. 5 sc (dc), ch 9, skip 9 sc (dc), 5 sc (dc)). Sc (dc) in each sc (dc) along the next side. Repeat the handle side. Sc (dc) in every sc (dc) until the end of the round. Join.

Round :

Ch 1 and turn, sc (dc) in every sc (dc) and, in the space created by each handle, sc (dc) the same number of sts as there are ch in the handle (e.g. 9 sc (dc)). Join then fasten off.

β€” Finishing :

Info :

If you have used yarn sew in the ends on the inside, or if you have used a thick cord which can't be sewn glue the ends neatly on the inside.

Info :

If your fabric isn't as stiff as you had hoped, try painting the inside and/or the outside with fabric stiffener.

Assembly Instructions

  • If you used yarn, sew in all ends on the inside of the container so the exterior remains neat and tidy.
  • If you used a thick cord that cannot be sewn, glue the ends neatly on the inside to secure them without visible bulk.
  • Move stitch markers up on each round while building the sides to keep corners aligned and ensure even sides before adding handles.
  • When adding handles, count and mark stitch counts on each side so the handle chains are centred with equal stitches left and right.

Important Notes

  • πŸ’‘Use stitch markers at corners and move them each round; they mark where each side starts and ends for accurate shaping.
  • πŸ’‘Make colour changes on the slip stitch join at the end of a round for the neatest transitions between yarns.
  • πŸ’‘The gauge is not critical, but keep your stitches dense enough to produce a relatively stiff container for best structure.

This easy Any-Size Square Container pattern helps you turn leftover bulky yarn into beautiful, usable storage that looks great on any shelf. The design is flexible so you can size it, change colours, and add handles to suit your home and needs. Whether you make one for yarn, toys or toiletries, these containers are practical, stylish and handmade with care. 🧢🏠

You ask,

we answer.

FAQs

What size will the finished piece be?

The finished size depends on your base rounds and side repeats; the cover photo container is 24cm wide and 15cm tall as an example.

Can I use different yarn weights for this pattern?

Yes, you can use different yarn weights, but heavier or thicker yarns produce a stiffer, more robust container while thinner yarn will be less structured.

Do I need prior crochet experience for this pattern?

This pattern is beginner friendly and uses basic stitches like single crochet (US) / double crochet (UK) and chain; basic knowledge of working in rounds and stitch counting is helpful.

How long does this project typically take to complete?

Most crocheters complete a medium container in 2-4 hours, though time may vary depending on size and yarn choice.