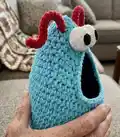
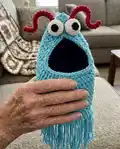
🧶 Beautiful ✨ Detailed 💝 Adorable

Yip Yips Amigurumi Pattern

Yip Yips Amigurumi Pattern
4.7★ Rating
5-7 Hours Time Needed
4.0K Made This
✂️

Intermediate Level

Ideal for those with basic crochet experience, featuring slightly more advanced stitches and techniques to expand your skills.

⏱️

Weekend Treat

Takes 5-7 hours, making it an enjoyable project to finish over a couple of days.

🧸

Cute Companion

An adorable friend to cherish, handcrafted with love to bring comfort and joy for years to come.

About This Yip Yips Amigurumi Pattern

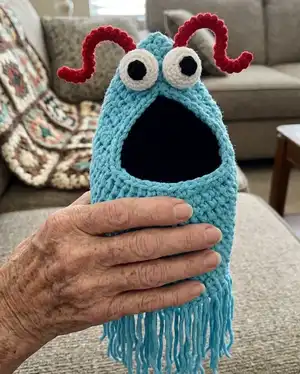
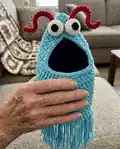
This pattern creates a hanging Yip Yip toy with a soft, lined body, playful fringe tentacles, and quirky ping-pong eyes. You can choose to crochet or knit the body — both options are fully written out. The design includes step-by-step shaping, instructions for attaching tentacles and antennae, and a simple lining template to finish the mouth neatly.

Yip Yips Amigurumi Pattern crochet pattern - detailed view of completed project

Perfect for gifting or as fun home decor, the Yip Yip is made from bulky, fluffy yarn for a cozy texture. The pattern includes clear assembly and finishing steps so you can create a polished, expressive creature.

Why You'll Love This Yip Yips Amigurumi Pattern

I absolutely love this pattern because it combines playful design with surprisingly simple construction — the result is delightfully expressive. I enjoy that you can crochet or knit the body depending on which technique you prefer, and both versions are clearly written. The tentacles and ping-pong ball eyes give each Yip Yip personality, and they are fun to customize with colors and lengths. Making a set of these in different colors is one of my favorite quick, creative projects to brighten a room.

Yip Yips Amigurumi Pattern step 1 - construction progress Yip Yips Amigurumi Pattern step 2 - assembly progress Yip Yips Amigurumi Pattern step 3 - details and accessories Yip Yips Amigurumi Pattern step 4 - final assembly and finishing

Switch Things Up

I love experimenting with colors — try soft pastels for a soothing nursery theme or neon brights for a fun modern twist.

I often change tentacle lengths and thicknesses: make some strands longer or double strands for chunkier fringe to change the silhouette.

If you want a mini version, use a lighter weight yarn and smaller hook; for a jumbo, use bulky yarn and an even larger hook for a chunky, plush Yip Yip.

I sometimes replace ping-pong balls with felted wool balls or felt circles sewn into small domes for a softer eye option that's child-friendly.

Try embroidery for additional facial details like eyebrows or a tiny mouth instead of a painted pupil for more personality.

Make seasonal versions by using holiday-themed yarns or adding small crocheted accessories like a scarf, hat, or tiny banner.

I like to create matching sets in ombre colorways — make several in graduated shades to hang together as a colorful installation.

For a more durable hanging loop, braid three strands of yarn instead of chaining, or sew a small fabric loop and stitch it securely into the seam.

If you prefer more posability, insert a thin craft wire inside a pipe cleaner for firmer antennae that still bend nicely.

Personalize each Yip Yip by changing the number and placement of tentacles or adding small sewn-on patches and appliques for unique characters.

Common Mistakes & How to Fix Them

✗ Skipping the stitch marker at the beginning of rounds can make shaping and counting confusing; place and move a stitch marker to the first stitch each round to keep track of the start. ✗ Attaching tentacles through the wrong loop will make them sit awkwardly; be sure to attach tentacles to the front loops (crochet) or purl bumps (knit) specified in the pattern. ✗ Not measuring the body length before shaping the mouth can result in wrong placement; repeat Round 10 (crochet) or Round 15 (knit) until the body measures the specified 8 inches before continuing. ✗ Forgetting to secure the hanging loop chain properly will cause instability; when creating the hanging loop follow the instructions exactly and place the stitch marker as directed before binding off or shaping. ✗ Using a very tight tension with bulky blanket yarn makes the work stiff and hard to manipulate; keep your tension relaxed and consistent to preserve the plush texture and ease of assembly.

Yip Yips Amigurumi Pattern

Make whimsical Yip Yips—lovable alien hangers—using this friendly pattern. You can crochet or knit a soft, lined body, add playful tentacles, and make expressive ping-pong eyes. The pattern includes step-by-step rounds and rows, tentacle instructions, eye/antennae assembly, and a simple lining template so your Yip Yip is neat and durable. Perfect for gifting or brightening a laundry nook.

Intermediate 5-7 Hours

Materials Needed for Yip Yips Amigurumi Pattern

— Main Fabric

  • 01
    Bernat Blanket / Blanket Brights / Baby Blanket (100% polyester), approximately 220 yds / 201 m per 300 g skein; 1 skein in color of your choice (shown: Royal Blue, Pixie Pink, Pow Purple, Baby Teal, Crimson for crochet; Baby Lilac for knit)
  • 02
    Black flannel fabric, 16 inches by 24 inches for lining
  • 03
    Optional: additional scrap yarn for tentacles or accents (48 strands per Yip Yip, roughly 8-12 inches each)

— Tools Required

  • 01
    Crochet hook size L/8mm (also used for attaching tentacles in both crochet and knit versions)
  • 02
    US 10.5 / 6.5mm circular needle, 24 inches long (for knit body)
  • 03
    Stitch marker
  • 04
    Tapestry needle
  • 05
    2 ping pong balls (for eyes)
  • 06
    Black paint pen or permanent marker (to draw pupils)
  • 07
    2 pipe cleaners, 12 inches long (for antennae)
  • 08
    Awl, ice pick, or corn pick (for poking holes in ping pong balls)
  • 09
    Scissors
  • 10
    Sewing needle
  • 11
    Black thread

Progress Tracker

0% Complete

— Crochet Body :

Info :

Make a slip knot.

Round 1 :

6 sc into slip knot. (6)

Info :

Place stitch marker on first st. Move marker up to first st of each new round as you work.

Round 2 :

2 sc into each st. – 12 sts

Round 3 :

[Sc in next st, 2 sc in following st] to end. – 18 sts

Round 4 :

[Sc in each of next 2 sts, 2 sc in following st] to end. – 24 sts

Round 5 :

[Sc in each of next 3 sts, 2 sc in following st] to end. – 30 sts

Round 6 :

[Sc in each of next 4 sts, 2 sc in following st] to end. – 36 sts

Round 7 :

[Sc in each of next 5 sts, 2 sc in following st] to end. – 42 sts

Round 8 :

[Sc in each of next 6 sts, 2 sc in following st] to end. – 48 sts

Round 9 :

Sc into back loop of each st. (The tentacles will be attached to the front loops of this round.)

Round 10 :

Sc in each st.

Info :

Repeat Round 10 an additional 11 times, or until body measures 8 inches from front loops of Round 9.

Row 22 [RS] :

Sc in each of next 16 sts, turn.

Row 23 [WS] :

Ch1, sc dec in next 2 sts, sc in each of next 27 sts, sc dec in next 2 sts, turn. – 29 sts

Row 24 :

Ch1, sc dec in next 2 sts, sc in each of next 25 sts, sc dec in next 2 sts, turn. – 27 sts

Row 25 :

Ch1, sc dec in next 2 sts, sc in each of next 23 sts, sc dec in next 2 sts, turn. – 25 sts

Row 26 :

Ch1, sc dec in next 2 sts, sc in each of next 21 sts, sc dec in next 2 sts, turn. – 23 sts

Row 27 :

Ch1, sc dec in next 2 sts, sc in each of next 19 sts, sc dec in next 2 sts, turn. – 21 sts

Row 28 :

Ch1, sc dec in next 2 sts, sc in each of next 17 sts, sc dec in next 2 sts, turn. – 19 sts

Row 29 :

Ch1, sc dec in next 2 sts, sc in each of next 15 sts, sc dec in next 2 sts, turn. – 17 sts

Round 30 :

Ch1, sc dec in next 2 sts (move marker to this st), sc in each of next 7 sts, ch12 (this will be the hanging loop so feel free to chain more or fewer for your desired loop length), sc in each of next 6 sts, sc dec in next 2 sts, do not turn. – 15 sts (do not count hanging loop chain)

Round 31 :

Sc in first st of previous round (with the marker in it), [sc dec in next 2 sts, sc in following st] twice, sc dec in next st and first st after hanging loop chain, [sc in next st, sc dec in following 2 sts] twice. – 10 sts

Round 32 :

[Sc dec in next 2 sts] 5 times. – 5 sts

Info :

Cut yarn and tie off. Using tapestry needle, thread tail in and out of final sts and cinch closed.

Info :

Join yarn at top point of mouth opening. Work 13 sc down first side of mouth, 17 sc along bottom edge of mouth, 12 sc up second side of mouth, slip st in first st of this round. Cut yarn and tie off. Weave in ends.

— Knit Body :

Info :

CO 2 sts, slide to opposite end of needle, and place marker for beginning of round.

Round 1 :

Kfb twice. – 4 sts

Info :

Redistribute sts to use magic loop method until full circumference is achieved.

Round 2 :

Kfb 4 times. – 8 sts

Round 3 :

K to end.

Round 4 :

Kfb 8 times – 16 sts

Round 5 :

K to end.

Round 6 :

[K1, kfb] 8 times – 24 sts

Round 7 :

K to end.

Round 8 :

[K2, kfb] 8 times – 32 sts

Round 9 :

K to end.

Round 10 :

[K3, kfb] 8 times – 40 sts

Round 11 :

K to end.

Round 12 :

[K4, kfb] 8 times – 48 sts

Round 13 :

K to end.

Round 14 :

P to end. (The tentacles will be attached to the purl bumps of this round.)

Round 15 :

K to end.

Info :

Repeat Round 15 an additional 33 times, or until body measures 8 inches from purl ridge of Round 14.

Short-row 49 [RS] :

K16, turn.

Short-row 50 [WS] :

Sl1 wyif, p15, sm, p16, turn.

Short-row 51 :

Sl1 wyib, k15, sm, k15, turn.

Short-row 52 :

Sl1 wyif, p14, sm, p15, turn.

Short-row 53 :

Sl1 wyib, k14, sm k14, turn.

Short-row 54 :

Sl1 wyif, p13, sm, p14, turn.

Short-row 55 :

Sl1 wyib, k13, sm, k13, turn.

Short-row 56 :

Sl1 wyif, p12, sm, p13, turn.

Short-row 57 :

Sl1 wyib, k12, sm, k12, turn.

Short-row 58 :

Sl1 wyif, p11, sm, p12, turn.

Short-row 59 :

Sl1 wyib, k11, sm, k11, turn.

Short-row 60 :

Sl1 wyif, p10, sm, p11, turn.

Short-row 61 :

Sl1 wyib, k10, sm, k10, turn.

Short-row 62 :

Sl1 wyif, p9, sm, p10, turn.

Short-row 63 :

Sl1 wyib, k9, sm, k9, turn.

Short-row 64 :

Sl1 wyif, p8, sm, p9, turn.

Short-row 65 :

Sl1 wyib, k8, [place last st back on left-hand needle, k1] 12 times (this will be the hanging loop so feel free to repeat more or fewer times for your desired loop length), do not turn.

Info :

You should now be back to the stitch marker for the beginning of round.

Round 66 :

K9, [k1, pass previous st over] 32 times (32 sts bound off), k7. – 16 sts

Round 67 :

K8, k8 from other side of bind off to close gap.

Round 68 :

K7, k2tog, k7. – 15 sts

Round 69 :

K to end.

Round 70 :

[K3, k2tog] 3 times. – 12 sts

Round 71 :

K to end.

Round 72 :

[K2, k2tog] 3 times. – 9 sts

Round 73 :

K to end.

Round 74 :

[K1, k2tog] 3 times. – 6 sts

Info :

Cut yarn, leaving a 6-inch tail. Using tapestry needle, thread tail through final sts, cinch closed, and tie off. Weave in ends.

— Tentacles :

Step 1 :

Cut 48 strands of yarn roughly 8-12 inches long. There’s no need to be precise. In fact, variable length for the tentacles is better.

Step 2 :

Insert crochet hook upward through one of the front loops not used in Round 9 (crochet version) or the purl bumps of Round 14 (knit version).

Step 3 :

Fold a strand in half roughly (again, no need to be precise). Grab the middle with your hook and pull it through.

Step 4 :

Grab both tails with hook and pull through loop.

Step 5 :

Gently pull to tighten.

Info :

Repeat Steps 2-5 with each strand and each front loop or purl bump around the body.

— Eyes & Antennae :

Step 1 :

Using a sharp implement, carefully poke a small hole in a ping pong ball. Wiggle it around to widen the hole a bit.

Step 2 :

Poke a second hole about 1/2 inch away from the first. Widen this hole as well until you can stick the tool in one hole and out the other.

Step 3 :

Feed one end of a pipe cleaner through the holes. You may have to bend the end slightly.

Step 4 :

Pull about an inch of pipe cleaner out the other side.

Step 5 :

Repeat Steps 1-4 with a second ping pong ball and pipe cleaner.

Step 6 :

Poke the short end of both pipe cleaners through the fabric on either side of the top of the head.

Step 7 :

Twist the ends of the pipe cleaners together on the underside of the fabric.

Step 8 :

Feed the long end of both pipe cleaners through the fabric near where you poked through the short ends in Step 6, but not in the exact same place.

Step 9 :

Twist the ends of the pipe cleaners together a couple times on the underside of the fabric. Then feed them back up through the same holes as in Step 8.

Step 10 :

Bend antennae into desired shape.

Step 11 :

Using a paint pen or permanent marker, draw pupils on each ping pong ball. Once again, there is no need to be precise as a little asymmetry will give your Yip Yip that delightfully wacky expression.

— Lining :

Step 1 :

Fold lining fabric in half widthwise.

Step 2 :

With the folded edge to the left, cut a 3-inch square from each of the bottom corners, cutting through both layers of fabric.

Step 3 :

Measure 4 inches down from the top right corner and cut inward 4 inches through both layers. Then measure 7 inches across from the top right corner and cut downward at an angle to meet the stopping point of your previous cut.

Step 4 :

Either by hand or with a sewing machine, sew across the top flat edge, the right edge, and the bottom edge.

Step 5 :

Pinch the fabric of each bottom corner so that the bottom seam meets the side seam on the right side and the bottom seam meets the original fold on the left side. Sew both corners closed.

Step 6 :

Insert the lining, with seams facing outward, into the body. There is no need to fold over the top edge of the lining fabric if you used flannel or another non-fraying fabric. Hand-sew around the mouth opening using short, straight stitches. The black thread should not be visible from the outside if you used a fluffy yarn like the original sample.

Step 7 :

Hang your finished Yip Yip in a place of honor for all to admire.

Assembly Instructions

  • Attach tentacles by inserting a folded strand through the front loops of Round 9 (crochet) or the purl bumps of Round 14 (knit), pull tails through and tighten, repeating around the body until the desired fringe is achieved.
  • Form the hanging loop by chaining the specified number (ch12 in crochet example) at Round 30 or creating the short-row chain in knit Short-row 65, then move the marker and work shaping rounds as instructed to secure the loop.
  • Construct eyes by poking two holes in each ping pong ball, feeding a pipe cleaner through, and feeding the short ends through the head fabric; twist and secure the pipe cleaners on the underside and bring the long ends back up to form antennae.
  • Insert the lining with seams facing outward into the finished body, hand-sew around the mouth opening with short straight stitches using black thread so the seam is not visible from outside, and sew bottom corners closed to box the base.
  • Weave in all yarn tails and trim any excess; finish the mouth edge by working the instructed sc row around the mouth opening and slipping off, then block lightly if needed before hanging.

Important Notes

  • 💡The body begins at the bottom center and is worked in continuous rounds to the base of the mouth opening; keep your stitch marker in place and move it each round to maintain alignment.
  • 💡Tentacles are attached to the front loops of Round 9 for the crochet version and to the purl bumps of Round 14 for the knit version; attaching them to the wrong loops will alter the look.
  • 💡When inserting the lining, place seams facing outward and hand-sew around the mouth opening using short straight stitches so black thread is hidden from the outside when using fluffy yarn.
  • 💡Measure the body length before shaping the mouth: repeat body rounds until the body measures 8 inches from the tentacle row (front loops or purl ridge) to ensure correct mouth placement.

This cheerful Yip Yip pattern is designed to bring colorful, goofy charm to your home or gifts. Create a row of bright Yip Yips in different shades and hang them where they can make people smile. The pattern is fun to customize with color, tentacle length, and eye placement for unique personalities. 🧶🎉
You ask,

we answer.

FAQs

What size will the finished piece be?

The finished Yip Yip measures approximately 14 inches tall (excluding tentacles and hanging loop) with a circumference of about 25 inches when made with the recommended Bernat Blanket yarn and hook/needle sizes.

Can I use different yarn weights for this pattern?

Yes, but changing yarn weight will affect the final size and texture; adjust hook or needle size accordingly and check gauge before continuing to ensure the mouth and lining fit correctly.

Do I need prior crochet or knitting experience for this pattern?

This pattern is rated intermediate; basic knowledge of single crochet and increasing/decreasing or basic knitting in the round and short-row techniques is recommended for best results.

How long does this project typically take to complete?

Most crafters finish a single Yip Yip in about 5-7 hours, though time will vary depending on experience, whether you crochet or knit, and how many customizations you make.