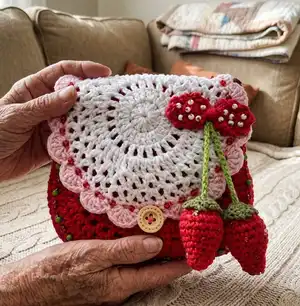
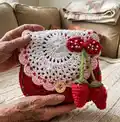
Make a charming strawberry-inspired crochet purse that combines playful details with practical design. This pattern walks you through the circular main body, scalloped flap, braided handle, tiny strawberries and finishing beads so you can create a delightful accessory. Perfect as a thoughtful handmade gift or a fun personal project to show off your crochet skills.
Progress Tracker
0% Complete
— Main part of the purse :
Info :
Beginning: use red yarn and crochet: CH 4, join first stitch with 1 Slip stitch to form a ring.
Round 1 :
CH 3 (count as first DC), 11 DC in the middle of the ring, join first DC with 1 SlSt (you will have 12 DC totally)
Round 2 :
CH 3 (count as first DC), 1 DC in very first stitch, [inc of DC] - repeat 11 times totally, join first DC with 1 SlSt (you will have 24 DC)
Round 3 :
CH 3 (count as first DC), [CH 1, 1 DC in next stitch] repeat the group in brackets to the end of the round (you will repeat it 23 times totally). Join first DC with 1 SlSt (you will have 24 DC and 24 CH-spaces totally)
Round 4 :
CH 3 (count as first DC), 1 DC in very first CH-space from previous round. 2 DC in every CH-space from previous round, repeat to the end of the round (you will repeat it 23 times totally). Join first DC with 1 SlSt (you will have 48 DC totally)
Round 5 :
CH 3 (count as first DC), 1 DC in very first stitch (picture bellow), now you will make [1 DC in next stitch, inc of DC in next stitch] - repeat this group in brackets 23 times totally, 1 DC in next stitch, join first DC with 1 SlSt, end the work (72 DC).
Round 6 :
CH 3 (count as first DC) + CH 1, [skip one stitch, 1 DC in next stitch + CH 1] - repeat the group in the brackets to the end of the round (you will repeat it 35 times totally). Join first stitch of the round with 1 SlSt (you will have 36 DC and 36 CH-spaces).
Round 7 :
CH 3 (count as first DC), 1 DC in first CH-space from previous round, 2 DC in next two CH-spaces from previous round, 3 DC in next CH-space from previous round, [2 DC in next three CH-spaces, 3 DC in next CH-space] - repeat the group in the brackets 8 times totally, join first stitch of the round with 1 SlSt (you will have 81 stitches).
Round 8 :
CH 1 – just a helper, don't count it, 1 SC in next 12 stitches from previous round, 1 HDC in next stitch, 1 DC in next 4 stitches, [inc of DC] - repeat 6 times totally, 1 DC in next 13 stitches, [inc of DC] - repeat 6 times totally, 1 DC in next 4 stitches, 1 HDC in next stitch, 1 SC in next 12 stitches (you will have 71 stitches). There will left 22 stitches, you will not crochet into them. CH 1 for turning the work, turn.
Round 9 :
1 SC in next 12 stitches, 1 HDC in next stitch, 1 DC in next 45 stitches, 1 HDC in next stitch, 1 SC in next 12 stitches (you will have 71 stitches totally), CH 1 for turning the work, turn.
Round 10 :
1 SC in each stitch from previous round (you will have 71 SC totally), end the work.
Info :
Make this part of the purse one time again (you will have two identical main parts).
— Join both parts together :
Join both parts together :
You have two same parts, which you place by the right sides to each other and crochet them together. You could also sew them, but I would rather crochet them together. You will crochet on the reserve side. Use red yarn and crochet one row of SC (71 SC), as you see on the picture below, don't cut the yarn, you will continuously crochet the upper brim. Turn the purse into the right side.
— Upper brim of purse :
Info :
Use red yarn and crochet in the circle rounds.
Round 1 :
CH 1 as a helper, don't count it and continue 1 SC in next 3 stitches on the side, 1 SC in next 22 stitches in the middle part of first part, 1 SC in next 3 stitches on the side of first part, 1 SC in the middle stitch from crocheting of both parts, 1 SC in next 3 stitches on the side of second part, 1 SC in next 22 stitches in the middle part of second piece,1 SC in next 3 stitches on the side, join first stitch of the round with 1 SlSt (you will have 58 SC totally).
Round 2 :
CH 1 as a helper, don't count it, 1 SC in every stitch from previous round (58 SC), join first stitch of the round with 1 SlSt.
Round 3 :
1 SlSt in every stitch from previous round (58 SlSt), end the work. Neaten free threads.
— Flap :
Info :
Flap: Beginning: use white yarn and crochet CH 4, join first stitch with 1 SlSt to form a ring.
Round 1 :
CH 3 (count as first DC), 11 DC in the middle of the ring, join first DC with 1 SlSt (you will have 12 DC totally)
Round 2 :
CH 3 (count as first DC), 1 DC in very first stitch, [inc of DC] - repeat 11 times totally, join first DC with 1 SlSt (you will have 24 DC)
Round 3 :
CH 3 (count as first DC), [CH 1, 1 DC in next stitch] repeat the group in brackets to the end of the round (you will repeat it 23 times totally). Join first DC with 1 SlSt (you will have 24 DC and 24 CH-spaces totally)
Round 4 :
CH 3 (count as first DC) + CH 1, 1 DC in very first CH-space from previous round, [1 DC + 1 CH + 1 DC] in every CH-space from previous round, repeat to the end of the round (you will repeat it 23 times totally). Join first DC with 1 SlSt (you will have 24 groups of [1 DC + 1 CH + 1 DC] totally)
Round 5 :
CH 3 (count as first DC) + CH 1, 1 DC in very first CH-space from previous round, [1 DC + 1 CH + 1 DC] in every CH-space from previous round, repeat to the end of the round (you will repeat it 23 times totally). Join first DC with 1 SlSt (you will have 24 groups of [1 DC + 1 CH + 1 DC] totally).
Round 6 :
CH 3 (count as first DC) + CH 2, 1 DC in very first CH-space from previous round, [1 DC + 2 CH + 1 DC] in every CH-space from previous round, repeat to the end of the round (you will repeat it 23 times totally). Join first DC with 1 SlSt. (You will have 24 groups of [1 DC + 2 CH + 1 DC] totally.)
Round 7 :
CH 1 as a helper, [3 SC in each CH-space from previous round]. Join first SC with 1 SlSt (you will have 72 SC totally), end the work.
Round 8 :
Change the color, use light pink yarn and crochet 1 SC in each stitch around. Join first SC with 1 SlSt (you will have 72 SC totally)
Round 9 :
Continue with light pink yarn, CH 1 as a helper [skip one stitch, 5 DC in one stitch, skip one stitch, 1 SlSt in next stitch] – repeat it 8 times totally, CH 5, skip 3 stitches (make a button's hole), 1 SlSt in next stitch, [skip one stitch, 5 DC in one stitch, skip one stitch, 1 SlSt in next stitch] – repeat it 9 times totally, join first stitch of the round with 1 SlSt, end the work.
Info :
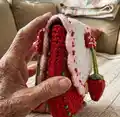
Neaten free threads of all parts of the purse nicely. Pin the upper part of the flap on the back side of the purse. The button hole should be in the middle of the front side, center it. Open the purse and sew the flap inside using common sewing thread and needle. Sew the scallops to the main part of the purse with tiny stitches so scallops are not free on the back side.
— Handle :
Info :
Adjust the length of the handle according to the age of the child. The designer made a cross body purse for a 6 years old girl. Use brown yarn, hook 3.5 mm, two threads of yarn to make the handle firmer and crochet CH 134.
Handle :
Now you will make 1 SlSt in each CH, but you will insert a hook in side loop of the chains (insert a hook in the side loop of chain stitch and make 1 SlSt). Sew the handle in the middle of the purse. Use common sewing thread and needle.
— Strawberry :
Info :
Use red yarn, hook 3 mm. Make 2 same strawberries. Crochet in circle spiral rounds, it means, that you will not join the rounds and you will not turn the work at the end of the round.
Round 1 :
CH 2, 7 SC in second stitch from the hook (7 SC)
Round 2 :
1 SC in each stitch around (7 SC)
Round 3 :
1 SC in each stitch around (7 SC)
Round 4 :
[inc, 1 SC in next stitch] - repeat 2 times totally, 1 SC in next 3 stitches (9 SC)
Round 5 :
[inc, 1 SC in next 2 stitches] - repeat 2 times totally, 1 SC in next 3 stitches (11 SC)
Round 6 :
[inc, 1 SC in next 3 stitches] - repeat 2 times totally, 1 SC in next 3 stitches (13 SC). Fill the strawberry with the toy filling as you go.
Round 7 :
[inc, 1 SC in next 3 stitches] - repeat 3 times totally, 1 SC in next stitch (16 SC)
Round 8-10 :
1 SC in each stitch around (16 SC)
Round 11 :
[dec, 1 SC in next stitch] - repeat 5 times totally, 1 SC in next stitch (11 SC)
Round 12 :
[dec] - repeat 5 times totally, 1 SlSt in next stitch (6 stitches), end the work. Sew the rest of the stitches. Make two strawberries.
— Leaf :
Info :
Make two same leaves. Use dark green yarn, hook 3 mm. Crochet in the circle.
Beginning :
CH 4, join first stitch with 1 SlSt and make a ring.
Round 1 :
9 SC in the middle of the ring, 1 SlSt in first stitch of the round (9 SC)
Round 2 :
[CH 2, 1 SlSt in next stitch] - repeat 9 times totally, end the work.
— Stem :
Stem :
Use hot green yarn, insert a hook in the middle of the strawberry and crochet CH 16, end the work. Pull the stem through the middle of the leaf and sew the leaf on the strawberry. The stem of second strawberry is CH 18.
— Bow :
Info :
Use red yarn, hook 3 mm.
Row 1 :
Insert hook in fourth stitch from the hook and make 1 DC, 1 DC in next 3 stitches, 1 SC in next 2 stitches, 1 DC in next 3 stitches, 1 DC + 1 SlSt in next stitch, end the work. Fasten free threads.
Info :
Cut about 20 cm (7.8 inches) of red yarn and tie the yarn around the middle of the bow several times (part of SC). Make the knot on the back side. Neaten free threads. Crochet one row around both parts of the bow separately: insert a hook in very first stitch next the middle part (it is marked by yellow dot - beginning) and make CH 2, 1 SlSt in next stitch - repeat 8 times totally, end the work. Crochet by the same way on second part of the bow.
— Finishing :
Info :
Use white beads average 4 mm / beads size 6/0 and sew them on the bow. Sew the stems of the strawberries on the reverse side of the bow and then sew the bow on the flap. Sew white, light pink and red beads on the strawberries. Use tapestry needle and sew red beads on the flap as shown in the pictures. Use red glass beads and green wooden beads and tapestry needle and sew them on the main part of the purse on the front-side. Sew wooden button average 1.8 cm / 0.7 inches on the main part of the purse, in the middle of round 5 of front side.
Info :
Your strawberry purse is finished. Congratulation :-)
This sweet Strawberry Purse pattern brings playful charm to a practical accessory with scalloped edges and tiny strawberry charms. 🧶🍓 The step-by-step rounds and photo tips guide you from the circular base to the final beaded details. Make one for a child or create a grown-up version with different colors — either way it’s a joyful little project. ✨