About This Squirtle Amigurumi Pattern
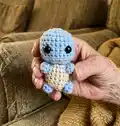
This pattern creates a tiny Squirtle amigurumi complete with head, body, shell, arms, legs and a curled tail. It uses worsted weight yarn and simple single crochet shaping to keep construction quick and satisfying. The pattern is written with clear row-by-row instructions and helpful assembly notes for precise placement.

Youll learn increases, decreases and finishing techniques while building a charming small toy. Perfect for gifting, keychains or display, this little Squirtle is a fun, rewarding make.
Why You'll Love This Squirtle Amigurumi Pattern
I absolutely love this pattern because it captures so much personality in a very small, quick project. I enjoy the simple shaping — the head and body come together fast, and the shell detail gives real character. I like that it uses common materials and an easy hook size so you can make it right away. Sewing the pieces on and adding the curled tail is my favorite part because it brings the whole toy to life.
Switch Things Up
I love customizing this pattern by changing colors to create different turtle personalities; try mint, pastel or bold blues for a fresh look.
I often make a mini version by switching to a finer yarn and smaller hook to create keychain-friendly sizes.
I sometimes add embroidered eyebrows or a tiny smile to give the face more expression and character.
I like to make the shell in two contrasting colors or use variegated yarn for a textured effect that looks handmade and unique.
I recommend experimenting with safety eye sizes; using smaller eyes makes a cuter, more delicate face while larger eyes give a toy-more look.
I occasionally stuff a small bell or rattle inside for a toy suitable for older children; just ensure all parts are securely attached.
I also try adding tiny accessories like a crocheted bandana, scarf, or little hat to personalize each Squirtle.
I sometimes use a stronger yarn for the shell to give it more structure and stability when attached to the body.
I like to vary stuffing density to create firmer or softer toys depending on intended use or gifting preferences.
I always test placement of eyes and limbs before sewing permanently so I can tweak positioning for the cutest result.
Common Mistakes & How to Fix Them
✗ Placing safety eyes too high or too low can make the face look off; measure five stitches apart and six stitches down from the top and check placement before securing.
✗ Not stuffing the head enough causes a floppy shape; stuff the head firmly as you go and finish stuffing before closing the final decreases.
✗ Skipping stitch counts during increases and decreases results in uneven rounds; count stitches at the end of each round to ensure you have the correct total.
✗ Fastening off too early on the body leaves an awkward tail for sewing; leave a long tail when switching colors and use it for stitching pieces together cleanly.