Make a sweet crocheted spaniel nestled in its own tiny dog bed. This pattern guides you step-by-step through crocheting the dog, ears, tail, bed and pillow with clear photos. Youll enjoy color changes, simple shaping, and a cuddly finished toy perfect for gifting or display.
Progress Tracker
0% Complete
— Tail :
Info :
Place row marker here.
Round 2 :
(1sc, inc) *2 (6)
Round 4 :
Change color to beige. 6sc
Info :
Fold in half and crochet 2sc through both sides.
Info :
Fasten off, cut the yarn, weave in the yarn ends.
— Paws (make 4) :
Info :
Place row marker here.
Round 3 :
Change color to white. (1sc, inc) *6 (18)
Round 4 :
Change color to beige. (1sc, 4dc in one stitch)*4, 10sc (30)
Round 5 :
(1sc, dc4tog) *4, 10sc (18)
Round 6 :
(1sc, dec) *6 (12)
Round 7-13 :
12sc (7 rounds)
Info :
Stuff the paws with fiberfill.
Info :
Fold in half and crochet 6sc through both sides.
Info :
Fasten off, cut the yarn, weave in the yarn ends.
— Body :
Info :
Place row marker here.
Round 3 :
(1sc, inc) *6 (18)
Round 4 :
(2sc, inc) *6 (24)
Round 5 :
(3sc, inc) *6 (30)
Round 6 :
(4sc, inc) *6 (36)
Round 7 :
(5sc, inc) *6 (42)
Round 8 :
You will turn two pieces: body and tail into one: 1sc, 2sc with the tail and body together; 39sc (42)
Round 10 :
You will turn three pieces: body and two paws into one: 13sc, 6sc with the paw and body together; 6sc; 6sc with the second paw and body; 11sc (42)
Round 11 :
(1sc, dec) *3, 24sc, (1sc, dec) *3 (36)
Round 12-14 :
36sc (3 rounds)
Round 15 :
(4sc, dec) *6 (30)
Round 16-17 :
30sc (2 rounds)
Round 18 :
(4sc, inc) *6 (36)
Round 19-20 :
36sc (2 rounds)
Round 21 :
You will turn three pieces: body and two paws into one: 10sc, 6sc with the thirds paw and body together; 6sc; with the fourth paw and body; 8sc (36)
Round 22 :
(4sc, dec) *6 (30)
Round 24 :
(3sc, dec) *6 (24)
Round 25 :
(2sc, dec) *6 (18)
Round 26 :
(1sc, dec) *6 (12)
Info :
Stuff the body with fiberfill.
Info :
Fasten off, cut the yarn, weave in the ends.
— Head :
Info :
Place row marker here.
Round 3 :
3inc, 3sc, 3inc, 3sc (18)
Round 4 :
(1sc, inc) *2, 3sc, (inc, 1sc) *3, 4sc, inc (24)
Round 5 :
(2sc, inc) *2, 4sc, (inc, 2sc) *3, 4sc, inc (30)
Round 6-8 :
30sc (3 rounds)
Round 9 :
Change color to beige. Attention! Crochet in jacquard technique from Rnd 9 to 12. Add white yarn (these stitches are highlighted in red) (4sc, inc)*3, 4sc, inc, (4sc, inc)*2 (36)
Round 10 :
(5sc, inc)*3, 4sc, sc, inc, (5sc, inc)*2 (42)
Round 11 :
(6sc, inc)*3, 4sc, 2sc, inc, (6sc, inc)*2 (48)
Round 12 :
(7sc, inc)*3, 4sc, 3sc, inc, (7sc, inc)*2 (54)
Round 13-20 :
With beige yarn. 54sc (8 rounds)
Info :
Insert the eyes between rounds 11-12 at a distance of 14-16 stitches.
Round 21 :
(7sc, dec)*6 (48)
Round 22 :
(6sc, dec)*6 (42)
Round 23 :
(5sc, dec)*6 (36)
Round 24 :
(4sc, dec)*6 (30)
Round 25 :
(3sc, dec) *6 (24)
Round 26 :
(2sc, dec) *6 (18)
Round 27 :
(1sc, dec) *6 (12)
Info :
Stuff the head with fiberfill.
Info :
Fasten off, cut the yarn, weave in the ends.
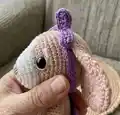
— Ears (make 2) :
Info :
Crochet 2 pieces in beige and 2 pieces in light pink color.
Round 1 :
Chain 13. Start in the second chain from the hook: 11sc, 4dc in one stitch , 11sc, turn (26)
Round 2 :
Ch1, 7sc, 4dc, 4dcinc, 4dc, 7sc, turn (30)
Round 3 :
Ch1, 4sc, 7dc, 8dcinc, 7dc, 4sc (38)
Info :
Cut the yarn on the light pink pieces.
Info :
Continue crocheting from beige piece. Apply the beige part and crochet with beige yarn: (3sc in one stitch, sl st)*19.
Info :
Leave a long tail for sewing.
Info :
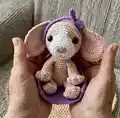
Tighten cheeks following pictures below. Embroider the corners of the eyes with white.
Info :
Embroider the eyebrows with white yarn. Embroider the nose with brown yarn.
Info :
Sew the head to the body.
Info :
Sew the ears to the head.
Info :
Crochet the Headband with pink yarn. Chain 70. Start in the third chain from the hook: 70sc . Cut the yarn and fasten off. Tie the headband on the head.
Info :
Embroider the mouth with brown yarn.
— Dog bed :
Info :
Base - With purple yarn.
Info :
Place row marker here.
Round 3 :
(1sc, inc) *6 (18)
Round 4 :
(2sc, inc) *6 (24)
Round 5 :
(3sc, inc) *6 (30)
Round 6 :
(4sc, inc) *6 (36)
Round 7 :
(5sc, inc) *6 (42)
Round 8 :
(6sc, inc) *6 (48)
Round 9 :
(7sc, inc) *6 (54)
Round 10 :
(8sc, inc) *6 (60)
Round 11 :
(9sc, inc) *6 (66)
Round 12 :
(10sc, inc) *6 (72)
Round 13 :
(11sc, inc) *6 (78)
Round 14 :
(12sc, inc) *6 (84)
Info :
Cut the yarn and fasten off.
Info :
Side wall - With pink yarn.
Round 1 :
Chain 6. Start in the second chain from the hook: inc, 3sc, 3sc in the last chain , 4sc (12)
Round 2 :
2inc, 3sc, 3inc, 3sc, inc (18)
Round 3 :
2inc, 6sc, 3inc, 6sc, inc (24)
Round 4-85 :
24sc (82 rounds)
Info :
Stuff with fiberfill in the process.
Round 86 :
2dec, 6sc, 3dec, 6sc, dec (18)
Round 87 :
2dec, 3sc, 3dec, 3sc, dec (12)
Info :
Cut the yarn and fasten off.
Info :
Sew the side wall in a circle to the bottom of the bed. Cut the yarn and fasten off.
— Pillow :
Info :
Crochet 2 pieces in pink color.
Round 1 :
Chain 15. Start in the second chain from the hook: 14sc, turn (14)
Round 2-11 :
Ch1, 14sc, turn (10 rounds)
Info :
Apply the pink part and crochet with purple yarn: 14sc, inc in the corner, 11sc, inc in the corner, 14sc, inc in the corner, 11sc, inc in the corner.
Info :
Stuff with fiberfill in the process. Fasten off, cut the yarn, weave in the yarn ends.
Info :
Congrats your spaniel is ready!!!
This charming Spaniel in a Dog Bed makes a perfect handmade gift or a cozy shelf companion. Create a full scene with the tiny pillow and headband for extra personality. Enjoy every stitch as you bring this little friend to life! 🧶🐶