🧶 Beautiful ✨ Detailed 💝 Adorable

SpaceBall Amigurumi Pattern

SpaceBall Amigurumi Pattern
4.3★ Rating
5-7 Hours Time Needed
1.5K Made This
✂️

Intermediate Level

Ideal for those with basic crochet experience, featuring slightly more advanced stitches and techniques to expand your skills.

⏱️

Weekend Treat

Takes 5-7 hours, making it an enjoyable project to finish over a couple of days.

🧸

Cute Companion

An adorable friend to cherish, handcrafted with love to bring comfort and joy for years to come.

About This SpaceBall Amigurumi Pattern

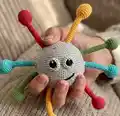
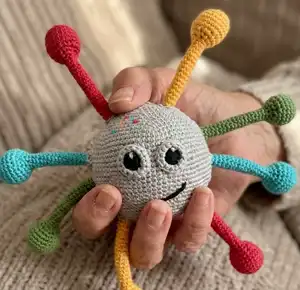
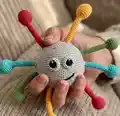
This pattern teaches you how to crochet a bright SpaceBall toy with eight pullable arms for tactile play. It includes full instructions for arms, body, eyes, and embroidered details so you can finish a complete, child-friendly toy. The design focuses on safe assembly and playful textures to encourage exploration and motor skills.

SpaceBall Amigurumi Pattern crochet pattern - detailed view of completed project

You will make four long arm pieces (in four colors repeated around the body), crochet a spherical body with integrated arm openings, and add simple embroidered facial details. Recommended for makers comfortable with amigurumi basics.

Why You'll Love This SpaceBall Amigurumi Pattern

I absolutely love this pattern because it balances fun construction with practical play features that children enjoy. I enjoy the visual impact of the bright arms radiating from a soft round head, and the challenge of integrating the arms directly into the body while maintaining a neat finish. I also love how customizable it is — swapping colors or adding different embroidery completely changes the personality. Finally, sewing the eyes and adding tiny embroidered spots is a satisfying finishing touch that makes each toy unique.

SpaceBall Amigurumi Pattern step 1 - construction progress SpaceBall Amigurumi Pattern step 2 - assembly progress SpaceBall Amigurumi Pattern step 3 - details and accessories SpaceBall Amigurumi Pattern step 4 - final assembly and finishing

Switch Things Up

I love changing the color scheme to match the recipient—try pastel colors for a softer, baby-friendly version or neon brights for a playful, modern look.

I often make a mini keychain version by using thinner yarn and a smaller hook to create tiny SpaceBalls perfect for backpacks or party favors.

If you want a chunkier, cuddlier toy, use a bulkier yarn and a larger hook; just remember to adjust stuffing and expect a larger finished size.

I sometimes add small felt details inside a safety pocket or use embroidered faces instead of crocheted eyes for a different expression.

Try adding a loop at the top of the body to hang the toy as a mobile or attach a ring for stroller play; reinforced stitching will help it hold up to use.

I also recommend experimenting with different arm lengths—shorter arms make the toy rounder while longer arms increase tactile play and reach.

To make the toy more durable for toddlers, weave in all ends tightly and consider adding a safety lining or fabric disk inside the body before closing.

I like to embroider initials or a small motif on the back to personalize the toy as a special gift.

If you enjoy sewing, you can applique little shapes on the arms or add buttons (safely sewn and supervised) for extra texture.

Finally, try switching the placement of colors around the body for interesting symmetry or random placement for a more whimsical effect—each change makes the SpaceBall feel like a new character.

Common Mistakes & How to Fix Them

✗ Skipping stitch markers when joining rounds can make it hard to find the start and cause misaligned rows; place a marker at the first stitch of each round and move it up as you work. ✗ Overstuffing the arms and body can cause the filler to bulge out of the openings when the arms are pulled; stuff gradually and keep some space near the arm openings so stuffing can be pushed back with a stick. ✗ Forgetting to secure arm pieces firmly will cause them to loosen or shift; sew each arm in place as instructed and work 1 SC into each CH where specified to secure the joins. ✗ Not counting stitches at increases and decreases will distort the sphere shape; count stitches after every increase/decrease round to ensure you have the correct stitch total. ✗ Using a hook that is too large for the yarn will create loose fabric and visible stuffing; use the recommended 2 mm hook and maintain tight tension for firmer amigurumi fabric. ✗ Attaching eyes without checking round placement can make the face uneven; place eyes between rounds 25 and 29 and space them 4 SC apart before permanently securing them.

SpaceBall Amigurumi Pattern

Create a playful, colorful SpaceBall amigurumi perfect for babies and toddlers. This pattern guides you through crocheting a round body with eight stretchy arms that can be pulled and moved—great for sensory play and fine motor development. You will work modular pieces (arms, body, eyes) and finish with embroidered details for a cheerful face. Recommended for makers with basic crochet skills ready for a fun, slightly detailed project.

Intermediate 5-7 Hours

Materials Needed for SpaceBall Amigurumi Pattern

— Main Fabric

  • 01
    YarnArt Jeans 50 g / 160 m, 55% cotton, 45% acrylic: Grey - shade 80 (body) - 50g ball(s)
  • 02
    YarnArt Jeans 50 g / 160 m: Black - shade 53 (eyes) - small amount (approx 5g)
  • 03
    YarnArt Jeans 50 g / 160 m: White - shade 03 (eye highlights and securing) - small amount (approx 5g)
  • 04
    YarnArt Jeans 50 g / 160 m: Red - shade 26 (arm color) - 50g
  • 05
    YarnArt Jeans 50 g / 160 m: Green - shade 69 (arm color) - 50g
  • 06
    YarnArt Jeans 50 g / 160 m: Yellow - shade 35 (arm color) - 50g
  • 07
    YarnArt Jeans 50 g / 160 m: Blue - shade 33 (arm color) - 50g
  • 08
    Fiber filler / polyester stuffing - amount to fill body and arms (approx 50-100g depending on tightness)

— Tools Required

  • 01
    Crochet hook size 2.0 mm
  • 02
    Scissors
  • 03
    Large eye needle for sewing and embroidery
  • 04
    Wooden stick or chopstick for pushing stuffing back
  • 05
    Stitch markers (optional)
  • 06
    Pins for assembly (optional)

Progress Tracker

0% Complete

— Arms (make 4) :

Info :

Begin crocheting in any color you like. You should make pieces in 4 different colors. I used red, green, yellow, and blue. I began with red.

Round 1 :

6 MR (6)

Round 2 :

INC *6 (12)

Round 3 :

(1 SC, INC)*6 (18)

Round 4 :

(2 SC, INC)*6 (24)

Round 5 - 8 :

4 rnds straight: 24 SC

Round 9 :

(DEC, 2 SC)*6 (18)

Info :

Stuff tightly.

Round 10 :

(DEC, 1 SC)*6 (12)

Round 11 :

(DEC, 2 SC)*3 (9)

Info :

Further on leave the pipe part of 9 SC hollow. Go on crocheting 60 rows.

Round 12 - 71 :

60 rnds straight: 9 SC

Round 72 :

(INC, 2 SC)*3 (12)

Round 73 :

(1 SC, INC)*6 (18)

Round 74 :

(2 SC, INC)*6 (24)

Round 75 - 78 :

4 rnds straight: 24 SC

Round 79 :

(DEC, 2 SC)*6 (18)

Info :

Stuff tightly.

Round 80 :

(DEC, 1 SC)*6 (12)

Round 81 :

DEC*6. Fasten off.

— Body :

Info :

Begin crocheting with grey yarn. Be very attentive, as you are going to attach arms pieces as you crochet the body.

Round 1 :

6 MR (6)

Round 2 :

INC *6 (12)

Round 3 :

(1 SC, INC)*6 (18)

Round 4 :

(2 SC, INC)*6 (24)

Round 5 :

(3 SC, INC)*6 (30)

Round 6 :

(4 SC, INC)*6 (36)

Round 7 :

(5 SC, INC)*6 (42)

Info :

Take red and yellow arm pieces at this stage.

Round 8 :

Chain 3, skip 3 SC, put the yellow arm and continue crocheting the round. 3 SC, INC, (6 SC, INS)*2, 3 CH, put the red arm, 3 SC, INC, (6 SC, INC)*2. The arms should be placed opposite each other symmetrically. (48)

Round 9 :

(7 SC, INC)*6 (54) (work 1 SC into each CH)

Round 10 :

(8 SC, INC)*6 (60)

Round 11 :

(9 SC, INC)*6 (66)

Round 12 :

(10 SC, INC)*6 (72)

Round 13 :

(11 SC, INC)*6 (78)

Round 14 :

(12 SC, INC)*6 (84)

Round 15 - 18 :

4 rnds straight : 84 SC

Round 19 :

In this round you want to attach green and blue arms. 6 SC, 3 CH, skip 3 SC, put the green arm, 39 SC, 3 CH, skip 3 SC, put the blue arm, 33 SC.

Round 20 - 24 :

5 rnds straight: 84 SC

Round 25 :

In this round place the remaining loose ends of blue and green arms. 3 SC, 3 CH, skip 3 SC, put the blue arm, 39 SC, 3 CH, skip 3 SC, green arm, 36 SC (84). Yellow and red pieces should go between the green and blue pieces inside the toy.

Round 26 - 29 :

4 rnds straight: 84 SC

Info :

Further on work decreases.

Round 30 :

(DEC, 12 SC)*6 (78)

Round 31 :

(DEC, 11 SC)*6 (72). Stuff the piece.

Round 32 :

(DEC, 10 SC)*6 (66)

Round 33 :

(DEC, 9 SC)*6 (60)

Round 34 :

(DEC, 8 SC)*6 (54)

Round 35 :

(DEC, 7 SC)*6 (48)

Round 36 :

In this round attach the r loose ends of red and yellow arm pieces. DEC, 1 SC, 3 CH, skip 3 SC, put the red arm, 2 SC, DEC, (6 SC, DEC)*2, 1 SC, 3 CH, skip 3 SC, put the yellow arm, 2 SC, (DEC, 6 SC)*2 (42)

Round 37 :

(DEC, 5 SC)*6 (36). Work 1 SC into each CH.

Round 38 :

(DEC, 4 SC)*6 (30). Stuff tightly. Shape a nice sphere.

Round 39 :

(DEC, 3 SC)*6 (24)

Round 40 :

(DEC, 2 SC)*6 (18)

Round 41 :

(DEC, 1 SC)*6 (12)

Round 42 :

DEC*6. Fasten off.

— Eyes (make 2) :

Info :

Begin crocheting in black yarn.

Round 1 :

6 MR (6)

Round 2 :

INC *6 (12)

Round 3 :

(1 SC, INC)*6 (18), SL ST, fasten off.

Info :

Place the eyes between rounds 25 to 29, 4 SC apart. I don’t sew them with black thread, but only secure them on place with white thread. Embroider 3 white stitches on top of the eyes and stitch semicircles at the bottom of each eye.

Info :

Now you need to single crochet round the eyes. Insert your hook into the body and work 15 SC around the eyes. Do 2 rounds.

— Embroidery :

Info :

Embroider a mouth in black under the left eye between rounds 30 and 32, make 2 stitches.

Info :

Embroider small spots over the top of the head above the right eye and over the back using red, yellow, green, and blue yarn with cross-stitch. You can add these spots wherever and however you like, the key thing is to make the toy bright and attractive.

— Please note :

Info :

Quite tricky is the issue of the filler, which might come out when the arms are pulled. I always test the arms, and push the filler back in with a chopstick, and I simply cut the excess stuffing with scissors.

Info :

For the best effect, you could single crochet round each opening, from where the arms come out (that is, 8 openings). Insert your hook into the corner of the hole on the body and work 3 SC, 2 SC to the corner, 3 SC, 2 SC - round 1 is done. Round 2 - 10 SC, SL ST.

Assembly Instructions

  • Attach the arms to the body as specified during body rounds: insert and secure red and yellow arms at round 8 positions and green and blue arms at round 19 positions, making sure arms sit opposite one another symmetrically.
  • Stuff arms and body firmly but not overpacked; when attaching arms inside the body tuck the loose ends into the inside and finish sewing as rounds instruct, then continue stuffing the body before closing.
  • Place eyes between rounds 25 and 29 spaced 4 SC apart; secure them with white thread and embroider three small white highlights at the top of each eye and semicircles at the bottom.
  • Embroider the mouth under the left eye between rounds 30 and 32 using two black stitches, and add cross-stitched colorful spots on top and back of the head using red, yellow, green and blue yarn.
  • After adding the arms and stuffing, close the body by working the decreasing rounds (30-42) and fasten off; weave in all loose ends inside the toy for safety.
  • If stuffing comes out when the arms are pulled, push filler back with a wooden stick and trim any excess stuffing protruding from openings, then single crochet around the opening as suggested to neaten it.

Important Notes

  • 💡Use stitch markers to keep track of your rounds and the start of each round, especially when attaching arms and working increases/decreases.
  • 💡Stuff firmly but not too tightly - overstuffing can distort the rounded shape and cause stuffing to push out of arm openings.
  • 💡Test each arm after attaching and push any loose stuffing back in with a wooden stick; trim excess stuffing if needed and secure openings with extra single crochet rounds.
  • 💡Pin the positions of arms and eyes before sewing to ensure symmetry and correct spacing.
  • 💡Weave in ends securely and hide loose ends inside the toy for child-safe finishing.

This bright SpaceBall amigurumi is made to delight little hands and spark imaginative play with its stretchable arms and cheerful face. The pattern combines precise shaping with playful colorwork so you can create a durable toy with personality. Enjoy customizing colors and embroidery for a unique handmade gift! 🧶✨
You ask,

we answer.

FAQs

What size will the finished piece be?

The finished toy measures approximately 25-30 cm across including the arms when using YarnArt Jeans and a 2.0 mm hook; arm length from the pattern materials is about 30 cm.

Can I use different yarn weights for this pattern?

Yes, you can substitute yarn, but changing yarn weight and hook size will affect final size and arm flexibility; use a smaller hook than usual to keep fabric tight for amigurumi.

Do I need prior crochet experience for this pattern?

This pattern is rated intermediate: you should be comfortable with amigurumi basics such as magic rings, increases, decreases, joining, and sewing pieces together.

How long does this project typically take to complete?

Most crocheters complete this project in 5-7 hours depending on experience and how much time is spent on embroidery and assembly.

How should I secure the stuffing so it does not come out when arms are pulled?

Test the arms, push filler back with a wooden stick if needed, trim excess stuffing, and single crochet around the opening (3 SC, 2 SC to corner, etc.) to reinforce the hole.