🧢 Beautiful ✨ Detailed πŸ’ Adorable

Plush Backpack Frog Amigurumi Pattern

Plush Backpack Frog Amigurumi Pattern
4.5β˜… Rating
8-10 Hours Time Needed
3.6K Made This
βœ‚οΈ

Intermediate Level

Ideal for those with basic crochet experience, featuring slightly more advanced stitches and techniques to expand your skills.

⏱️

All-Day Adventure

Requires 8-10 hours, ideal for a full day of immersive crocheting.

πŸ₯

Charming Critter

Delightful animal designs with sweet details that capture the essence of your favorite woodland and farmyard friends.

About This Plush Backpack Frog Amigurumi Pattern

This pattern teaches you how to crochet a plush frog backpack with a removable flap, straps, handle and decorative frog head. It uses super bulky velvet yarn (HIMALAYA DOLPHIN BABY) for an ultra-soft finish and includes clear photos to guide assembly. The design combines amigurumi shaping for the frog parts with simple flat and round crochet for the backpack body.

Plush Backpack Frog Amigurumi Pattern crochet pattern - detailed view of completed project

Perfect as a special handmade gift for a child or for your little adventurer, the backpack measures about 21 cm wide and 24 cm high. Intermediate crochet skills are recommended to follow increases, decreases and joining pieces.

Why You'll Love This Plush Backpack Frog Amigurumi Pattern

I absolutely love this pattern because it combines playful amigurumi character work with practical functionality as a backpack. I enjoy the tactile feel of the velvet yarn and how it makes the frog soft and huggable. The design lets you practice shaping techniques while creating a useful finished item that children will adore. Sewing the frog head to the flap and adding the little details like embroidered cheeks brings the whole character to life and is very rewarding.

Plush Backpack Frog Amigurumi Pattern step 1 - construction progress Plush Backpack Frog Amigurumi Pattern step 2 - assembly progress Plush Backpack Frog Amigurumi Pattern step 3 - details and accessories Plush Backpack Frog Amigurumi Pattern step 4 - final assembly and finishing

Switch Things Up

I love experimenting with this pattern by changing yarn colors to create different frog personalities; try mint green, lime, or even pastel versions for variety.

If you want a smaller or larger backpack, I change yarn weight and hook size β€” bulky yarn with a larger hook gives a chunkier version, while DK yarn makes a mini keychain-sized frog.

I sometimes replace safety eyes with embroidered eyes for safety-conscious gifts, which also gives a softer, toddler-friendly finish.

Try adding tiny crocheted accessories like a bow, hat, or little scarf to personalize the frog and make it gift-ready.

For a more structured backpack, I add a thin interfacing or lining inside the backpack before sewing pieces together to keep shape over time.

I also experiment with different button types for the flap closure β€” a wooden button looks rustic, while a colorful plastic button adds a playful touch.

To make the straps adjustable, I create longer straps and add small buckles or ties so the backpack can grow with the child.

When I want posable limbs, I carefully insert thin craft wire into the legs before stuffing to allow gentle posing for display.

Try embroidering freckles, spots or a tiny smile to give your frog a distinct expression and character that suits the recipient.

Don’t be afraid to mix yarn textures β€” using a slightly fuzzier yarn for the tummy or cheeks creates contrast and makes the face pop.

Common Mistakes & How to Fix Them

βœ— Skipping the stitch marker at the beginning of rounds can cause you to lose track of the round start; place a marker or contrasting thread at the first stitch of each round to stay oriented. βœ— Overstuffing the head or limbs will distort the shape and make sewing difficult; stuff gradually, using small amounts and checking the shape as you go to achieve smooth, even contours. βœ— Not changing color neatly at the eye pieces may leave loose tails inside the eye; secure the cream-to-green color change by cutting and weaving in ends or tying a small knot and hiding tails within the eye before stuffing. βœ— Failing to count stitches after increases or decreases can quickly cause mismatched rounds; count your stitches at the end of each numbered round, especially after shaping rounds, to ensure correct stitch counts. βœ— Sewing parts without pinning can result in uneven placement of eyes, legs or head; always pin pieces in place and check alignment before permanently sewing to the backpack.

Plush Backpack Frog Amigurumi Pattern

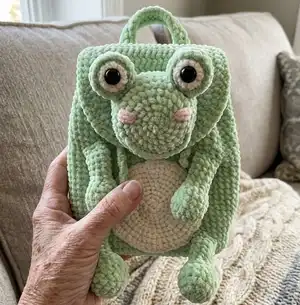
Make a charming plush backpack frog using super bulky velvet yarn and simple amigurumi techniques. This pattern guides you step-by-step through crocheting the backpack body, flap, straps, frog head and limbs, and finishing details. You will enjoy creating a soft, huggable backpack perfect as a gift or a playful accessory for a child. Clear photos and instructions are included to help you assemble everything neatly.

Intermediate 8-10 Hours

Materials Needed for Plush Backpack Frog Amigurumi Pattern

β€” Main Fabric

  • 01
    Super Bulky/Super Chunky/14ply velvet yarn HIMALAYA DOLPHIN BABY - 2 skeins green (main color)
  • 02
    Super Bulky velvet yarn HIMALAYA DOLPHIN BABY - 1/5 skein cream color for tummy and eyes
  • 03
    Small amount of pink yarn for embroidered cheeks

β€” Tools Required

  • 01
    Sewing needle
  • 02
    Crochet hook size 3.75 mm (Clover)
  • 03
    Wooden button 2 mm (as specified in pattern)
  • 04
    Safety eyes 14 mm (2 pieces)
  • 05
    Stuffing toy material (polyester fiberfill)
  • 06
    Stitch marker or small length of contrasting thread
  • 07
    Scissors
  • 08
    Yarn needle for sewing and weaving in ends
  • 09
    Cotton thread (optional) for sewing on pieces if plush yarn crumbles

Progress Tracker

0% Complete

β€” Tip :

Info :

If plush yarn is crumble, use cotton thread matching color to sew on pieces.

β€” Flap :

Info :

Crochet with green yarn. Work in rows.

Round 1 :

ch2, crochet 5 sc into the 2nd ch from the hook. Do not pull the ring. Turn. (5)

Round 2 :

t-ch, 1 sc, inc * 4, turn (9)

Round 3 :

t-ch, (sc, inc) * 4, 1 sc, turn (13)

Round 4 :

t-ch, (2 sc, inc) * 4, 1 sc, turn (17)

Round 5 :

t-ch, (3 sc, inc) * 4, 1 sc, turn (21)

Round 6 :

t-ch, (4 sc, inc) * 4, 1 sc, turn (25)

Round 7 :

t-ch, (5 sc, inc) * 4, 1 sc, turn (29)

Round 8 :

t-ch, (7 sc, inc) * 3, 5 sc, turn (32)

Round 9 :

t-ch, (8 sc, inc) * 3, 5 sc (35)

Round 10 :

t-ch, (9 sc, inc) * 3, 5 sc (38)

Info :

Do not turn. Work along the top of the flap.

Round 11 :

t-ch, 21 sc, turn (21)

Round 12-18 :

t-ch, 21 sc, turn (6 rows)

Round 19 :

t-ch, 21 sc (21). Do not turn.

Info :

Then work in rounds.

Round 20 :

t-ch, 26 sc, 3 ch, skip 3 stitches, 25 sc, turn (54)

Round 21 :

t-ch, 53 reverse sc (53), sl st

β€” Backpack :

Info :

Crochet with green yarn. Ch20. Start on the second chain from the hook.

Round 1 :

18 sc, 3 sc in the last chain, on the other side of the chain: 17 sc, inc, inc into t-ch (42)

Info :

Place a marker.

Round 2 :

inc, 15 sc, (inc, 1 sc) * 2, inc, 17 sc, (inc, 1 sc) * 2 (48)

Round 3 :

inc, 1 sc, inc, 15 sc, (inc, 1 sc) * 4, inc, 15 sc, (inc, 1 sc) * 3 (58)

Round 4 :

inc, 1 sc, inc, 16 sc, (inc, 3 sc) * 3, inc, 18 sc, (inc, 3 sc) * 2 (66)

Round 5 :

inc, 3 sc, inc, 18 sc, (inc, 4 sc) * 3, inc, 17 sc (inc, 4 sc) * 2 (74)

Round 6 :

74 sc (74)

Round 7 :

BLO 74 sc (74)

Round 8-16 :

74 sc (9 rounds)

Round 17 :

32 sc, dec, 35 sc, dec, 3 sc (72)

Round 18-36 :

72 sc (19 rounds)

Info :

Join the flap in the next round

Round 37 :

1 sc, 23 sc with the flap, 48 sc (72), sl st.

β€” Straps (two pieces) :

Info :

Crochet with green yarn. Work in rows.

Round 1 :

ch71, start from the second chain on the hook: 70 sc, turn (70)

Round 2-4 :

t-ch, 70 sc (3 rows)

Info :

You can make the straps longer or shorter. Make more or less chains. My straps are 50 cm long. Cut the yarn. Leave the end for sewing pieces.

Info :

Sew the straps at the bottom of the backpack between rounds 7 and 11, at the top of the backpack between rounds 32 and 36. Distance between straps 12 sc.

β€” Handle :

Info :

Crochet with green yarn. Work in rows.

Round 1 :

ch21, start from the second chain on the hook: 20 sc, turn (20)

Round 2-3 :

t-ch, 20 sc (20 rows)

Info :

Cut the yarn. Leave the end for sewing pieces. Sew on the handle.

β€” Cord :

Info :

Crochet with green yarn. Ch150. Step back at the top of the backpack 2 rounds and stretch the cord between the stitches, after folding the backpack, as shown in the photo. Make knots at the ends. Sew a button between rounds 23 and 27.

β€” Frog :

Info :

All frog pieces are crocheted with green yarn unless otherwise noted. Follow individual piece instructions below.

β€” Head :

Round 1 :

ch2, crochet 6 sc into the 2nd ch from the hook (6)

Round 2 :

inc * 6 (12)

Round 3 :

(1 sc, inc) * 6 (18)

Round 4 :

1 sc, inc, (2 sc, inc) * 5, 1 sc (24)

Round 5 :

(3 sc, inc) * 6 (30)

Round 6 :

2sc, inc, (4 sc, inc) * 5, 2 sc (36)

Round 7-10 :

36 sc (4 rounds)

Round 8 :

2 sc, dec, (4 sc, dec) * 5, 2 sc (30)

Round 9 :

(3 sc, dec) * 6 (24)

Info :

Stuff the head. Leave the end for sewing pieces.

β€” Eyes (two pieces) :

Info :

Crochet with cream yarn.

Round 1 :

6 sc in MR (6)

Round 2 :

inc *6 (12)

Info :

Change color to green. Cut the cream yarn.

Round 3 :

(3 sc, inc) * 3 (15)

Info :

Insert the safety eye into the middle of the amigurumi ring.

Round 4 :

BLO 15 sc (15)

Round 5 :

15 sc (15)

Round 6 :

(3 sc, dec) * 3 (12)

Info :

Stuff the eye.

Round 7 :

dec * 6 (6)

Info :

Cut the yarn. Tighten the hole, weave in the yarn ends.

Info :

Attach the green yarn to the front loops of round 4 and work 15 sl st. Cut the yarn. Leave the yarn tail for sewing.

β€” Tummy :

Info :

Crochet with cream yarn.

Round 1 :

6 sc in MR (6)

Round 2 :

inc *6 (12)

Round 3 :

(sc, inc) * 6 (18)

Round 4 :

1 sc, inc, (2 sc, inc) * 5, 1 sc (24)

Round 5 :

(3 sc, inc) * 6 (30)

Round 6 :

2 sc, inc, (4 sc, inc) * 5, 2 sc, sl st (36)

Round 7 :

(5 sc, inc) * 6 (42)

Round 8 :

3 sc, inc, (6 sc, inc) * 5, 3 sc (48)

Round 9 :

(7 sc, inc) * 6 (54), sl st.

Info :

Cut the yarn. Leave the yarn tail for sewing.

β€” Forelegs (make 2) :

Info :

Crochet with green yarn.

Round 1 :

ch2, crochet 6 sc into the 2nd ch from the hook (6)

Round 2 :

inc * 6 (12)

Round 3 :

(3 sc, inc) * 3 (15)

Round 4-5 :

15 sc (2 rounds)

Round 6 :

(3 sc, dec) * 3 (12)

Round 7 :

(2 sc, dec) * 3 (9)

Info :

Stuff the lower foreleg.

Round 8-12 :

9 sc (5 rounds)

Info :

Fold it in half and crochet 4 sc through both sides. Cut the yarn. Leave the yarn tail to sew pieces.

β€” Hind legs (make 2) :

Info :

Crochet with green yarn.

Round 1 :

ch2, crochet 6 sc into the 2nd ch from the hook (6)

Round 2 :

inc * 6 (12)

Round 3 :

(2 sc, inc) * 4 (16)

Round 4-5 :

16 sc (2 rounds)

Round 6 :

(2 sc, dec) * 4 (12)

Round 7 :

(2 sc, dec) * 3 (9)

Info :

Stuff the lower leg.

Round 8-13 :

9 sc (6 rounds)

Info :

Fold it in half and crochet 4 sc through both sides. Cut the yarn. Leave the yarn tail to sew pieces.

β€” Assembly :

Round 1 :

Sew the eyes between rounds 6 and 10 of the head at a distance of 5 sc.

Round 2 :

Mouth: attach the green yarn to the stitch between rounds 6 and 7, work between the rounds 11 sc, sl st. Cut the yarn. Weave in the yarn ends.

Round 3 :

Using a pink chenille thread, embroider the cheeks between rounds 3 and 7.

Round 4 :

Sew the head to the flap of the backpack.

Round 5 :

Sew on the tummy to the backpack.

Round 6 :

Sew the forelegs between rounds 25 and 28.

Round 7 :

Sew on the hind legs between rounds 8 and 12.

Assembly Instructions

  • Sew the eyes between rounds 6 and 10 of the head at a distance of 5 sc to create symmetrical placement.
  • Attach the mouth by anchoring green yarn to the stitch between rounds 6 and 7 and working 11 sc (sl st) between the rounds, then weave in ends.
  • Using a pink chenille thread, embroider the cheeks between rounds 3 and 7 to add soft blush details.
  • Sew the head to the flap of the backpack, aligning the head center with the flap center for correct positioning.
  • Sew on the tummy to the front of the backpack, centering it visually and securing with slipstitch or whipstitch.
  • Sew the forelegs between rounds 25 and 28 on the backpack body, spacing them evenly for a natural pose.
  • Sew the hind legs between rounds 8 and 12 so the frog sits correctly on the backpack when assembled.

Important Notes

  • πŸ’‘Work in continuous rounds, in rows and in a spiral as instructed to keep shaping consistent.
  • πŸ’‘The size of the backpack is approximately 21 cm wide and 24 cm high when using the recommended yarn and hook.
  • πŸ’‘At the beginning of the round, use a marker or thread of a different color so that you can see where the beginning of the round is.
  • πŸ’‘If plush yarn sheds or crumbles, use matching cotton thread to sew on small pieces to avoid visible damage.

Thank you for making this sweet Plush Backpack Frog β€” your handmade frog will be a treasured companion for playtime and adventures. 🐸🧢 This pattern blends soft velvet yarn with playful amigurumi shaping to create a cozy, lovable backpack your child will adore. ✨ Happy crocheting and enjoy every stitch as your frog comes to life! 🧡

You ask,

we answer.

FAQs

What size will the finished piece be?

The finished backpack measures approximately 21 cm wide and 24 cm high when using HIMALAYA DOLPHIN BABY super bulky yarn and a 3.75 mm hook.

Can I use different yarn weights for this pattern?

Yes, you can use different yarn weights, but this will affect the final size and softness. Choose an appropriate hook for the yarn you select and expect changes in finished dimensions.

Do I need prior crochet experience for this pattern?

This pattern is rated intermediate; basic crochet skills such as magic ring, increases, decreases and working in rounds are recommended for best results.

How long does this project typically take to complete?

Most crocheters complete this project in about 8-10 hours, though time may vary depending on experience and how many parts you sew together at once.

What hook size and materials are recommended?

The pattern recommends a 3.75 mm Clover hook and super bulky HIMALAYA DOLPHIN BABY velvet yarn, plus safety eyes 14 mm, stuffing, a wooden button and basic sewing tools.