🧢 Beautiful ✨ Detailed πŸ’ Adorable

Pillow-Fox Amigurumi Pattern

Pillow-Fox Amigurumi Pattern
4.1β˜… Rating
5-7 Hours Time Needed
4.1K Made This
βœ‚οΈ

Intermediate Level

Ideal for those with basic crochet experience, featuring slightly more advanced stitches and techniques to expand your skills.

⏱️

Weekend Treat

Takes 5-7 hours, making it an enjoyable project to finish over a couple of days.

🧸

Cute Companion

An adorable friend to cherish, handcrafted with love to bring comfort and joy for years to come.

About This Pillow-Fox Amigurumi Pattern

This pattern creates a soft plush Pillow-Fox using plush yarn for a super cuddly finish. You will crochet a rectangular pillow body with color changes, then make nose, ears, legs, arms and a tail to sew on. The instructions include round-by-round stitch counts and assembly guidance to finish beautifully.

Pillow-Fox Amigurumi Pattern crochet pattern - detailed view of completed project

Perfect as a handmade gift or for nursery decor, this design uses YarnArt Dolce or similar plush yarn. Detailed photos and step instructions help you through shaping and assembly for a neat result.

Why You'll Love This Pillow-Fox Amigurumi Pattern

I absolutely love this pattern because it transforms simple stitches into a charming, huggable fox with personality. I enjoy how the plush yarn gives it a soft, cozy feel that children and adults both adore. I also love that the pattern breaks tasks into small, manageable rounds so you can see steady progress. I feel proud when I sew the details (ears, nose, tail) and the final pillow looks so joyful and finished.

Pillow-Fox Amigurumi Pattern step 1 - construction progress Pillow-Fox Amigurumi Pattern step 2 - assembly progress Pillow-Fox Amigurumi Pattern step 3 - details and accessories Pillow-Fox Amigurumi Pattern step 4 - final assembly and finishing

Switch Things Up

I love how easy it is to customize this Pillow-Fox by changing colors; try pastel shades for a nursery or cool greys for a modern look.

I sometimes use a thinner yarn with a smaller hook to make a mini keychain version that fits in the palm of your hand.

I often replace the plush YarnArt Dolce with Himalaya Dolphin Baby for a slightly different texture and equally soft result.

I like adding tiny embroidered freckles or a blush using a small dab of yarn or fabric paint to change the fox's expression.

I sometimes swap the button eyes for safety eyes or embroider eyes for a fully child-safe toy option.

I recommend experimenting with different stuffing to adjust firmness; less stuffing gives a slouchy pillow, more makes it firmer.

I add tiny crocheted accessories like a scarf or bow to make seasonal or gift-ready versions of the fox.

I occasionally make matching setsβ€”small plush fox and a larger pillowβ€”to create a charming duo for gifts.

I find that changing the tail color placement (more white or more orange) can dramatically change the finished look.

I encourage you to try different ear shapes and sizes by adjusting row counts to create a pointier or rounder fox personality.

Common Mistakes & How to Fix Them

βœ— Starting the foundation chain too loosely can create a floppy pillow edge; maintain even tension and slightly firmer chains for a stable edge. βœ— Forgetting to fix the beginning of each round leads to gaps or misaligned seams; secure each new round with a pin or a small thread marker. βœ— Overstuffing the pillow distorts the corners and sewing lines; stuff tightly but in small increments, shaping corners as you go for clean angles. βœ— Skipping stitch counts during color changes will misalign rows; count your stitches after each round and mark the start of the round with a marker.

Pillow-Fox Amigurumi Pattern

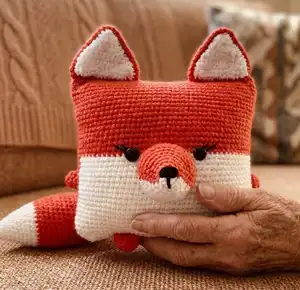
Make a soft, cuddly Pillow-Fox using plush yarn and simple amigurumi techniques. This pattern guides you step-by-step through crocheting the pillow body, nose, ears, legs, arms and tail with clear rounds and photos. You will end with an adorable fox pillow perfect for gifting or decorating your home. Follow the full instructions and enjoy a fun, satisfying crochet project.

Intermediate 5-7 Hours

Materials Needed for Pillow-Fox Amigurumi Pattern

β€” Main Fabric

  • 01
    YarnArt Dolce (120 m / 100 g) plush yarn - Orange: 2 skeins (approx.)
  • 02
    YarnArt Dolce (120 m / 100 g) plush yarn - White: 1 skein (approx.)
  • 03
    Black acrylic or cotton yarn for embroidered nose/eyelashes (small amount)
  • 04
    Alternative plush yarn options: Himalaya Dolphin Baby or similar plush yarns
  • 05
    Hollofayber polyester filler (polyester stuffing) - enough to fill a 28x33 cm pillow

β€” Tools Required

  • 01
    Crochet hook size 3.5 mm (recommended) (Hook No 3.5-4 mm can be used)
  • 02
    Black beads or buttons for eyes (18-22 mm) or safety eyes (optional)
  • 03
    Scissors
  • 04
    Yarn needle for sewing pieces together
  • 05
    Stitch markers or pins
  • 06
    Polyester stuffing (hollofayber)
  • 07
    Pins for fixing the beginning of rounds (optional)

Progress Tracker

0% Complete

β€” Materials & Symbols :

Infos :

Materials: I used YarnArt Dolce yarn (120 m / 100 g). Colors: orange (2 clew), white (1 clew), black acrylic or cotton yarn for eyes. You can crochet any other plush yarn - Himalaya Dolphin Baby or YarnArt Dolce. Filler (I used hollofayber). Hook β„– 3.5-4 mm (I used Nr3.5). Black beads or buttons for eyes (18-22 mm). Needle. Do not forget to fix the beginning of each new circle with a pin or thread.

β€” Pillow :

Round 1 :

93 ch, connect with the first loop

Round 2 :

White yarn: 45 sc; Orange yarn: 48 sc {93}

Round 3 - 19 :

White yarn: 45 sc; Orange yarn: 48 sc {93}

Round 20 - 38 :

Orange yarn: 93 sc

Info :

Leave a long thread and sew the top of the pillow. We fasten the thread and hide inside the pillow.

Info :

Fill tightly and evenly. Fill the angle of the pillow well. Sew and fasten the thread and hide inside the pillow.

β€” Nose :

Info :

Use white plush yarn. Leave a long thread for sewing (white and orange). Fill the nose. Use black acrylic or cotton yarn and make nose details as shown.

Round 1 :

6 sc in magic Ring {6}

Round 2 :

orange yarn: inc, inc, inc; white yarn: inc, inc, inc {12}

Round 3 :

orange yarn: 7 sc; white yarn: 5 sc {12}

Round 4 :

orange yarn: 3 sc, inc, 1 sc, inc, 1 sc; white yarn: 5 sc {14}

Round 5 :

orange yarn: 2 sc, inc, 2 sc, inc, 3 sc; white yarn: inc, 2 sc, inc, 1 sc {18}

Round 6 :

orange yarn: 2 sc, inc, 3 sc, inc, 3 sc, inc; white yarn: 3 sc, inc, 3 sc {22}

Round 7 :

orange yarn: 3 sc, inc, 4 sc, inc, 5 sc; white yarn: inc, 4 sc, inc, 2 sc {26}

Round 8 :

orange yarn: 3 sc, inc, 2 sc, inc, 2 sc, inc, inc, 2 sc, inc, 2 sc; white yarn: inc, 2 sc, inc, 2 sc, inc, 3 sc {34}

Round 9 :

orange yarn: inc, 20 sc; white yarn: 13 sc {35}

Round 10 :

orange yarn: 22 sc; white yarn: 13 sc {35}

Round 11 :

orange yarn: 22 sc; white yarn: 13 sc {35}

Info :

Leave a long thread for sewing (white and orange). Fill the nose. Use black acrylic or cotton yarn and make nose details.

β€” Leg (2 details) :

Info :

Use yellow plush yarn (colour indicated in pattern photos). Make 2 identical leg details and leave long thread for sewing.

Round 1 :

6 sc in magic Ring {6}

Round 2 :

(inc) – repeat 6 times {12}

Round 3 :

(1 sc, inc) – repeat 6 times {18}

Round 4 :

18 sc

Info :

Leave a long thread for sewing

β€” Arm (2 details) :

Info :

Use yellow plush yarn (make 2 arms). Leave a long thread for sewing.

Round 1 :

6 sc in magic Ring {6}

Round 2 :

(inc) – repeat 6 times {12}

Round 3 :

12 sc

Info :

Leave a long thread for sewing

β€” Tail :

Info :

Use white yarn for beginning rounds, then change to orange yarn as specified. Leave a long thread for sewing when finished. Fill and shape tail.

Round 1 :

6 sc in Magic ring

Round 2 :

(2 sc, inc) – repeat 2 times {8}

Round 3 :

(3 sc, inc) – repeat 2 times {10}

Round 4 :

(2 sc, inc) – repeat 3 times, 1 sc {13}

Round 5 :

(3 sc, inc) – repeat 3 times, 1 sc {16}

Round 6 :

(4 sc, inc) – repeat 3 times, 1 sc {19}

Round 7 :

(5 sc, inc) – repeat 3 times, 1 sc {22}

Round 8 :

(4 sc, inc) – repeat 4 times, 2 sc {26}

Round 9 :

(4 sc, inc) – repeat 5 times, 1 sc {31}

Info :

Change to orange yarn

Round 10 - 19 :

Orange yarn: 31 sc (10 rounds)

Round 20 :

(4 sc, dec) – repeat 5 times, 1 sc {26}

Round 21 :

26 sc

Round 22 :

(3 sc, dec) – repeat 5 times, 1 sc {21}

Round 23 :

21 sc

Round 24 :

(2 sc, dec) – repeat 5 times, 1 sc {16}

Round 25 :

16 sc

Info :

Fill. Leave a long thread for sewing.

β€” Ears :

Info :

Use orange yarn and make 2 details. Then use white yarn and make 2 details. You will crochet orange around white and join together as shown, leaving a long thread to sew ears to pillow.

Row 1 :

Make 15 ch

Row 2 :

We begin to work from the second loop from the hook: 14 sc, 1 ch, turn

Row 3 - 4 :

We begin to work from the second loop from the hook: 14 sc, 1 ch, turn

Row 5 :

We begin to work from the second loop from the hook: dec, 10 sc, dec, 1 ch, turn

Row 6 :

We begin to work from the second loop from the hook: dec, 8 sc, dec, 1 ch, turn

Row 7 :

We begin to work from the second loop from the hook: dec, 6 sc, dec, 1 ch, turn

Row 8 :

We begin to work from the second loop from the hook: dec, 4 sc, dec, 1 ch, turn

Row 9 :

We begin to work from the second loop from the hook: dec, 2 sc, dec, 1 ch, turn

Row 10 :

We begin to work from the second loop from the hook: dec, dec, 1 ch, turn

Row 11 :

We begin to work from the second loop from the hook: dec

Info :

Tighten the thread and cut it off. Use orange yarn and crochet around the ear. Start from the bottom right corner. Make 12 sc, 3 sc in the 1 top loop, 12 sc. Leave a long thread to sew ears together. Similarly, make two white details. Tighten thread and cut it off. Put together white and orange details and crochet ears together sc (use orange yarn).

β€” Assembly :

Info :

Leave a long thread for sewing. Sew ears to the orange part of the pillow. Sew nose between rounds 12 and 21, using white and orange yarn. Sew eyes (distance between eyes 11 sc). Make eyelashes. Fill and sew legs. Fill and sew arms. Sew tail to bottom corner of the pillow. Fasten and hide all threads inside the pillow.

Assembly Instructions

  • Sew ears to the orange part of the pillow at the top edge; position them symmetrically and sew through both orange and white ear layers to secure.
  • Attach the nose between rounds 12 and 21 on the front of the pillow, using the long sewing tail left on the nose; secure firmly and hide the thread inside the pillow.
  • Position and sew the eyes with a distance of 11 sc between them; use black beads or buttons (18-22 mm) or sew-on safety eyes and add embroidered eyelashes with black yarn.
  • Fill the pillow firmly and evenly before closing; sew the top seam with a mattress stitch or whip stitch and hide the tail inside the pillow.
  • Sew the four legs to the bottom edge of the pillow spaced evenly for stability; use the long thread left from each leg and attach securely.
  • Sew the two arms to either side of the pillow between rounds indicated in the photos (approx mid-side), and sew the tail to a bottom corner of the pillow.

Important Notes

  • πŸ’‘Do not forget to fix the beginning of each new circle with a pin or thread to keep rounds aligned and avoid gaps.
  • πŸ’‘Use stitch markers at the start of each round and after color changes to keep track of your stitch counts and placement.
  • πŸ’‘Stuff the pillow and small parts gradually to maintain even shaping; overstuffing can distort edges and details.
  • πŸ’‘Leave long sewing tails on small parts (nose, legs, arms, ears, tail) to make assembly easier and more secure.

Thank you for choosing this Pillow-Fox pattern β€” I hope it brings you joy and a warm handmade touch to your home. This plush fox is soft, squishy, and perfect for cuddles or as a thoughtful gift. Happy crocheting and enjoy every stitch! 🧢🐾✨

You ask,

we answer.

FAQs

What size will the finished piece be?

The finished pillow measures approximately 28 x 33 centimeters when using the recommended plush yarn and a 3.5 mm hook; final size may vary with yarn and hook choice.

Can I use different yarn weights for this pattern?

Yes, you can use different yarn weights but the final size and texture will change; choose an appropriate hook for your yarn and expect differences in dimensions.

Do I need prior crochet experience for this pattern?

This pattern is rated intermediate; familiarity with single crochet, increases, decreases, working in rows and rounds, and basic assembly is recommended.

How long does this project typically take to complete?

Most crocheters complete this project in 5-7 hours, though time may vary based on experience, yarn choice, and how much time you spend on finishing and sewing details.